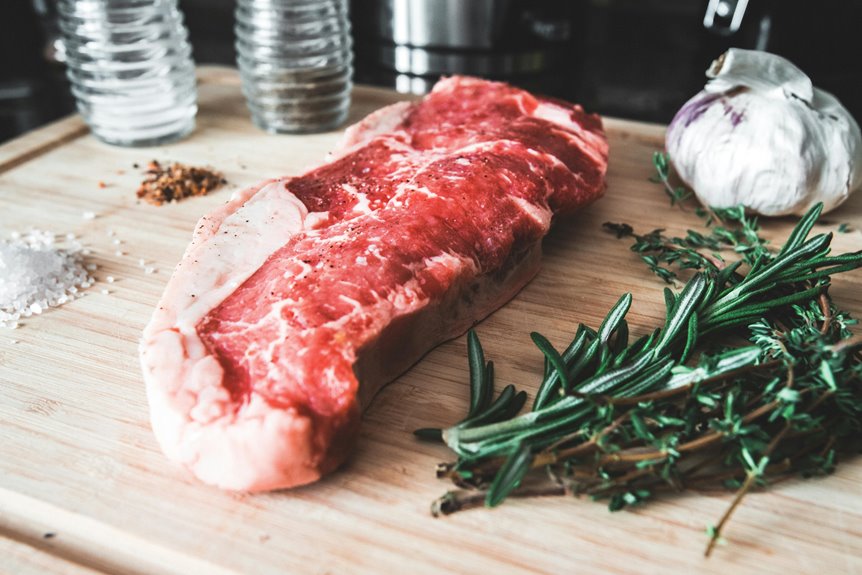
Beef striploin is a tender, flavorful steak from the short loin that costs way less than filet mignon. You’ll love its marbling—those white fat lines that melt during cooking. To cook it perfectly, dry-brine with coarse salt about an hour ahead, pat it completely dry, then sear it hard in a hot skillet for 4–5 minutes. Flip, reduce heat, and baste with butter and garlic until it hits 135°F for medium-rare. Rest it five minutes, and you’ve got restaurant-quality beef at home. Want to nail every step?
What Is Beef Striploin and Why Choose It?

The strip loin is a fantastic cut that comes from the short loin, sitting right near the tenderloin. You’ll love it because it’s boneless or bone-in, and it’s got serious marbling throughout. That marbling means flavor and tenderness you can actually taste.
Here’s why you’d want to choose it: it beats prime rib in flavor and costs less than filet mignon. Pretty solid deal, right? You’re getting restaurant-quality beef without the restaurant price tag.
The strip loin really shines with quick high-heat cooking. It doesn’t need much fussing around. A dry-brine and even sear? That’s honestly all you need. Whether you’re grilling this summer or roasting it indoors, you’ll impress your guests every single time. It’s economical and genuinely impressive.
What Makes a Great Striploin Steak

When you’re hunting for a great striploin steak, you’ll want to spot those beautiful white lines of fat running through the meat—that’s marbling, and it’s your flavor guarantee. You should also grab a cut that’s at least one to one-and-a-half inches thick, since thinner steaks tend to overcook before they get that perfect crust. Consistency matters too, so pick steaks that look uniform in thickness, which helps them cook evenly from edge to edge.
Marbling and Fat Distribution
Ever wonder why some striploin steaks taste so much better than others? The secret’s in the marbling—those beautiful fat lines running through the meat that make all the difference.
Here’s what you’re really looking for:
- Intramuscular fat lines melt during cooking, adding tenderness and incredible flavor to every bite
- Fat cap on the side keeps your steak moist; trim it to 1/4 to 1/2 inch if you prefer less fat
- Even distribution across consistent thickness ensures uniform cooking and balanced marbling throughout
Striploin’s naturally loaded with marbling, so you’ll get that juicy, flavorful experience even at medium-rare. USDA Prime cuts show the highest marbling levels, delivering pronounced flavor that’ll make you understand why your friends rave about their steaks. That’s the real magic here.
Thickness and Cut Consistency
Why does thickness matter so much? You’ll want your striploin thickness between 1 to 1½ inches for even cooking. Thinner steaks cook too fast and dry out. Thicker ones leave cold centers—nobody wants that.
Cut uniformity is your secret weapon. Look for steaks with a consistent shape, avoiding mangled or weird-looking pieces. Reference photos help you spot good cuts. Uniform thickness means predictable searing and that perfect crust you’re after.
You’ve probably noticed marbling—those thin fat streaks running through the meat. They’re not just pretty. They melt during cooking, adding tenderness and flavor you’ll actually taste.
Check the fat cap on one side. If it’s thicker than ½ inch, trim it back. This helps heat penetrate evenly. You’re building the foundation for perfectly cooked striploin.
Should You Go Grass-Fed or USDA Prime?

How’d you like your striploin: bold and lean, or tender and buttery?
You’ve got two solid contenders here. USDA Prime gives you that marbling magic—those fat lines running through the meat that make it juicy and flavorful. You’ll find it easily at most grocery stores, and it’ll deliver consistent, tender results every time.
Grass-fed beef takes a different route. Here’s what sets them apart:
- Flavor profile: Grass-fed offers a bold, sometimes gamey taste that leans leaner overall.
- Availability: USDA Prime dominates grocery shelves, while grass-fed can be trickier to track down.
- Values alignment: Grass-fed appeals to folks prioritizing ethical farming practices.
Both work beautifully for striploin. Choose USDA Prime if you want foolproof tenderness. Pick grass-fed if you’re after distinctive flavor and ethical sourcing matters to you.
Season Your Striploin and Let It Rest

You’ll want to salt your striploin at least an hour before cooking, or go big and do it overnight uncovered in the fridge—this dry brine method actually tenderizes the meat and locks in juiciness. Let your steak sit out for 60–90 minutes before you sear it so it reaches room temperature, which helps you get that gorgeous, caramelized crust. After cooking, give it a quick 5–10 minute rest so the juices redistribute and your bite stays tender instead of dry.
Salt As A Dry Brine
Ever notice how restaurant steaks taste so much better than yours at home? The secret’s salt as a dry brine. You’re not just seasoning the surface—you’re transforming the meat itself.
Here’s how you join the club:
- Apply coarse salt generously to all sides, letting it dissolve into the meat for tenderness and juiciness
- Rest your striploin for about one hour (or ideally overnight in your fridge uncovered) so the surface dries completely
- Skip rinsing the salt off—that dry surface is your ticket to serious crust formation
Don’t rinse. Seriously. That salt stays put.
Pair your coarse salt with coarse black pepper and optional dried chili flakes for depth. This dry brine approach delivers results way beyond basic seasoning. You’re not just cooking steak anymore—you’re creating restaurant-quality magic at home.
Optimal Resting Time Guidelines
Timing’s everything when you’re trying to nail that perfect steak. You’ve salted your striploin and let that dry brine work its magic for about an hour. Now comes the crucial part: resting after cooking.
Once you pull your steak off the heat, don’t cut into it immediately. Instead, tent it loosely with foil and let it rest for 5–10 minutes. This pause allows your juices to redistribute throughout the meat, making each bite incredibly tender.
Think of resting like giving your steak a cool-down period. The fibers relax, and everything settles. You’ll notice the difference immediately when you take that first bite.
Skip this step, and you’ll lose precious juices onto your plate. That’s wasted flavor you worked hard to develop during searing. Trust the process.
Surface Preparation For Searing
Before you even think about firing up that pan, surface prep’s where the magic starts. You’re about to unlock the secrets to a restaurant-quality crust that’ll make you proud.
Here’s your game plan:
- Generously coat your striploin with sea salt on all sides, then let it sit uncovered for about an hour to dry brine the meat.
- Keep the surface completely dry—don’t rinse off that salt or you’ll sabotage your crust potential.
- Go for consistent thickness throughout your steak so everything cooks evenly and sears beautifully.
Want to level up? Salt your striploin the day before and refrigerate it uncovered. This extra time creates an incredibly crispy crust that’ll have everyone asking your secrets. You’ve got this.
Final Prep: Why You Pat Your Striploin Dry

Why’s that paper towel so important right before you cook?
You’re about to unlock the secret to a restaurant-quality crust. When you pat your striploin dry, you’re removing surface moisture that’d otherwise steam the meat instead of searing it. That’s the difference between a golden, caramelized exterior and a disappointing gray surface.
Pat your striploin dry to remove surface moisture and unlock that golden, caramelized crust instead of a disappointing gray surface.
Here’s what happens: moisture on the surface prevents direct pan contact, which means no crust. By patting dry, you’re creating the ideal conditions for those 4–5 minutes on medium-high heat. The drier your exterior, the better your sear develops.
Plus, a dry surface helps salt stick around longer. That means deeper browning and more even caramelization across the whole cut. Your striploin deserves this simple step—it takes thirty seconds and changes everything.
Pan-Searing Your Striploin: Step-by-Step

Now you’re ready to hit the pan and transform your steak into something special. You’ll preheat your skillet to medium-high, sear that dry striploin for 4–5 minutes to build a golden crust, then flip and baste with butter while managing heat and temperature. From there, you’ll rest your steak and finish it perfectly, so let’s walk through each step together.
Preparing Your Striploin Steak
Getting that gorgeous, caramelized crust on your striploin takes a little prep work upfront. You’re basically setting yourself up for success before you even heat the pan.
Here’s what you’ll do:
- Salt your striploin about 1 hour ahead (or overnight uncovered in the fridge for an extra-dry surface)
- Pat it completely dry with paper towels right before cooking
- Heat your skillet to medium-high and add 1 tablespoon of oil
That dry surface? It’s your secret weapon for pan-searing. Moisture is the enemy of crust formation. Once your skillet’s hot and your steak’s ready, you’re primed to nail that perfect doneness. Trust the process here—these simple steps make a real difference in your final result.
Searing and Temperature Control
When your skillet’s screaming hot and your steak’s completely dry, you’re ready to sear. Place your beef striploin into the cast iron skillet and let it sit undisturbed for 4–5 minutes. You’re building that gorgeous brown crust we all crave. Once you flip, drop the heat to medium and grab your butter. Spoon 1–2 tablespoons of melted fat over your steak continuously. This basting trick speeds everything up while adding serious flavor.
| Temperature | Doneness | Internal Heat |
|---|---|---|
| 125°F | Rare | Cool center |
| 135°F | Medium-rare | Warm center |
| 145°F | Medium | Hot center |
| 155°F | Medium-well | Very hot |
| 165°F | Well-done | Fully cooked |
Temperature control matters most here. Use your meat thermometer religiously—it’s your secret weapon. Don’t guess. Rest your steak 5–10 minutes after cooking. This step redistributes juices throughout, ensuring every bite stays tender and juicy.
Basting, Resting, and Finishing
Once you’ve flipped that steak, here’s where the magic really happens. Reduce the heat to medium and add 1–2 tablespoons of butter to your pan. This is butter-basting—your secret weapon for incredible results.
Why basting matters:
- Speeds up cooking while promoting even doneness throughout the meat
- Enhances that buttery flavor you’re craving in every bite
- Lets you customize with garlic, rosemary, thyme, or chili peppers
Spoon that melted butter over your steak constantly. It’s genuinely satisfying to watch.
When you’re done cooking, resting is non-negotiable. Let your steak sit for 5–10 minutes. This redistributes juices and relaxes the fibers, making it way more tender.
Finally, slice against the grain. You’ll notice the difference immediately—maximizing tenderness and juiciness in every single bite.
Basting Your Striploin With Butter and Aromatics

How’d you like your steak even juicier? Butter basting is your secret weapon for striploin cooking success. After flipping your steak, reduce the heat to medium and add 1–2 tablespoons of butter to the pan. Here’s where the magic happens: continuously spoon that melted butter over your striploin throughout cooking. This technique speeds up cooking while distributing fats and flavors evenly, giving you that tender bite you’re after. Want to level up? Toss in chopped garlic and fresh rosemary or thyme. These aromatics infuse your steak with fragrant notes as the butter emulsifies. The basted surface stays moist while your striploin finishes perfectly. Don’t skip the final step—rest your steak for 5–10 minutes so those juices redistribute before serving.
Striploin Doneness: Nailing the Perfect Internal Temperature

All that butter basting means nothing if you overcook your beautiful striploin. Nailing the perfect doneness takes precision and a bit of practice. Here’s how you’ll nail your striploin’s internal temperature every time:
- Remove from heat 5–10°F early – Your steak keeps cooking while resting, so pull it off when it’s slightly underdone.
- Use an instant-read thermometer – Insert it into the thickest part away from bone for accurate readings.
- Rest for 5–10 minutes – This redistributes juices and relaxes fibers, finishing your cooking perfectly.
Target these temps: rare hits 125°F, medium-rare reaches 135°F, medium lands at 145°F, and medium-well sits at 150°F. Trust the thermometer over guessing. You’ve earned that perfectly cooked striploin.
Resting Your Striploin for Maximum Tenderness

You’ve nailed the temperature—now comes the part that actually makes your steak tender. Resting isn’t just waiting around. It’s when your striploin’s fibers relax and juices redistribute throughout the meat. This transforms your steak from good to genuinely tender.
| Rest Time | Cut Type | What Happens |
|---|---|---|
| 5 minutes | Pan-seared steaks | Juices settle, tenderness improves |
| 10 minutes | Thicker cuts | Even temperature, maximum juiciness |
| 15+ minutes | Large roasts | Fibers fully relax, optimal results |
For pan-seared stripLoins, aim for 5–10 minutes. If you dry-brined earlier, resting also helps salt absorb deeper while surface moisture dries for that perfect sear. Skip resting, and you’ll lose juices the moment you slice. Your striploin deserves those few quiet minutes. It’s the finishing move that separates mediocre steaks from restaurant-quality ones.
Pan Sauce for Striploin: A Quick Addition

Why let all that flavorful browned stuff stick to your pan? After resting your striploin, deglaze that hot skillet with wine, stock, or water. You’re basically capturing liquid gold here.
Let the mixture simmer and reduce by about half. This concentrates all those deep, savory flavors you’ve worked hard to develop. The sauce should coat the back of a spoon when it’s ready.
Here’s what transforms your pan sauce from good to restaurant-quality:
- Add minced rosemary, garlic, and a knob of butter to enrich everything
- Strain out aromatics for a silky finish or leave them in for rustic texture
- Drizzle generously over your sliced striploin right before serving
This quick pan sauce takes maybe five minutes but elevates your entire meal. Your guests will notice the difference immediately.
Pairing Striploin With the Perfect Sides

Now that your striploin’s resting and your pan sauce is simmering, it’s time to think about what goes on the plate beside it. You’ll want sides that complement rather than compete with your steak’s rich, dense flavor.
Sautéed mushrooms are a no-brainer—they’re earthy and work beautifully alongside beef. Roast lemon garlic fingerling potatoes in a roasting skillet until they’re golden and crispy. They’ll soak up those pan drippings perfectly.
Sriracha garlic green beans bring heat and brightness. Mashed potatoes with chives and pecorino add creamy comfort without stealing the show.
The key? Keep things simple. Your striploin deserves sides that enhance, not distract. These pairings let that gorgeous marbled striploin stay the star of your dinner.
Five Common Mistakes: From Uneven Thickness to Skipping the Rest

Even the best cooking technique can’t save a striploin that’s already working against you. You’ll want to avoid these common pitfalls that sabotage your results.
- Uneven thickness prevents consistent cooking. Aim for uniform 1- to 1.5-inch thickness so your striploin cooks evenly throughout.
- Skipping the rest step ruins your sear-crust. After salting, let your meat rest. This develops the surface and locks in those precious juices.
- Room temperature matters more than you think. Don’t skip the 60–90 minute wait before cooking. A cold center takes forever to finish properly.
You’ll also want to pat your striploin completely dry beforehand. Moisture prevents that beautiful crust from forming. After flipping, baste with butter and garlic for even doneness and incredible flavor. These small adjustments transform your results dramatically.