A pork shank is the lower leg portion of a pig, weighing about two pounds and packed with lean meat, connective tissue, and marrow-rich bone. You’ll cook it low and slow through braising for three to four hours until it’s fork-tender and pulls right off the bone. Start by searing it in a hot Dutch oven, then braise it in stock with vegetables. The result? Incredibly flavorful, restaurant-quality pulled pork that’ll make you wonder why you didn’t try this cut sooner. Stick around to discover the exact steps that’ll get you there.
What Exactly Is a Pork Shank?

Ever wonder what that mysterious cut of meat is at the butcher counter? That’s a pork shank—and it’s honestly pretty cool. You’re looking at the lower portion of a pig’s leg, sitting above the hock. Each shank weighs about two pounds and comes from either the front or back leg.
Here’s the thing: shanks aren’t fancy cuts. They’re packed with lean meat, connective tissue, and marrow-rich bone. That’s actually perfect for you because it means serious flavor. The well-used muscle delivers strong, rich taste that makes your kitchen smell amazing.
The catch? You can’t just throw it in a hot pan and hope for the best. Braising works wonderfully—slow cooking with moisture transforms tough fibers into tender, pull-apart goodness. That’s when a pork shank becomes your secret weapon.
Pork Shank vs. Pork Hock: Which Should You Buy?

Now that you know shanks are braising superstars, you’ve probably spotted something else at the butcher—the pork hock. Here’s the real difference: a pork shank weighs about 2 pounds and sits above the hock. You’ll get tender, flavorful meat that falls right off the bone. A pork hock? That’s smaller and sits below the shank. It’s packed with tendons, ligaments, and thick skin that need serious cooking time. Think extended simmering rather than quick roasting. If you’re roasting or braising, grab the pork shank. If you’re making stews or soups and want that rich, gelatinous broth, the hock’s your move. Both are delicious—it just depends on what you’re cooking.
Select and Prep Your Pork Shank

What’s the secret to a show-stopping pork shank dinner? Smart selection and prep work, friend.
Look for shanks weighing about two pounds each. You’ll want that marrow-rich bone and lean meat combo. Here’s your game plan:
- Season generously with salt and black pepper before searing—this builds flavor that’ll impress your crew.
- Create garlic pockets by making shallow cuts and inserting small garlic pieces—it’s easier than it sounds.
- Ensure proper submersion during braising so heat reaches every part evenly.
Pat your pork shank dry first. This helps searing work beautifully. Consider marinating or glazing with BBQ-style sauces if you want deeper flavor. The connective tissue breaks down perfectly with slow, low-and-slow braising. You’re basically unlocking tenderness magic here. Your braising liquid becomes liquid gold too.
Sear Your Shank: Developing Color and Flavor

You’re ready to transform those shanks into something special—now it’s time to sear them hard and fast. Heat up your Dutch oven with a tablespoon or two of oil until it’s smoking, then lay your dry shanks in there for about two minutes per side to build that gorgeous, browned crust. Once they’re richly golden, you’ll pull them out and deglaze the pan with beer or stock, scraping up all those flavorful browned bits stuck to the bottom.
High-Heat Searing Technique
Why does searing matter so much? You’re developing the Maillard reaction—that gorgeous brown crust that makes pork shanks taste incredible. High-heat searing creates flavors you can’t get any other way.
Here’s your game plan for nailing it:
- Heat your 6–7 quart Dutch oven until it’s smoking hot, then add vegetable oil
- Sear each shank about 2 minutes per side for that rich, deep color
- Reserve seared shanks separately to avoid crowding the pan
Keep your heat steady and strong—this isn’t the time to back down. You’re aiming for even browning, not boiling the meat. That means less crowding, better results. The browned bits stuck to the bottom? Those’ll deglaze into pure gold for your braising liquid. You’ve got this.
Building Flavorful Fond Layers
Those browned bits clinging to your Dutch oven’s bottom? That’s liquid gold called fond, and you’re about to unlock serious flavor. After searing your pork shank for about 2 minutes per side, you’ve created a rich, caramelized crust through the Maillard reaction. Now comes the magic: deglazing.
Pour in beer, stock, or wine and scrape those crusty bits loose. They dissolve into your liquid, creating an incredibly flavorful base for braising. This fond transforms your simple braising liquid into something restaurant-quality.
| Step | Action | Why It Matters |
|---|---|---|
| Sear | 2 min per side | Builds deep color |
| Deglaze | Add liquid, scrape | Lifts concentrated flavor |
| Combine | Mix fond into braise | Creates depth in sauce |
You’re not just cooking—you’re building layers of flavor that’ll make your braised pork shank absolutely unforgettable.
How to Braise Pork Shank: Step-by-Step

Braising pork shanks is honestly one of the easiest ways to turn tough cuts into fall-apart-tender meat. You’ll love how simple this bone-in pork shank method truly is.
Start by dredging your shanks in seasoned flour. Brown them in a Dutch oven until deeply caramelized—this creates flavor magic. Deglaze with beer, scraping up those browned bits.
Here’s what makes braising so rewarding:
- The aroma filling your kitchen for hours
- Fork-tender meat that practically melts off the bone
- Rich, silky sauce you’ll want to pour over everything
Add mirepoix (celery, carrots, onions), garlic, and mushrooms. Pour in enough stock to halfway cover the shanks. Toss in rosemary and sage.
Cover and braise low for 3.5–4 hours. Then remove the shanks and reduce that braising liquid into an incredible sauce. Your bone-in pork shank will be impossibly tender and absolutely delicious.
Beer, Wine, or Stock: Choosing Your Liquid

What you pour into that Dutch oven matters way more than you’d think. When deglazing your pan after searing, beer’s your classic move—it adds malty depth and slight sweetness that makes shanks taste incredible. Can’t do alcohol? NA beer, Dr Pepper, Root Beer, or Coke work surprisingly well as substitutes.
After deglazing, you’ll add stock (vegetable, beef, or chicken) plus herbs, salt, pepper, and tomato paste. This combo creates your braising liquid that’ll break down those tough connective tissues during the long simmer.
Some folks prefer white wine for deglazing first, then stock follows. Here’s the real talk: beer gives you robust, complex notes, while stock provides neutral balance. Pick what matches your vibe and what you’ve got on hand.
Classic Beer Braised Pork Shanks With Vegetables

You’ll start by dredging your seasoned pork shanks in flour, then sear them hard in a hot Dutch oven until they’re deeply browned on all sides. Once you’ve built that flavorful crust, you’ll deglaze the pan with beer—or swap in non-alcoholic beer or stock mixed with tomato paste if you prefer. Those crusty browned bits lifting off the bottom? That’s pure flavor gold going straight into your braising liquid.
Dredge, Sear, Deglaze
The magic really starts with a simple flour coating. You’ll dredge your pork shanks in seasoned flour—sea salt and black pepper work beautifully. This light coating helps them brown gorgeously and grip the sauce better.
Next, sear those shanks in vegetable oil using a 6–7 quart Dutch oven. Give each side about 2 minutes to develop that deep, caramelized crust. You’re building flavor, not rushing.
Here’s what makes this step transformative:
- Those browned bits (called fond) unlock magnitude depth
- The Maillard reaction creates savory, complex tastes
- Your kitchen smells absolutely amazing
Now comes the deglaze. Pour beer into the hot pot and scrape those precious browned bits from the bottom. They’ll lift right into your braising liquid, enriching everything.
Finally, add your mirepoix, mushrooms, potatoes, and garlic. Let them cook 5–7 minutes to build your vegetable foundation. You’re almost there.
Beer Alternatives and Substitutes
Not everyone keeps beer on hand, and that’s totally fine. You’ve got plenty of beer substitutes for deglazing your pork shanks. Each option brings something different to your braise.
| Substitute | Flavor Profile | Deglazing Power | Best For |
|---|---|---|---|
| Non-Alcoholic Beer | Mild, balanced | Good | Health-conscious cooks |
| Dr. Pepper | Sweet, spiced | Excellent | Bold flavor lovers |
| Root Beer | Vanilla, earthy | Very Good | Comfort food vibes |
| Coke | Sweet, caramel | Good | Simple, accessible |
After deglazing with your chosen substitute, add stock to maintain proper liquid levels. You’ll still build remarkable depth through browning and long braising. The shanks’ll get fork-tender regardless. Don’t stress about using traditional beer—your shanks won’t know the difference, and you’ll still create something delicious.
Smoking and Braising: The Hybrid Method

If you’ve got a few extra hours and want the best of both worlds, this method’s for you. You’ll smoke your shanks first, then braise them—combining two cooking styles into one astonishing dish.
Here’s what makes this approach special:
- Smoky flavor locked in – One hour of smoking creates depth that braising alone can’t match
- Guaranteed tenderness – Two more hours of braising transforms tough meat into fall-apart perfection
- Impressive results – Your friends will taste restaurant-quality cooking from your own kitchen
Start by placing shanks on a grate over vegetables for that initial smoking hour. Then nestle everything into braising liquid with mushroom stock, chicken broth, white wine, rosemary, and sage. Cover and simmer about two hours until the meat pulls from bone effortlessly. Serve over risotto or potatoes with that remarkable sauce.
Pulled Pork Shank: Pressure Cooker or Braised?

Want tender, shreddable pork shank without spending all day in the kitchen?
Want tender, shreddable pork shank without spending all day in the kitchen? Braising or pressure cooking delivers fork-tender results.
You’ve got two solid options: braising or using a pressure cooker. Braising takes about 3.5 to 4 hours, but it’s totally worth it. You’ll sear those shanks first, which creates amazing flavor through browning. Then you simmer them low and slow in liquid until they’re fork-tender.
If you’re short on time, grab a pressure cooker instead. Brown your shanks, add enough liquid to cover them, and cook on high for roughly 1 hour. Natural release does the heavy lifting for you.
Either way, you’re pulling that meat right off the bone. Mix it with sauce or add a glaze for that classic pulled-shank magic. Both methods break down connective tissue perfectly, leaving you with incredibly tender results. Pick whichever fits your schedule best.
Doneness and Timing: How Long to Cook

You’ve got two main cooking methods to choose from, and they’ll totally change your timeline. Braising on the stovetop takes about 3.5 to 4 hours, while an Instant Pot’ll get you fork-tender meat in just one hour. You’ll know you’re done when the meat practically slides off the bone and the juices run clear—no guesswork needed.
Cooking Time Guidelines
How long does a pork shank actually take to cook? It depends on your method, and we’ve all got different schedules, right?
Here’s what you’re looking at:
- Braising in your oven takes 2–3 hours at 350°F after browning—perfect for weekend cooking
- Instant Pot cuts it down to just 1 hour on high pressure, plus 10 minutes natural release
- Slow cooker needs 8–10 hours on low, then finish with 15–20 minutes in the oven for crispiness
The time-tenderness connection is real. Longer cooking breaks down collagen into gelatin, giving you that fork-tender, pull-away-from-the-bone texture we’re after. You’ll know you’ve nailed it when juices run clear and the meat practically falls off. Pick your method based on your day, and you’ll get delicious results.
Meat Tenderness Indicators
Now that you’ve got your cooking method locked in, knowing when your pork shank’s actually done matters just as much. You’ll recognize successful tenderization through clear visual cues. The juices should run clear when you pierce the meat. Your pork shank’s ready when it pulls away from the bone effortlessly—we’re talking minimal effort here. The meat should shred with just a fork, no wrestling required. If you’re braising, expect three to four hours for proper tenderization. Pressure cooking cuts that dramatically, needing just one hour at high pressure. Slow cookers demand eight to ten hours on low. That soft, tender interior means collagen’s broken down completely. Once you’ve hit these markers, you’ll know you’ve nailed it. Trust your instincts—you’ve got this.
Finishing the Sauce for Maximum Flavor

What separates a good pork shank from a great one? The sauce, honestly. You’ll want to nail your braising reduction to create that glossy, flavorful glaze everyone craves.
Here’s what transforms your shank into something special:
The secret to an exceptional pork shank lies in mastering your braising reduction and creating that irresistible glossy glaze.
- Reduce your liquid until it coats the back of a spoon—this takes about 5–10 minutes and concentrates all those deep flavors you’ve built.
- Deglaze that pot bottom after searing to capture every browned bit of fond that’ll anchor your sauce’s taste.
- Let it rest 7–8 minutes so juices redistribute and your sauce gets genuinely shiny.
If you’re using beer, reduce it slightly during the final simmer. This balances bitterness while highlighting sweetness and acidity. Spoon those cooked vegetables and juices over everything. You’ve earned this moment.
Plating and Side Dish Pairings

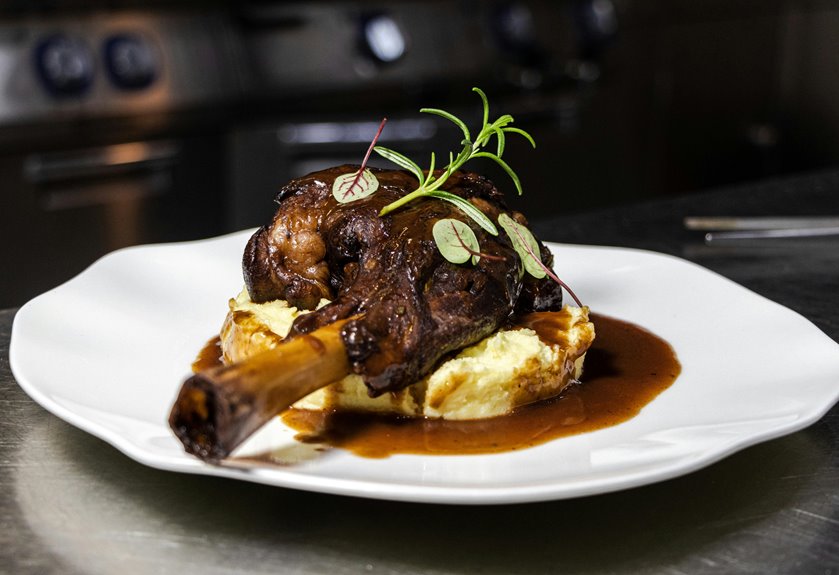
The magic of a perfectly braised pork shank honestly happens on the plate. You’ll want to slice it across the grain to show off that tender meat you’ve worked so hard to create. Arrange your sliced braised pork on creamy mashed potatoes or risotto for a solid foundation. Then ladle that glossy braising liquid generously over everything. Add roasted vegetables or garlic potatoes around the plate for texture and balance. A sprinkle of fresh rosemary or parsley brings color and aroma. Want to impress people? Serve it family-style with the shanks centered and sides arranged around them. Offer extra sauce in a warm boat on the side. Your guests will feel welcomed by this generous, thoughtful plate presentation.
Overcooked? Salvaging and Storing Leftovers

If you’ve accidentally overdone your pork shank, don’t panic—you can salvage it by shredding the meat and adding broth or sauce to restore moisture. Store your leftovers in an airtight container in the fridge for up to three days, or freeze them for three months if you want to save them longer. When you’re ready to eat them, reheat gently on the stove or in the oven with a little added liquid so the meat stays tender and delicious.
Fixing Overdone Meat
Ever pulled your pork shank from the oven only to find it’s tougher than a shoe sole? Don’t panic—you’ve got this. Overcooked meat isn’t ruined; it just needs some TLC.
Here’s your rescue plan:
- Add moisture-rich sauces or broths to rehydrate those dry fibers and restore tenderness.
- Reheat gently at low temperatures (350°F covered with foil) to avoid further drying out your pork shanks.
- Store leftovers with cooking liquid in airtight containers to keep them juicy for next time.
The key? Don’t blast it with high heat again. Instead, nurse that overcooked meat back to life slowly. A splash of stock on the stovetop works wonders too. We’ve all been there, and recovery is totally possible. Your pork shank can still become something delicious.
Proper Storage Methods
Now that you’ve rescued your pork shank from the overcooking mishap, storage becomes your best friend. Place your leftover meat in an airtight container and refrigerate it for up to three days. This keeps everything fresh and ready for quick meals.
Planning ahead? Freeze your leftovers instead. Wrap them tightly to lock in moisture and flavor for three months maximum. Don’t skip labeling your containers with the date and contents—future you’ll appreciate knowing exactly what’s inside.
When you’re ready to eat again, reheat gently on the stovetop or in the oven while covered. This prevents your meat from drying out further. Proper storage transforms your cooking mishap into convenient meals throughout the week.
Reheating Leftovers Successfully
So you’ve got leftover pork shank sitting in your fridge—what’s the best way to bring it back to life?
Reheating leftovers doesn’t have to be complicated. Here’s what we recommend:
- Add moisture like broth or BBQ sauce to prevent your meat from drying out during reheating.
- Heat gently at 300°F until it reaches 165°F internally to keep everything tender and delicious.
- Rest your pork shank for 5–10 minutes after reheating so juices redistribute throughout.
Avoid boiling, which’ll toughen your meat faster than you’d think. You can also freeze leftovers for up to three months—just thaw overnight in the fridge first. With these simple steps, your reheated pork shank tastes nearly as good as day one. We’ve all been there, and you’ve totally got this.
Make-Ahead Tips and Reheating Instructions

Since pork shanks take hours to braise, you’ll love that they’re perfect for cooking ahead. You can refrigerate the shredded meat and sauce separately for up to three days. When you’re ready to eat, reheat everything covered on the stove or in a 300°F oven until it’s warm throughout. Add a splash of broth if things seem dry. Want extra flavor? Swirl in some BBQ sauce or tomato-based liquid while reheating. For freezing, portion your cooked pork with sauce and freeze for three months. Thaw overnight in your fridge before reheating. Here’s the final trick: let your meat rest seven to eight minutes after reheating. This keeps it juicy and tender, making leftovers taste almost as good as the original meal.