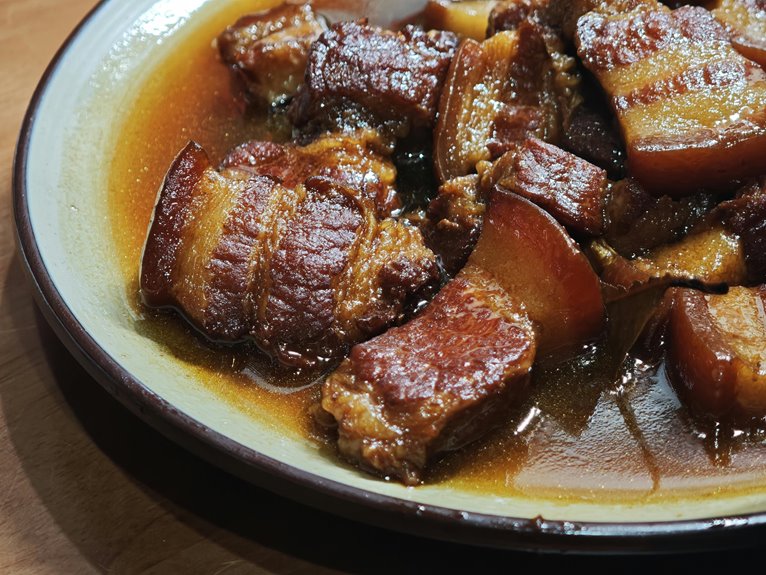
A pork trotter is basically collagen-packed meat that becomes incredibly tender when you braise it low and slow for two to three hours. You’ll want to blanch it first to remove slime, then sear it for flavor if you’re feeling fancy. The magic happens in the braising liquid—soy sauce, ginger, star anise, and rock sugar transform into a glossy, silky sauce that coats fall-apart-tender meat. It’s honestly one of the easiest impressive dishes you can make, and there’s way more technique to master.
What Makes a Pork Trotter Worth Cooking?

Why’d pork trotters become a superstar ingredient in kitchens around the world? You’ll find they’re secretly packed with collagen from tendons and connective tissue. When you braise them low and slow, that collagen transforms into something magical—a silky, gelatinous texture that makes every spoonful feel luxurious. You’re basically getting a built-in sauce maker that creates rich, glossy liquids naturally. The deep, savory flavors develop when you braise with soy, aromatics, and spices, turning modest cuts into genuinely craveable dishes. Here’s the thing: you don’t need tons of meat to feel satisfied. One trotter goes far, making hearty, filling meals that stick with you. They’re the ingredient that makes you feel like you’re cooking something special.
Front vs. Back Trotters: Which Should You Buy?

When you’re picking between front and back trotters, you’re basically choosing between meatier versus tougher cuts. Front trotters give you more meat and those satisfying tendons for braising, while back ones pack serious collagen for soups but cost less at your local market. Your choice really comes down to what you’re cooking and your budget—both work great if you slice them into crosscut sections first.
Meat and Texture Differences
Here’s where it gets interesting
Picture yourself at the butcher counter, staring at two piles of pork trotters that honestly look pretty similar. But here’s where it gets interesting—they’re actually quite different. Front trotters are meatier and more wrinkled, with bigger tendons that make them perfect for braising. You’ll notice they’re softer and more forgiving when you cook them. Back trotters? They’re straighter and tougher on the outside, but don’t skip them. They pack serious collagen content, which means they’ll give you that silky, gelatinous texture you’re after in slow-cooked dishes. Think of front trotters as your comfort choice and back trotters as your collagen powerhouse. Your butcher can cut them into bite-sized pieces too—about six pieces per trotter keeps things manageable in your pot.
Selection and Cooking Methods
So, which trotter should you actually buy? Here’s the deal: front trotters give you more meat and tendon, making them perfect for braising. You’ll get tender, flavorful results that’ll impress anyone at your table. Back trotters? They’re bonier but loaded with collagen, which creates that silky, gelatinous texture you’re after in soups.
Think about what you’re craving. Want something meatier and more satisfying? Go front. Prefer maximum collagen for that luxurious mouthfeel? Choose back. Either way, ask your butcher to cut whole pork trotters into large bite-sized pieces—about six pieces per trotter works great. Crosscut slices are easier to eat too. This simple prep step makes braising way more manageable and ensures everything cooks evenly throughout.
Price and Market Availability
Where do you actually find quality pork trotters, and what’s the price difference? Chinese markets and Asian online deliveries stock fresh pork trotters readily. You’ll find front vs back trotters priced differently, though. Front trotters cost more because they’re meatier and larger with substantial tendons—perfect for braising. Back trotters are cheaper since they’re straighter and tougher. Both work great depending on your cooking goals. Here’s the smart move: ask English-speaking butchers to slice crosscuts for easier eating. Plan about six pieces per whole trotter for bite-size portions. Pre-cut options save you time if convenience matters more than price. The market availability is genuinely impressive these days, making quality pork trotters accessible whenever you need them for your next braising project.
Selecting and Preparing Trotters at the Butcher

When you’re at the butcher, you’ve got two main choices: front trotters, which are meatier and pricier, or back trotters, which are straighter with more collagen. Ask your butcher to cut them into about six bite-sized pieces per trotter using a sharp saw for clean cuts, or grab pre-cut ones if your market’s got them ready. Before you cook, you’ll want to blanch them with ginger and scallions to get rid of that slime and funky smell, then rinse everything well.
Front Versus Back Trotters
Here’s the thing about selecting trotters—you’ve really got two distinct options at the butcher counter. Front trotters are larger, meatier, and packed with flexible, wrinkled skin that’s absolutely worth the higher price tag. They’re your go-to for that satisfying bite.
Back trotters, though? They’re straighter with tougher texture and thinner skin, but don’t overlook them. They’re loaded with on-the-bone meat and serious collagen content—basically braising gold.
Here’s my honest take: if you’re braising, grab a mix of both. You’ll balance the meatiness from front trotters with the gelatin-rich bones from back trotters. That combo creates seriously silky, deeply flavorful broths that’ll make your whole kitchen smell incredible. Your future self will thank you.
Cutting And Preparation Techniques
Once you’ve picked your trotters, the real work begins at the butcher counter. Don’t be shy about asking for what you need—good butchers love helping home cooks succeed.
Request these pork trotters cutting options:
- Large bite-size pieces if whole trotters are available
- Cross-cut sections for easier eating and better texture
- Pre-cut packages from most Chinese markets to skip butchering
For braising preparation, grab your trotters and get prepping. Thoroughly clean them under cold water first. This removes slime and odor that nobody wants. Consider blanching them briefly in boiling water. This step is game-changing for texture and flavor.
You’re basically doing prep techniques that serious cooks swear by. Your effort now means better results in the pot later. That’s just how braising works—good prep equals delicious results.
Cleaning and Blanching for Best Results

Why do pig’s feet need so much prep work? You’re basically starting with a pretty funky ingredient, and proper cleaning transforms them into something delicious.
Start by rinsing your pork trotters thoroughly under cold water. Then blanch them in hot water for a few minutes—this loosens all that slimy stuff clinging to the surface. Add ginger slices and scallions to your blanching water; they seriously help reduce odor.
After blanching, scrub those trotters under hot water to remove remaining impurities. Don’t skip this step—it makes a real difference in your final dish.
Many cooks then simmer trotters with rice wine and spices before actual cooking. This pre-cooking deodorizes everything while preparing the collagen-rich tissue for braising.
You’ll notice the difference immediately. Clean trotters cook better and taste cleaner.
Braising vs. Other Cooking Methods

Braising really shines because you’re essentially letting time and moisture do the heavy lifting for you. You could fry or roast your trotters instead, but you’d miss out on that glossy, collagen-rich sauce and the fall-apart tenderness that makes braising worth the wait. Here’s the thing: other methods cook the meat faster, yet braising transforms those tough cuts into something genuinely special over 2–3 hours of low simmering.
Why Braising Works Best
How’d you think pork trotters got that fall-apart-tender reputation? Braising is your secret weapon. Here’s why it works so well:
- Collagen breaks down: That tough skin and connective tissue transforms into gelatin over 2–3 hours of moist, low heat.
- Even tenderness throughout: Unlike quick methods, braising reaches every dense part of the trotter, preventing chewy centers.
- Flavor-packed sauce: Your braising liquid absorbs garlic, onions, and soy sauce, creating a glossy glaze that emulsifies with rendered fat.
You’re basically letting time do the heavy lifting. You brown the meat first, then submerge it in flavorful liquid and let it simmer. The result? Meat so tender it falls right off the bone. That’s the kind of tenderness that makes everyone at your table feel like you’re a total pro.
Alternative Cooking Techniques
While braising truly shines for pork trotters, you’ve got other solid options if you’re short on time. A pressure cooker cuts your cooking time dramatically—think 45 minutes instead of three hours. You’ll still get tender, fall-apart meat without sacrificing flavor. Just add your aromatics and braising liquid, seal it up, and let the pressure do the heavy lifting. Then simmer briefly to reduce and glaze your sauce.
Slow cookers work beautifully too if you prefer hands-off cooking. Set it on low for 8 hours with soy-based braising liquid and aromatics. Stove-top simmering offers another route, needing about 2 hours of gentle heat. Each method delivers tender pork trotters with rich, glossy sauce. Pick what fits your schedule best.
Essential Aromatics, Spices, and Sauce Components

What makes pork trotters taste so extraordinary? You’re building layers of flavor that transform humble meat into something unforgettable.
Here’s what you’ll need in your braising pot:
- Aromatics: Ginger, green onion, and sand ginger create that deep, warming base you’re after.
- Spices: Star anise, clove, and dried chili pepper add complexity and richness to every bite.
- Sauce foundation: Dark soy sauce plus light soy sauce, Shaoxing wine, and rock sugar create your glossy glaze.
You’ll combine these ingredients to build a balanced flavor profile that’s salty, sweet, and aromatic. The soy sauce delivers umami depth while rock sugar adds shine and sweetness. When you braise your pork trotters in this liquid, you’re letting everything meld together beautifully.
Step-by-Step Braising Process for Tender Trotters

Ready to transform those trotters into something spectacular?
Start by caramelizing rock sugar in oil until it’s dark and glossy. This creates your flavor foundation. Add sliced ginger and spices—star anise, cloves, bay leaves—and let them get fragrant. That’s when you’ll know you’re on the right track.
Pour in just enough hot water to barely cover your pork trotter pieces. Season with light and dark soy sauces, salt, and optional MSG. Now comes the patience part: braise uncovered or with the lid slightly ajar for 1–2 hours at low heat.
| Stage | Temperature | Time | Result |
|---|---|---|---|
| Initial | Medium | 10 min | Caramel forms |
| Sauté | Medium | 5 min | Aromatic base |
| Braise | Low | 60–120 min | Gelatinous skin yields |
| Reduce | Medium | 10 min | Thick glaze |
Your gelatinous skin should fall off the bone. You’ve earned this.
How to Achieve the Perfect Gelatinous Texture?

The magic happens when you give collagen time to do its thing. You’re basically coaxing those tough connective tissues into silky, luxurious gel. Here’s your game plan:
The magic happens when you give collagen time to do its thing—coaxing tough connective tissues into silky, luxurious gel.
- Braise trotters covered in liquid with aromatics for 2–3 hours on low heat
- Cut them into smaller pieces to boost collagen extraction and even texture
- Reduce the sauce at the end for a glossy, gelatinous finish
The key? Don’t rush it. Gentle simmering beats aggressive boiling every time. Keep that liquid topped up so everything stays tender, not mushy. Brown your trotters first if you want deeper flavor—it won’t stop the gelatinous texture from developing. When you finish with a proper glaze reduction, you’ve nailed it. That silky mouthfeel? That’s pure braising magic happening in your pot.
Serving Suggestions and Complementary Sides

Now that you’ve got those trotters silky and glazed, it’s time to actually eat them. You’ll want to pair your braised masterpiece with sides that balance all that rich collagen and sauce. Steamed rice or noodle soup work perfectly as your foundation. But here’s where you get creative with complementary vegetables:
| Side Dish | Why It Works |
|---|---|
| Fried Cabbage | Cuts through richness with crunch |
| Baby Bok Choy Stir Fry | Light, fresh contrast to braising flavors |
| Cucumber Salad | Refreshing acid balances deep soy notes |
These lighter sides help your palate reset between bites. You’re not fighting the trotters’ richness—you’re creating harmony. The gelatinous skin pairs beautifully when you’ve got something crisp alongside it. Trust me, your guests’ll appreciate the thoughtful balance.
Storage and Reheating Without Compromising Quality

What happens to those beautiful trotters after dinner’s done? You’ve got options for keeping them delicious.
Freeze your braised pork trotters for three to four months. That gelatinous texture and rich sauce stay preserved beautifully. Here’s how to reheat without losing quality:
- Thaw overnight in your refrigerator before reheating
- Steam or warm in a small pot over medium-low heat with frequent stirring
- Always reheat pork trotters in their sauce for maximum moisture
Skip the microwave—it’ll wreck the texture you worked hard for. If your sauce looks too thick, add a splash of water or stock. This restores that glossy finish you love.
Serve those leftovers over steamed rice or crusty bread. You’re preserving tenderness and flavor that’ll make you glad you saved them.
Common Mistakes and How to Avoid Them

Even experienced cooks mess up pork trotters—and you’ll want to avoid their mistakes. The biggest culprit? Under-seasoning or skimping on sauce. You need balanced seasoning with light and dark soy sauce, Shaoxing wine, and rock sugar for a proper glaze.
Rushing the braising process wrecks everything. Skip the high heat and commit to a gentle 2–3 hour simmer instead. Fast cooking creates stringy, collapsed meat nobody wants.
Before braising, don’t skip cleaning and blanching. Residual odor ruins your dish. Blanch your trotters with ginger and scallion, then rinse thoroughly.
Here’s another frequent oversight: inadequate liquid coverage during braising. Add just enough hot water to barely cover everything, and top it up as needed.
Finally, pork trotters need aromatic partners—ginger, garlic, star anise, bay leaves. They transform your seasoning balance from flat to genuinely delicious.