You don’t have to rinse your brined turkey, but it’s totally your call. Rinsing removes surface salt, which helps if you’re worried about it tasting too salty. Just skip it if you’re using a dry brine—rinsing defeats the whole purpose. Either way, pat everything dry with paper towels afterward; that’s what actually matters for crispy skin. The real magic happens in how you handle those final drying steps and roasting temps.
Why Rinsing a Turkey After Brining Matters
So that’s the situation—should you rinse your turkey after brining or just leave it alone? Here’s the thing: rinsing after brining is basically a trade-off you’ll need to decide on yourself. When you brining your turkey, salt gets absorbed into the meat, making it juicy and flavorful. But excess salt sits on the surface too. If you rinse, you’ll wash away that surface salt, which some folks prefer. However, you’ll also lose some of the brining benefits you worked hard to create. The USDA says rinsing doesn’t reliably remove bacteria anyway, so food safety isn’t really the point here. Your real choice comes down to this: do you want less salt on top, or maximum flavor throughout?
Do You Actually Need to Rinse a Brined Turkey?

You’ve probably heard conflicting advice about rinsing your brined turkey, and honestly, it comes down to what you’re trying to achieve. The USDA says rinsing won’t actually remove bacteria, so you can skip it for safety reasons—but if your turkey tastes too salty, rinsing the surface works fine. Your real goal is patting the skin completely dry with paper towels, which matters way more for getting that golden, crispy skin when you roast it.
Salt Removal Versus Safety
Why do so many recipes tell you to rinse your brined turkey? The answer’s simpler than you’d think. You’re not rinsing for safety—that’s actually a misconception. The USDA confirms that rinsing won’t remove harmful bacteria from your meat. Instead, you’re rinsing to control saltiness.
| Concern | Rinsing Helps? | Better Solution |
|---|---|---|
| Bacterial safety | No | Cooking thoroughly |
| Excess brine salt | Yes | Pat dry instead |
| Skin crispness | No | Air-dry completely |
| Flavor balance | Maybe | Taste before seasoning |
| Moisture loss | No | Skip the rinse |
Here’s the real deal: your brine salt levels depend entirely on your recipe. Some brines are saltier than others. If you’re worried your turkey’s too salty, a quick rinse works. But honestly? Pat it dry instead. You’ll preserve moisture and flavor while still adjusting saltiness. That’s the move most experienced cooks make.
USDA Guidance On Rinsing
When the USDA weighed in on turkey rinsing, they made something crystal clear: don’t bother. Here’s why: rinsing doesn’t actually remove bacteria from your bird. That splashing water? It spreads germs around your sink instead. The real safety move is washing your hands thoroughly to prevent cross-contamination. So you can skip that rinse turkey step entirely from a food safety perspective. Now, if you’re worried about excess salt from your wet brine affecting flavor, that’s a different conversation. Some cooks do a quick rinse for salt removal alone. But the USDA’s bottom line remains: focus on hand hygiene, not rinsing. Your turkey’s safety depends on what you do after brining, not the rinse itself.
Drying Methods For Crispness
it all comes down to drying. After you’ve finished your brine rinse routine, you’re not done yet. You’ve got to remove that surface moisture to get that golden, crackling skin you’re dreaming about.
Your drying methods matter more than you’d think:
- Pat the turkey dry with paper towels, working over the entire surface
- Let it air-dry in your fridge uncovered for several hours
- Dab away any remaining moisture right before roasting
- Skip rinsing if you’re using Nigella’s wet brine approach
A completely dry skin surface helps browning happen faster in your oven. You’ll get that crispy texture without losing the juiciness from your brine. It’s honestly the secret move that separates good turkey from great turkey.
Remove Your Brined Turkey From the Brine Bag

How’s your turkey looking after that briny soak? It’s time to get it out of that brine bag carefully. First, drain all the brine completely and toss it away. You’ll want to rinse your turkey under cool running water to remove excess salt and seasonings from the surface. This step helps prevent cross-contamination and ensures better flavor. Make sure you’ve emptied every drop of brine from inside the cavity too. Pat your turkey dry with paper towels, working gently around all the nooks and crannies. Once you’re done drying, keep your bird refrigerated at 35–38°F. If you’re prepping ahead, you can even leave it uncovered in the fridge to air-dry the skin further. This gives you that crispy exterior everyone craves.
Discard the Brine

Once you’ve lifted your turkey out, you’ll want to dump that brine liquid straight down the drain—don’t even think about saving it for later. That salty water’s done its job and can’t be reused safely, so it’s a one-time-only ingredient. Just rinse out your container, wipe it down with hot soapy water, and you’re set to move forward with drying out your bird.
Safety and Waste Disposal
After your turkey’s been soaking in that salty brine for 12 to 24 hours, you’ve got to deal with the leftover liquid—and therefore, you can’t reuse it. Proper brine disposal protects your kitchen from cross-contamination and keeps everyone safe.
Here’s what you need to do:
- Pour the brine down your sink with plenty of water running
- Never let the brine bag touch your counters or other foods
- Dispose of the bag separately following your local waste guidelines
- Wash your hands thoroughly with soap and water afterward
Think of it this way: that brine touched raw poultry, so it’s basically a bacteria highway. You’ll also want to sanitize any utensils, cutting boards, and surfaces that contacted the brine. This simple step protects your whole family during meal prep.
Brine Liquid Discarding Process
What should you do with all that salty brine your turkey’s been sitting in? You’ll want to discard it completely—don’t reuse it. Pour the brine down the drain and rinse out your container thoroughly. This step’s essential for sanitation and food safety. Never cook with the same brine or use that bag again. Just toss everything away separately from your cooking setup. Think of it like this: that brine has done its job, absorbed lots of turkey moisture, and now it’s finished. By fully discarding it, you’re preventing any cross-contamination that could compromise your roasted turkey. Fresh water’s your best friend from here on out. This simple habit keeps your kitchen safe and your dinner worry-free.
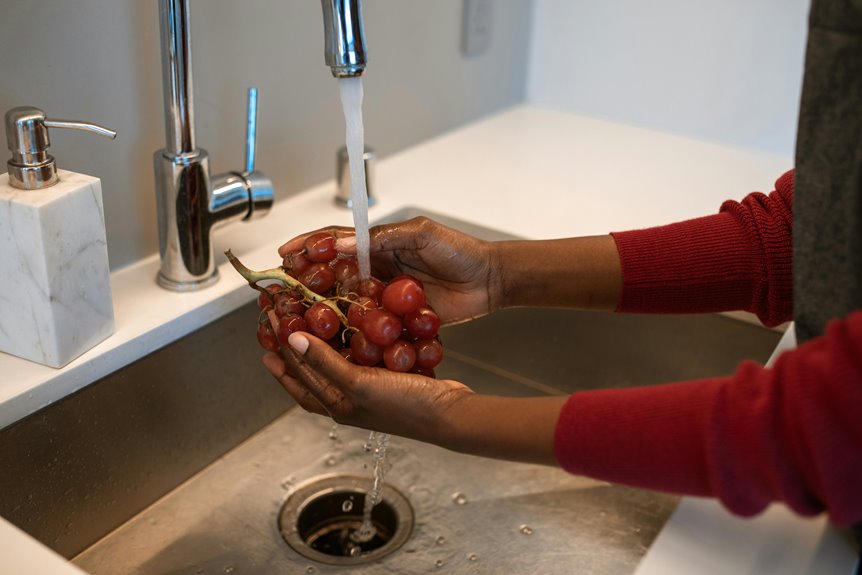
Rinse and Rub Down: How to Clean a Brined Turkey

Should you rinse your turkey after brining? Absolutely. Here’s your step-by-step approach to cleaning your brined bird properly.
After removing your turkey from the brine liquid, you’ll want to rinse it thoroughly under cool running water. This removes excess surface salt that’d otherwise make your turkey too salty. Pat it completely dry with paper towels—this is essential for crispy skin later.
Follow these steps for best results:
- Rinse the entire bird inside and out under cool water
- Pat dry with clean paper towels, inside and outside
- Let it air-dry in your fridge for a few hours if possible
- Skip rinsing only if you’ve used a dry brine method
The goal here is balance. You’re removing surface salt while keeping that internal moisture your brining created. Your turkey will thank you with juicier, perfectly seasoned meat.
Empty Excess Brine From Body Cavities

Once you’ve rinsed and patted down your turkey, there’s one more cleanup job waiting inside. You’ll want to empty any excess brine from the body cavity. This step matters because leftover brine can make your skin soggy instead of crispy. Remove the bag or vessel you used for brining, then carefully pour out any remaining liquid from the cavity. Wipe the inside clean with paper towels to catch any stubborn moisture. Don’t skip this part—we’ve all learned the hard way that soggy skin isn’t what we’re after. A completely dry cavity helps your turkey roast evenly and get that golden, crackling exterior everyone loves. You’re almost ready to get it in the oven!
Pat the Turkey Dry With Paper Towels

After you’ve emptied those cavities, grab a stack of clean paper towels and start patting your turkey dry. You’ll want to press gently all over the skin, lifting away that surface moisture that’d otherwise turn into steam and ruin your crispy skin goals. The drier your turkey’s exterior is, the better it’ll brown and crisp up in the oven—so don’t skip this step even though it feels tedious.
Moisture Removal Technique
Why does your turkey’s skin sometimes turn out soggy instead of gloriously crispy? Surface moisture is your enemy here. After brining, you’ll want to pat your turkey completely dry using clean paper towels. This step makes a real difference in your final result.
Here’s how to master the moisture removal technique:
- Use multiple paper towel passes on the skin, cavities, and any brine drips
- Focus on all surfaces where water pools or collects
- Replace towels frequently so you’re absorbing, not just pushing moisture around
- Take your time with this step—it directly impacts crispiness
Patting dry removes that surface water that’d otherwise steam your meat in the oven. Without this moisture, your turkey browns beautifully and develops that golden, crispy skin we’re all chasing. Skip rinsing entirely and go straight to thorough drying instead.
Skin Crispness Enhancement
Now that you’ve removed the excess brine, it’s time to get that skin absolutely bone-dry. Grab some paper towels and pat down every inch of your turkey’s surface. You’re not being gentle here—really press those towels against the skin to pull out moisture. This drying step matters because water creates steam during roasting, which prevents crispness. Without that surface moisture, your skin’ll brown beautifully instead of turning soggy and pale. Here’s the pro move: let your dried turkey sit uncovered in the fridge for several hours. This fridge-drying takes crispness to another level entirely. When you’re ready to roast, your skin’s ready for coating with canola oil or butter. That dry surface helps the fat spread evenly, giving you that golden, crackling texture everyone craves.
Paper Towel Application
The moment you lift that turkey from the brine is when the real work begins. You’re drying your bird to crispy perfection, and paper towels are your indispensable tool.
Grab clean, dedicated paper towels—don’t reuse ones from other tasks. Cross-contamination is real, and you’re protecting your kitchen. Here’s your drying game plan:
- Gently blot the skin surface using fresh paper towels
- Focus on the breast and legs where moisture blocks browning
- Pat the cavity inside thoroughly but carefully
- Ensure every surface feels dry before roasting
Work methodically across the entire turkey, changing towels as needed. Moisture hampers that golden-brown skin you’re after. Skip rinsing with water entirely; it undoes your brining work. Once you’ve finished drying, your turkey’s ready for the roasting rack.
Air-Dry Your Rinsed Turkey in the Refrigerator

Once you’ve rinsed your turkey thoroughly, it’s time to dry it out—and we mean really dry it. After patting down with paper towels, your turkey needs serious air-dry time in the refrigerator. Place it on a rack or tray so air flows underneath and around it. This setup matters because moisture trapped against skin won’t crisp up nicely.
| Step | Temperature | Duration | Result |
|---|---|---|---|
| Air-dry setup | 35–38°F | Several hours | Initial drying begins |
| Overnight rest | 35–38°F | 8+ hours | Maximum skin dryness |
| Pre-roast check | 35–38°F | Final hour | Optimal browning readiness |
| Roasting prep | Room temp | 30 minutes | Even cooking starts |
Plan overnight air-drying when you can. This extended time transforms your turkey’s skin into that golden, crispy texture everyone craves. You’ll notice the difference immediately when roasting begins.
How Long Should You Let It Air-Dry?

Here’s where patience really pays off: you’ll want to let your turkey air-dry anywhere from a few hours up to 24 hours in the fridge. The longer you wait, the crispier your skin’ll get, since that dry air breaks down surface moisture that’d otherwise steam your bird during roasting. Just find that sweet spot between maximum crispness and your actual cooking schedule, because honestly, even a few hours makes a noticeable difference.
Air-Drying Duration Guidelines
After you’ve patted your turkey dry, the next step is figuring out timing. Air-drying after brining is where the magic happens for crispy skin.
Here’s what you’re working with:
- 1 to 24 hours: The standard range for air-drying your turkey
- 4 to 8 hours: A solid middle-ground option if you’re short on time
- Up to 24 hours: Your best bet for seriously crispy skin results
- Refrigerator placement: Always keep it uncovered and cold during this process
The longer you air-dry, the crispier your skin becomes. But honestly, even a few hours makes a noticeable difference. Just remember—never leave it sitting out at room temperature. Keep that turkey refrigerated the whole time. Your future self will thank you when you pull out that perfectly golden bird.
Skin Crispness and Moisture Balance
So what’s the real secret to crispy turkey skin? You’ve gotta balance moisture removal with keeping your bird juicy inside. After you brine, skip rinsing—it’ll just undo your hard work by adding water back. Instead, pat that turkey completely dry with paper towels. This matters because dry skin browns better at high heat, especially around 425°F.
Here’s the game-changer: air-dry your brined turkey uncovered in the fridge for up to 24 hours. This technique seriously upgrades crispness without sacrificing juiciness. Can’t wait that long? No problem. Just pat it dry thoroughly and coat lightly with oil before roasting. That combination helps you nail both crispy exterior and moist meat. Your dry skin is basically your ticket to turkey success.
Does Rinsing Remove Important Flavors From the Brine?

Whether rinsing actually strips away the good stuff you’ve worked to add is honestly one of the trickier parts of the brining debate.
Whether rinsing strips away brining’s benefits remains one of the trickier debates in turkey preparation.
Here’s what actually happens when you rinse:
- Brine saltiness matters most — overly salty brines lose more flavor when rinsed than balanced ones do
- Rinse flavor loss is minimal — the brine’s seasonings have already penetrated deep into the meat
- Surface salt gets removed — this is the main thing rinsing accomplishes, which affects your final seasoning
- Your recipe determines everything — some cooks skip rinsing entirely to preserve moisture and flavor
The real deal? You’re not losing the flavor that counts. Most seasoning has already soaked into your turkey’s muscle fibers. You’re just removing excess surface salt, which actually helps you control how salty your final bird tastes before roasting.
What USDA Guidance Says About Rinsing Your Turkey

Now here’s where food safety enters the conversation. The USDA takes a pretty clear stance on rinsing your turkey. They actually advise against it, which surprises many home cooks. Here’s why: rinsing doesn’t reliably remove bacteria from poultry. You can splash water around, but you won’t eliminate the harmful stuff lurking on that bird.
Instead, focus on what actually works. Wash your hands thoroughly with soap and warm water. This prevents cross-contamination in your kitchen. Keep your turkey separate from other foods while handling it.
The USDA prioritizes food-safety through proper hygiene over rinsing methods. Yes, you might want to remove excess salt from brining. But skipping the rinse and practicing smart kitchen habits keeps your meal safer for everyone at your table.
Rinsing a Dry-Brined Turkey: Do You Need To?

they’re a different beast entirely. When you dry brine, salt and seasonings actually penetrate deep into the meat. You’re not just coating the surface like with wet brining.
So here’s what you should consider:
- Rinsing washes away surface flavors you worked hard to build up
- Salt balance gets disrupted when you rinse without reapplying seasonings
- The dry brine’s whole point relies on that salt staying put
- Pat drying with paper towels works better than rinsing anyway
Most experts suggest skipping the rinse entirely. Instead, pat your turkey dry thoroughly, then let it air-dry in the fridge. This approach keeps those hard-earned flavors intact while giving you that crispy skin everyone craves. You’ll thank yourself come carving time.
Common Mistakes to Avoid When Rinsing

What’s the biggest mishap people make when rinsing their turkey? They skip the drying step afterward. You rinse to remove surface salt, but moisture left on the skin will sabotage your crispy exterior. Pat everything dry with paper towels—really dry it.
The biggest turkey rinsing mistake? Skipping the drying step. Moisture sabotages crispy skin—pat everything dry with paper towels.
Another common mistake? Over-rinsing a dry-brined turkey. You’ll wash away valuable salt that seasoned your meat. A quick rinse works best here, not a thorough wash.
Don’t rinse under hot water either. Cold running water prevents bacteria from spreading around your sink and counter. Hot water actually increases contamination risk.
Finally, forget what you’ve heard about needing to rinse thoroughly. The USDA recommends focusing on hand hygiene instead. You’re in control—make smart choices based on your brining method.
Recovery Tips If Your Turkey Is Over-Salted

Sometimes you’ll realize mid-brine that you’ve gone overboard with the salt. Don’t worry—you’re not alone, and recovery is totally doable. Here’s how to fix an over-salted turkey:
- Rinse briefly under cold running water to dilute surface salt, then pat dry thoroughly with paper towels
- Soak in fresh cold water for 15 minutes post-brine to remove excess salt before roasting
- Sanitize your sink and surrounding area after rinsing to prevent cross-contamination from brine residues
- Use low-salt or unsalted gravy and skip extra salt in stuffing and roasting rubs
The key’s patting your bird completely dry afterward. Moisture prevents crispy skin. You’ve still got this. Your turkey’ll turn out delicious, and nobody needs to know about your salty mishap. We’ve all been there.
Ready to Roast: Next Steps After Rinsing and Drying

Now that your turkey’s rinsed and patted completely dry, you’re ready for the home stretch. Set up your roasting rack to elevate the bird properly. Good airflow is your secret weapon for crispy skin that’ll impress everyone at your table.
Skip the roasting bag—seriously, it’ll trap steam and ruin all your brining and drying work. Place your turkey breast-side up on that rack, then pop it in a 325F oven. You’ll roast low and slow until the thickest part hits 165F internally.
Here’s the game-changer: don’t baste. Your brined turkey’s already moist, and opening the oven just wastes heat. Once you hit 165F, crank it to 425F for those final golden-brown moments. You’ve earned this perfectly roasted bird.