Beef cheeks are the tough cheek muscles from a cow that become incredibly tender through slow cooking. They’re packed with collagen that converts into silky gelatin during braising, giving you restaurant-quality results at home without the fancy price tag. You’ll sear them, then braise in the oven for 3–4 hours with red wine and vegetables. The result? Melt-in-your-mouth beef that absorbs flavors beautifully. Stick around to discover exactly how to nail the sauce consistency and serving tricks.
What Are Beef Cheeks and Why They’re Worth Cooking?

Ever wondered what beef cheeks actually are? They’re the cheek muscles from a cow. Yeah, they’re genuinely tough at first—but that’s exactly why they’re worth your time.
Here’s the thing: beef cheeks are loaded with collagen and fat. When you use slow cooking methods, all that collagen transforms into pure silky richness. You’re basically creating restaurant-quality tenderness at home.
The best part? They’re super affordable. You can find them at most butcher shops without breaking the bank. Many home cooks skip them simply because they don’t know better.
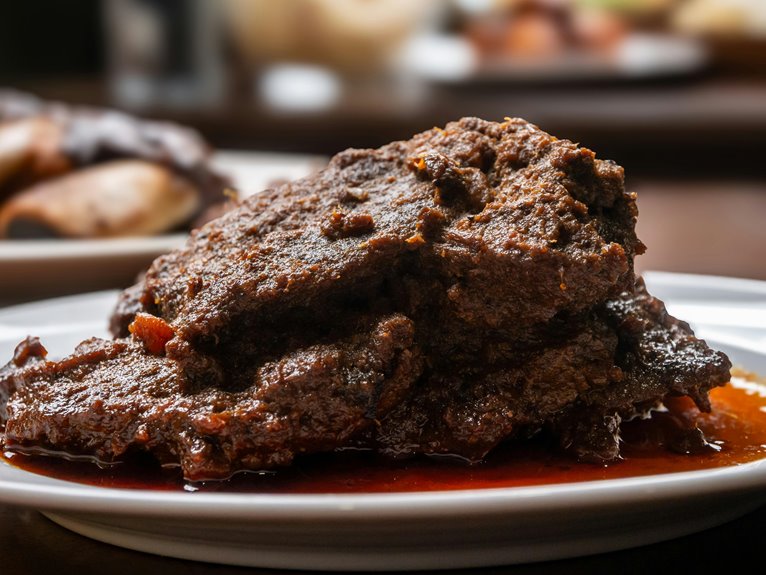
Once you braise beef cheeks for hours, they become melt-in-your-mouth tender. They’ll absorb flavors beautifully from your braising liquid. You’ll get deep beefy flavor with zero dryness. Trust us—once you try them, you’ll understand why we’re obsessed.
Where to Find and Buy Beef Cheeks

Your best bet is hitting up a local butcher shop first, since they’ll often have beef cheeks or can order them for you. If that doesn’t work out, you’ve got online meat retailers and specialty grocery stores as solid backup options. Each source has its perks, so you’ll want to know what works best for your situation.
Butcher Shop Selection
Finding beef cheeks takes a bit of hunting, but it’s totally worth it. Your best bet? Head to a local butcher shop where they actually know their stuff. These folks can track down beef cheeks for you, even if they’re not sitting in the case right now. Call ahead and ask about availability—most butchers love when customers show genuine interest in unusual cuts.
When you visit, chat with them about what you’re looking for. They’ll help you score cheeks that weigh around 250–350 grams each, with bright red flesh and nice fat marbling. Ask whether they’ve trimmed them already or if thick membranes need removing. A good butcher shop becomes your secret weapon for finding beef cheeks consistently. You’re joining a community that appreciates quality meat and bold flavors.
Online Meat Retailers
What if you can’t swing by a local butcher? Online retailers have you covered. You’ll find vacuum-sealed beef cheeks from specialty shops that ship nationwide. They’re labeled as “beef cheeks,” “bone-in cheek,” or “smoked beef cheeks” depending on processing.
| Retailer Type | What to Look For |
|---|---|
| Specialty butchers | Fresh or frozen, 250–350 g portions |
| Asian markets | Clear weight per piece, sourcing info |
| Rancher-direct shops | Grass-fed or grain-fed options |
| Online meat retailers | Country of origin, transparent labeling |
Availability can be seasonal or hit-or-miss, so patience helps. Check weight per piece carefully—you’re typically getting individual cheeks around 8–12 ounces. Look for clear sourcing details about grass-fed versus grain-fed beef. This transparency matters when you’re investing in quality ingredients for your kitchen.
Specialty Grocery Stores
When you’re hunting for beef cheeks, specialty grocery stores can be surprisingly helpful—if you know where to look. These shops often carry cuts that regular supermarkets skip entirely. You’ll find beef cheeks in the meat department, typically weighing around 12 ounces each. The staff there actually knows their inventory, so don’t hesitate asking if they’ve got them in stock. If they don’t, many specialty stores offer special-order programs—just ask! You might discover them nestled near other premium cuts like short ribs or brisket. Keep in mind that availability varies seasonally, so calling ahead saves disappointment. Specialty grocery stores pride themselves on sourcing quality meat, making them ideal places to build relationships with knowledgeable butchers who’ll help you find exactly what you need.
Why Slow Cooking Turns Tough Cheeks Into Butter

Because beef cheeks are packed with connective tissue, they’re essentially built for slow cooking—and that’s actually great news for you. When you braise cheeks low and slow, something magical happens. The collagen in that tough muscle converts to gelatin over several hours. You’re essentially transforming a chewy piece of meat into something buttery and tender.
| Time | Temperature | Result |
|---|---|---|
| 2-3 hours | 300°F | Partially tender |
| 4-5 hours | 275°F | Fall-apart tender |
| 6+ hours | 250°F | Melt-in-mouth texture |
Here’s the thing: you can’t rush this process. Low, slow cooking breaks down those tough fibers gradually. The meat absorbs all those delicious flavors from your braising liquid too. Each bite stays incredibly juicy because the gelatin holds moisture in. You’ll actually look forward to cooking beef cheeks.
What Equipment Do You Need?

Now that you understand why slow cooking works its magic on beef cheeks, let’s talk about what you’ll actually need in your kitchen.
First, grab a heavy Dutch oven or large braising pot. You’ll want something that holds heat evenly and has a tight-fitting lid—this keeps moisture in during those long cooking hours. A five to seven-quart capacity works perfectly for beef cheeks.
Next, you’ll need basic prep tools: a sharp knife for trimming, a cutting board, and a meat thermometer. A sturdy tongs set helps you handle the meat safely.
Finally, consider a slow cooker if you prefer hands-off cooking. Either way, you’re ready to transform those tough beef cheeks into something extraordinarily delicious that your family will love.
How Much Beef Cheek Should You Buy?

You’ll want to grab about 6–8 ounces per person, which matches how long they’ll actually braise. Since whole beef cheeks run 12 ounces each, you’re basically looking at one cheek split between two people, though going generous with two cheeks per person means you’ll have tasty leftovers to shred later. If your butcher’s out of cheeks, boneless beef short ribs cut into 8-ounce chunks’ll cook up the same way and give you that same fall-apart texture.
How Much Beef Cheek Should You Buy?
How many beef cheeks do you actually need? Here’s the practical answer: plan for one cheek per person as your baseline serving portion. Each cheek weighs roughly 12 ounces, which shrinks during cooking due to all that connective tissue breaking down.
A standard four-cheek recipe feeds about four people comfortably. If you’re cooking for a crowd or know your friends have big appetites, bump it up to two cheeks per person instead.
You’ll love that beef cheeks won’t break the bank either. They’re genuinely affordable compared to fancy cuts, making them perfect for feeding a group without stress. Just remember: these cheeks need time in the oven to become tender and shreddable. Your patience pays off deliciously.
Portion Size Per Person
When it comes to beef cheeks, the math is actually pretty straightforward. You’ll want about 6 ounces of cooked meat per person for a satisfying meal. That means you’re looking at roughly 8 ounces raw per person before cooking shrinkage happens. Since beef cheeks lose about 25–35% of their weight during braising, this calculation keeps you covered. One whole cheek typically weighs 8–12 ounces, so one cheek per person works perfectly. For a group of four, grab four cheeks or 2–3 larger ones totaling around 1.5–2 pounds raw. Pair each portion with sides like mashed potatoes or roasted vegetables for a complete plate. You’re not just feeding people—you’re creating a memorable dinner they’ll actually enjoy.
Weight And Trimming Considerations
Shopping for beef cheeks requires knowing what you’re actually getting. Individual cheeks weigh between 250g and 350g each, depending on the animal’s size. You’ll want to plan for about 6 portions from 4 pounds of beef cheeks total.
| Cheek Size | Weight | Servings |
|---|---|---|
| Standard | 250g (8 oz) | 1 portion |
| Large | 350g (12 oz) | 1.5 portions |
| 4 lbs total | 1.8 kg | 6 portions |
When trimming, you’re balancing flavor with fat content. Keep some marbling for taste, but remove excessive fat to prevent oversaturated cooking liquid. Since each animal provides only 2 cheeks, ordering ahead helps secure quality cuts. If your butcher runs short, boneless short ribs work great—just cut them into matching 250g pieces for consistent cooking times.
Trim and Prep Your Beef Cheeks

Before you even think about braising, there’s some important prep work to do. Beef cheeks need trimming to cook evenly and taste great. You’ll want to remove the tough membranes and silver skin covering each cheek. These bits don’t break down during cooking, so they’ve got to go. Use a sharp knife and take your time here. Once you’ve trimmed them, pat your beef cheeks dry with paper towels. This helps them brown better later. Now season generously with salt and pepper, plus whatever spices you’re using. Don’t hold back—these muscles are hearty and can handle bold flavoring. You’re basically prepping for success. Good prep means tender, delicious results in your braising pot.
Which Cooking Method Is Right for You?

So you’ve got your beef cheeks prepped and ready—now comes the fun part. You’ve basically got two solid options: braising and slow cooking.
Braising means you’ll sear those cheeks first, then nestle them into a flavorful liquid in the oven. It’s hands-on but incredibly rewarding. You’re looking at about three to four hours at low heat.
Slow cooking’s your friend if you want the ultimate set-it-and-forget-it approach. Toss everything into your slow cooker on low for eight to ten hours. The meat practically falls apart on its own.
Either way, you’re aiming for that 195–205°F internal temperature. That’s when the collagen breaks down and transforms into gelatin. The result? Incredibly tender, juicy meat that’ll make you look like a culinary genius.
The Classic Flavor Base: Garlic, Onions, Carrots, Celery, and Red Wine

When you brown your beef cheeks, you’ll want that classic mirepoix—garlic, onions, carrots, and celery—working hard to build aromatic depth. These vegetables caramelize and release their natural sugars, creating a savory foundation that’ll make your braising liquid taste incredible. Then you’ll deglaze with red wine, which doesn’t just add flavor—it’s got tannins and acidity that actually help tenderize the meat while it braises low and slow.
Building Aromatic Depth
Because beef cheeks are so rich and meaty, they need a solid flavor foundation to shine. You’ll want to build a classic mirepoix base using garlic, onions, carrots, and celery. This aromatic combo works together like a dream team.
Here’s what each ingredient does: garlic mellows during braising, adding depth without being pushy. Carrots bring subtle sweetness and beautiful color to your sauce. Celery lifts everything with crisp, vegetal notes that brighten the overall flavor.
When you deglaze your pan with red wine, you’re capturing all those browned, flavorful bits stuck to the bottom. The wine introduces tannins and acidity that create a velvety, robust backbone for your braising liquid.
These elements work in harmony, creating layers of flavor that let your beef cheeks truly shine.
Red Wine’s Tenderizing Magic
Within that braising liquid, red wine’s doing substantial work you might not expect. The acidity and tannins actively break down collagen in your beef cheeks, transforming tough meat into fork-tender perfection. You’re not just adding flavor—you’re engineering tenderness from the inside out.
Here’s the beauty: you don’t need expensive wine. End-of-bin Merlot or Cabernet Sauvignon works perfectly. The alcohol cooks off during those long hours, leaving concentrated fruit, spice, and mineral notes that enrich everything. That acidity also preserves moisture, creating a saucy, luscious texture when reduced into gravy.
Combined with your soffritto—garlic, onions, carrots, and celery—the red wine builds a balanced, deeply flavored sauce that makes beef cheeks genuinely craveable. This partnership transforms simple ingredients into restaurant-quality results at home.
Beef Cheeks Recipe: Complete Ingredient List

Ready to cook beef cheeks like a pro? You’ll need quality ingredients that complement slow cooking beautifully. Gather everything before you start, and you’re already halfway there.
Here’s what you’ll want on hand:
- Four beef cheeks (250–350 grams each), trimmed and ready for braising
- Red wine (about 2 cups) for that tenderizing magic we discussed
- Beef broth or stock to keep everything moist and flavorful
- Aromatics like onions, carrots, garlic, and fresh herbs for depth
Start with room-temperature beef cheeks. Cold meat won’t brown properly, and browning creates serious flavor. Your slow cooking journey depends on this foundation. Quality broth matters too—it’s basically your flavor backbone here.
Step-by-Step Instructions for Slow Cooker Cooking

Once you’ve got your ingredients ready, it’s time to get those beef cheeks into the slow cooker. First, trim any membranes and season your cheeks with salt and pepper generously. This ensures everything cooks evenly and tastes incredible.
Layer your beef cheeks directly in the slow cooker without adding liquids yet. They’ll release plenty of moisture naturally as they cook down.
Now comes the waiting game. Cook on LOW for 8 hours, or bump it to HIGH for 6 hours. You’ll know they’re done when the meat shreds easily with a fork.
Finally, make a cornstarch slurry by mixing cornstarch with water. Stir it into the cooking liquid and cook on HIGH for 30 minutes. This thickens everything into a rich, delicious gravy that makes your beef cheeks absolutely incredible.
Oven and Stovetop Methods for Beef Cheeks

If you don’t have a slow cooker or just prefer more hands-on cooking, the oven and stovetop are your best friends. Both methods transform tough beef cheeks into tender, flavorful masterpieces through braising.
Choose Your Method:
- Oven braising: Cover your beef cheeks in a Dutch oven at 325°F for 2.5–3.5 hours until fork-tender
- Stovetop searing: Brown meat first to build deep flavor, then simmer in broth or wine for 2.5–4 hours
- Brown before braising: The Maillard reaction creates a richer crust and more complex sauce
- Finish strong: Reduce that braising liquid into silky gravy and serve over potatoes or polenta
Both approaches deliver restaurant-quality results. The key? Low heat, patience, and letting time do the heavy lifting.
How Do You Thicken and Finish the Sauce?

You’ve got a few solid options for getting that sauce just right. Whisk together 1 tablespoon cornstarch with cold water, stir it in, and simmer for 15–30 minutes until you’ve got that perfect gravy-like consistency. If you’re not into cornstarch, try beurre manié (equal parts butter and flour) for a silkier finish that looks restaurant-quality.
Cornstarch Slurry Technique
How’s your braising liquid looking right now?
If it’s thinner than you’d like, a cornstarch slurry is your secret weapon. Here’s how you’ll master this technique:
- Whisk equal parts cornstarch and cold water until completely smooth with no lumps
- Stir your slurry gradually into simmering braising liquid while whisking constantly
- Simmer for 2–5 minutes until the sauce clings to a spoon’s back and looks glossy
- Strain the liquid before returning it to remove any starch clumps
The timing matters here—add your slurry only after your beef cheek’s already tender. This prevents over-thickening during long cooking. If you’ve overdone it, simply thin with beef stock or water and reheat briefly. You’ve got this down now.
High Heat Reduction Method
Now comes the fun part—finishing your sauce strong. After you’ve removed those tender beef cheeks, crank your heat to medium-high. You’ll watch your braising liquid shrink down beautifully—usually takes 8–15 minutes depending on how much you’ve got cooking.
Here’s where sauce reduction gets real: you’re concentrating all those rich flavors into something that coats the back of a spoon. That’s your signal you’re heading in the right direction.
Now grab a starch slurry—mix cornstarch or arrowroot with a little liquid. Whisk it in gradually until you hit that perfect thickness. Simmer for just 1–2 minutes so you don’t taste raw starch. Your sauce transforms into something glossy and gravy-like.
Too thick? Add beef stock. Too thin? Keep reducing.
Achieving Desired Sauce Consistency
What separates a mediocre beef cheek dish from a showstopper? A silky, luxurious sauce that actually clings to the meat.
You’ve got options here. The collagen breaking down during braising creates natural richness—that’s your secret weapon. To thicken, you can reduce the liquid until it coats the back of a spoon, or make a slurry with equal parts cornstarch and cold water. Cook the slurry for 2–5 minutes to activate it.
Here’s your finishing move:
- Remove the meat from the pan
- Simmer the liquid to concentrate flavors
- Strain for ultra-smooth texture
- Whisk in slurry gradually to avoid clumps
- Return cheeks to reabsorb moisture
Too thin? Add more slurry or keep reducing. Too thick? Whisk in beef stock or water until you hit that perfect coating consistency. You’ll nail it.
What to Serve With Beef Cheeks

Beef cheeks are rich, tender, and absolutely delicious—but they’re really the star of the show. You’ll want sides that complement their richness without competing for attention. Creamy mashed potatoes are your best friend here. They soak up that amazing braising liquid perfectly. Cauliflower mash or polenta work great too if you’re looking for alternatives.
Don’t skip the vegetables. Honey-glazed carrots, caramelized shallots, and roasted asparagus add sweetness and texture contrast. A simple green salad with arugula cuts through the richness beautifully.
Here’s the key: serve your shredded beef cheeks on a bed of starch with plenty of cooking liquid. This keeps everything saucy and connected. A robust red wine reduction ties the whole plate together. You’re creating a complete, satisfying meal that feels special without being complicated.
Keep Leftovers Fresh: Storage and Reheating Tips

So you’ve made a batch of beef cheeks and there’s actually some left over?
Smart move storing them properly. You’ll want to place your leftovers in an airtight container in the refrigerator for 3–4 days maximum. When reheating, you’ve got solid options:
- Reheat directly in the sauce to lock in moisture and flavor
- Use your microwave at 50% power for gentle warming
- Rewarm in a low oven if you prefer hands-off cooking
- Freeze extra braising liquid separately for up to 3 months
Here’s the thing about leftovers: they’re actually more versatile than you’d think. Shred that tender meat and pile it into tacos, stuff it in sandwiches, or serve it over cauliflower mash. Your leftovers become brand new meals with minimal effort.
Beef Cheeks FAQs: Common Questions Answered

Now that you’ve mastered storage and reheating, you’re probably wondering about the basics. What exactly are beef cheeks? They’re the cheek muscles from cows, and yes, they’re legitimately tough at first. But here’s the magic: braising transforms them into incredibly tender, melt-in-your-mouth bites.
You’ll want to cook them low and slow, usually two to four hours. The collagen and fat break down during braising, creating that luscious texture you’re after. Can’t find beef cheeks at your butcher? Boneless beef short ribs work great as substitutes.
They’re super affordable too, which means you can feed your family an impressive meal without breaking the bank. That’s the beef cheeks advantage right there.