Mastering the art of BBQ transforms ordinary weekends into unforgettable culinary adventures. We’ve all been there – standing over a grill watching our carefully planned meal turn into charcoal while wondering where we went wrong. The truth is BBQ isn’t just about throwing meat on hot coals and hoping for the best.
Real BBQ mastery comes from understanding the fundamentals that separate backyard heroes from weekend warriors. From controlling temperature zones to timing your proteins perfectly we’re about to share the game-changing techniques that’ll have your neighbors asking for your secrets. These aren’t complicated chef tricks – they’re simple proven methods that work every single time.
Whether you’re grilling your first burger or perfecting your hundredth brisket we’ll guide you through the essential steps that guarantee success. Get ready to transform your outdoor cooking from guesswork into an art form that’ll make every gathering memorable.
Essential BBQ Equipment and Tools
Having the right equipment transforms your BBQ experience from frustrating guesswork into confident cooking. We’ll walk you through the essential tools that make the difference between amateur grilling and professional-quality results.
Choosing the Right Grill
Gas grills offer convenience and precise temperature control for busy weeknight cooking. Weber Genesis and Char-Broil Performance series deliver consistent heat distribution across multiple burners. These grills heat up quickly and maintain steady temperatures without constant monitoring.
Charcoal grills provide authentic smoky flavor that gas simply cannot match. Weber Kettle grills remain the gold standard for backyard enthusiasts who prioritize taste over convenience. Kamado-style ceramic grills like Big Green Egg excel at both high-heat searing and low-and-slow smoking.
Pellet grills combine the best of both worlds with wood-fired flavor and digital temperature control. Traeger and Pit Boss models automatically feed wood pellets to maintain your desired temperature. These grills work exceptionally well for beginners learning temperature management.
Size matters when selecting your grill. A 22-inch kettle feeds a family of four comfortably. Larger gatherings require 26-inch models or multiple cooking zones on gas grills.
Must-Have BBQ Accessories
Long-handled tools keep your hands safe from heat while maintaining control over your food. We recommend 16-inch tongs for flipping delicate items and sturdy spatulas for burgers and steaks. Invest in stainless steel construction that won’t bend under pressure.
Grill brushes with brass or stainless steel bristles remove stuck-on residue from cooking grates. Clean grates prevent food from sticking and ensure even heat transfer. Replace brushes every season to avoid loose bristles contaminating your food.
Heat-resistant gloves protect your hands when handling hot grates or adjusting vents. Leather welding gloves work better than fabric alternatives for high-temperature tasks.
Chimney starters light charcoal without lighter fluid chemicals that can affect food flavor. Fill the top with charcoal and stuff newspaper in the bottom compartment. Light the paper and wait 15 minutes for evenly burning coals.
Aluminum foil serves multiple purposes from creating drip pans to wrapping foods for the Texas Crutch technique. Heavy-duty foil resists tearing during extended cooking sessions.
Temperature Control Tools
Instant-read thermometers eliminate guesswork when checking meat doneness. ThermoPop and Thermapen models provide accurate readings in under three seconds. Insert the probe into the thickest part of the meat for reliable results.
Wireless probe thermometers monitor internal meat temperature without opening the grill lid. These tools send alerts to your phone when food reaches target temperatures. We prefer models with multiple probes for cooking different cuts simultaneously.
Grill surface thermometers measure cooking grate temperature more accurately than built-in lid gauges. Place these dial thermometers directly on the grates where your food will cook.
Infrared thermometer guns measure surface temperatures across different grill zones instantly. Point and shoot to identify hot spots or cool areas that need adjustment.
| Temperature Tool | Best Use | Price Range |
|---|---|---|
| Instant-read thermometer | Quick doneness checks | $15-$100 |
| Wireless probe thermometer | Long cooking sessions | $50-$200 |
| Grill surface thermometer | Zone temperature mapping | $10-$25 |
| Infrared thermometer gun | Surface temperature scanning | $20-$60 |
Ingredients for Perfect BBQ

With the right equipment in place we can turn our attention to the foundation of exceptional BBQ: selecting premium ingredients and seasonings. Quality ingredients make the difference between ordinary grilled food and memorable BBQ that keeps guests talking long after the meal ends.
Selecting Quality Meats
We start every successful BBQ session by choosing fresh, high-quality cuts that deliver maximum flavor and tenderness. Our go-to selections include beef brisket, pork shoulder, ribs, chicken thighs, and artisanal sausages for their proven ability to absorb smoke and seasonings beautifully.
When shopping for meat we look for well-marbled cuts with adequate fat content. This marbling provides natural moisture and creates that coveted tender texture we all crave in great BBQ. Fat renders slowly during cooking and bastes the meat from within while adding incredible depth of flavor.
Freshness matters more than most people realize when it comes to BBQ success. We inspect meat for bright color, firm texture, and minimal liquid in the packaging. Proper storage before cooking also affects our final results, so we keep proteins refrigerated at consistent temperatures until we’re ready to season and cook.
Essential Dry Rubs and Seasonings
Dry rubs transform ordinary meat into flavor-packed BBQ by creating a delicious crust and penetrating deep into the protein. We rely on balanced blends that combine sweet, savory, and spicy elements for maximum impact.
Our classic BBQ dry rub foundation includes these essential components:
- Brown sugar – provides sweetness and promotes beautiful caramelization
- Paprika – delivers vibrant color and mild smoky flavor
- Chili powder or smoked paprika – adds depth and subtle heat
- Garlic powder and onion powder – contributes savory backbone
- Salt and black pepper – essential seasoning that enhances all other flavors
- Cayenne pepper – brings controllable spice kick
- Dry mustard – offers subtle tanginess that balances sweetness
We frequently use a straightforward blend combining brown sugar, regular and smoked paprika, dry mustard, salt, pepper, garlic powder, and onion powder. This versatile mixture works exceptionally well on chicken, pork, and beef cuts.
For those seeking more complex flavor profiles we incorporate additional spices like cumin, celery salt, oregano, thyme, and bay leaves. These advanced rubs allow us to customize seasonings for exact meats and regional BBQ styles.
Mixing our own rubs proves both economical and practical since homemade blends stay fresh for months when stored properly in airtight containers.
BBQ Sauce Options
BBQ sauces provide the finishing touch that can elevate our smoked meats from good to extraordinary. Regional preferences and personal taste guide our sauce selection, with each style offering distinct flavor characteristics.
| Sauce Type | Base Ingredient | Flavor Profile | Best Regional Match |
|---|---|---|---|
| Tomato-based | Ketchup/tomato paste | Sweet, tangy, sometimes smoky | Kansas City style |
| Vinegar-based | Apple cider vinegar | Sharp, tangy, cutting | Carolina style |
| Mustard-based | Yellow mustard | Tangy, slightly sweet | South Carolina |
| White sauce | Mayonnaise | Tangy with horseradish kick | Alabama style |
Tomato-based sauces remain the most popular choice for their familiar sweet and tangy flavor that complements most BBQ meats. These thick sauces caramelize beautifully when applied during the final stages of cooking.
Vinegar-based sauces cut through rich, fatty meats with their sharp acidity and work particularly well with pulled pork. Carolina pitmasters swear by these thin, penetrating sauces that don’t mask the meat’s natural flavors.
Mustard-based sauces offer unique tanginess with subtle sweetness that pairs exceptionally with pork and chicken. South Carolina’s signature yellow sauce creates a distinctive flavor profile that sets it apart from other regional styles.
White sauces provide creamy richness with horseradish heat that complements smoked chicken perfectly. Alabama’s mayonnaise-based creation offers cooling contrast to spicy dry rubs.
Some BBQ purists prefer highlighting meat’s natural flavors with dry rubs alone, while others finish their creations with sauce glazes or serve sauces on the side for individual preference. We recommend experimenting with different combinations to discover what works best for our exact taste preferences and the cuts we’re preparing.
Preparation and Setup

With our ingredients selected and equipment ready, we now focus on the critical preparation phase that separates exceptional BBQ from average grilling. Success begins with proper meat preparation and strategic grill setup.
Prep Work for Meats
We select appropriate meat cuts based on our chosen BBQ style, such as brisket for Texas BBQ or ribs for Southern BBQ. Allow meats to reach near room temperature before cooking to ensure even heat distribution throughout the cooking process.
Trim excess fat and silver skin from our cuts for optimal results, leaving only a thin layer to preserve flavor and moisture. For tougher cuts like brisket, we apply a generous dry rub and let the meat rest for 30 minutes before placing it on the grill.
When preparing flank steak or similar cuts, we score the surface and marinate for several hours to enhance tenderness and flavor development. For burger preparation, we mix approximately 2 tablespoons of mayonnaise per pound of ground beef to improve juiciness and help with patty formation.
Pat all meats dry before grilling to ensure proper searing and prevent steaming, which can compromise the exterior crust we want to achieve.
Setting Up Your Grill
We preheat our grill thoroughly to establish the proper cooking environment before adding any meat. For charcoal grills, arrange coals to create both direct and indirect heat zones by placing charcoal on one side of the grill.
Direct grilling requires spreading coals evenly across the grate, while indirect cooking uses coals positioned to one side only. Gas grill users should light burners on one side for indirect cooking while leaving the opposite side turned off.
Clean and oil grill grates before heating to prevent food from sticking during the cooking process. This simple step saves us from losing precious meat to stubborn grate surfaces.
Fire Management Basics
We manage fire intensity based on the exact requirements of our chosen meats. Quick cooking items like steaks and burgers need high heat for proper searing, while large or tough cuts such as brisket and ribs require low, indirect heat for extended cooking periods.
Monitor internal temperatures using a reliable meat thermometer throughout the cooking process. Brisket reaches optimal tenderness when internal temperature reaches 195 to 203°F, ensuring the connective tissues break down properly.
| Meat Type | Cooking Method | Target Temperature |
|---|---|---|
| Steaks/Burgers | Direct High Heat | 130-160°F (preference) |
| Brisket | Indirect Low Heat | 195-203°F |
| Ribs | Indirect Low Heat | 190-203°F |
Maintain consistent heat by adjusting air vents on charcoal grills or burner settings on gas models. For direct grilling, place meat directly over the heat source to achieve a seared exterior and juicy interior.
Indirect cooking requires positioning meat away from direct heat and covering the grill to create an oven like environment for slow, even cooking. Flip meats regularly during cooking to ensure even heat distribution, and always allow grilled items to rest after cooking so juices can redistribute throughout the meat.
Instructions for BBQ Success

With our preparation complete and grill ready, we can now focus on the precise techniques that transform good BBQ into exceptional results. These proven methods ensure consistent cooking and help us achieve professional-quality barbecue every time.
Temperature Control Techniques
Mastering temperature control starts with understanding how air vents regulate heat on your charcoal grill. We control temperature by adjusting these vents strategically – more air increases temperatures while less air reduces heat levels.
Our damper settings determine the exact temperature ranges we achieve:
| Heat Level | Temperature Range | Damper Setting |
|---|---|---|
| High Heat | 450-550°F | Fully open |
| Medium Heat | 350-450°F | Half open |
| Low Heat | 250-350°F | One-quarter open |
| Low and Slow/Smoke Zone | 225-275°F | One-quarter to one-eighth open |
These settings give us precise control over our cooking environment. We start with fully open vents for high-heat searing and gradually close them for slower cooking methods. The key lies in making small adjustments and allowing time for temperature changes to stabilize.
Timing Guidelines for Different Meats
Different cuts require exact cooking times to reach optimal doneness and safety. We follow these general guidelines while always checking internal temperatures:
| Meat Type | Cooking Time | Internal Temperature |
|---|---|---|
| Steaks | 4-12 minutes per side | Varies by preference |
| Chicken Breasts | 5-7 minutes per side | 165°F |
| Sausages | 5-10 minutes total | Turn frequently |
| Pork Chops | 5-7 minutes per side | 145°F |
| Ribs | 2-3 hours | Low and slow method |
These times serve as starting points since thickness and grill temperature affect actual cooking duration. We adjust timing based on visual cues like browning and internal temperature readings rather than relying solely on clock time.
Monitoring and Adjusting Heat
Consistent temperature monitoring ensures our BBQ success throughout the entire cooking process. We use a lid thermometer or probe thermometer to track grill temperature accurately rather than guessing based on visual indicators.
Regular vent adjustments help us maintain desired temperatures as fuel burns and weather conditions change. We make small incremental changes and wait several minutes before making additional adjustments to avoid temperature swings.
Maintaining grill cleanliness supports proper airflow and temperature control. We keep vents free from ash buildup and ensure adequate ventilation around the cooking chamber. Clean grates and interior surfaces also prevent hot spots that can cause uneven cooking.
These monitoring techniques allow us to respond quickly to temperature changes and maintain the ideal cooking environment for whatever we’re preparing.
Directions for Smoking Methods

Now that we’ve covered preparation and temperature control fundamentals, we’ll explore the exact smoking methods that transform your BBQ from good to extraordinary. Each technique offers unique advantages for creating perfectly smoked meats with exceptional flavor depth.
Hot Smoking Technique
Hot smoking combines cooking and flavoring your meat simultaneously at temperatures between 200°F and 250°F. We place food on cooking grates positioned over a water pan, which adds essential moisture while protecting the meat from direct heat exposure. The closed lid environment allows us to maintain consistent temperatures through careful vent adjustments.
This slow cooking method over indirect heat enables smoke to penetrate deep into the meat fibers. We achieve those coveted results including tender texture, rich flavor, and the prized bark formation with distinctive smoke rings. Temperature and smoke level control remain critical throughout the process to ensure optimal texture development and flavor infusion.
Water pans serve multiple purposes in our hot smoking setup. They enhance moisture retention, help flavors blend more effectively, and keep our meat tender during extended cooking periods. We recommend preheating the smoker before adding food and making gradual vent adjustments to maintain steady temperatures suited for your exact cut.
Cold Smoking Approach
Cold smoking takes a completely different approach by infusing smoky flavor without actually cooking the meat. We maintain temperatures below 90°F during this process, focusing purely on flavor enhancement while preserving the meat’s original raw texture. This technique works exceptionally well for items like cheese, fish, and pre-cured meats.
Successful cold smoking requires specialized equipment or smoke generators designed to produce consistent smoke without heat buildup. We need dedicated smoker setups that can maintain these lower temperatures over extended periods. The goal centers on achieving maximum smoke penetration while avoiding any cooking that would alter the meat’s fundamental characteristics.
Wood Selection for Flavor
Wood choice dramatically impacts our final BBQ flavor profile, with each variety contributing distinct taste characteristics to our smoked meats.
| Wood Type | Flavor Profile | Best Meat Pairings |
|---|---|---|
| Hickory | Strong, smoky, bacon-like | Pork and ribs |
| Mesquite | Intense and earthy | Bold-flavored meats (use sparingly) |
| Apple | Mild, sweet, fruity | Poultry, pork, and fish |
| Cherry | Mild, sweet, fruity | Poultry, pork, and fish |
| Oak | Versatile, medium smoky | All-around smoking |
We position wood chunks directly on or near our heat source to ensure slow, steady burning that produces optimal smoke output. Using adequate wood quantities delivers stronger smoky flavors, but we must balance the amount carefully to prevent bitterness or overwhelming taste that masks the meat’s natural flavors.
Spacing wood chunks along our charcoal snake setup creates progressive ignition that provides steady smoke production throughout extended cooking sessions. This method works particularly well for long cooks like brisket or pork shoulder where consistent smoke flavor development over several hours produces the best results.
Cooking Different Types of Meat

Different cuts require exact techniques to achieve optimal results on the grill. We’ll walk through proven methods for the most popular BBQ meats that consistently deliver tender, flavorful outcomes.
BBQ Chicken Perfection
Chicken demands careful attention to avoid the common pitfall of drying out during cooking. We recommend using moderate heat and indirect cooking methods to ensure even heat distribution throughout the meat. Start by setting up your grill for indirect heat, keeping the chicken away from direct flame contact.
Basting becomes crucial for maintaining moisture levels throughout the cooking process. Apply your chosen marinade or sauce every 20-30 minutes to create a protective barrier against heat. This technique also builds layers of flavor as the liquid caramelizes on the surface.
Temperature monitoring ensures both safety and quality. We always use a meat thermometer to verify the internal temperature reaches 165°F before serving. Insert the probe into the thickest part of the thigh, avoiding bone contact for accurate readings.
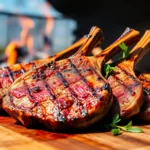
Mastering Beef Brisket
Brisket preparation starts with proper trimming to maintain moisture during the long cooking process. We trim the fat cap to approximately 1/4-inch thickness, which provides sufficient protection without preventing smoke penetration or seasoning absorption.
Temperature control becomes critical for brisket success. Set your smoker between 215°F and 225°F for optimal results. This range breaks down tough connective tissues without overcooking the exterior portions of the meat.
Wood selection significantly impacts the final flavor profile. We prefer hardwoods like oak or cherry for brisket, maintaining a steady flow of thin blue smoke throughout the cooking process. Thick white smoke indicates incomplete combustion and creates bitter flavors.
The cooking process follows a exact temperature progression for best results. Smoke the brisket until the internal temperature reaches 165°F, then wrap in foil to prevent moisture loss. Continue cooking until the internal temperature hits 195°F for proper tenderness and easy slicing.
| Brisket Temperature Guide | Temperature | Action |
|---|---|---|
| Smoker Temperature | 215°F – 225°F | Maintain throughout cook |
| First Phase | Until 165°F internal | Unwrapped smoking |
| Second Phase | 165°F – 195°F internal | Wrapped in foil |
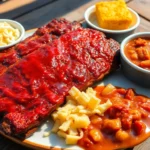
Pork Ribs and Pulled Pork
Pork shoulder serves as the foundation for exceptional pulled pork and requires low temperature cooking to break down connective tissue properly. We cook pork shoulder at temperatures similar to brisket, allowing time for collagen conversion into gelatin that creates the signature tender texture.
Ribs benefit from indirect heat application combined with strategic seasoning approaches. Apply dry rubs several hours before cooking to allow flavors to penetrate the meat surface. Position ribs away from direct heat sources to prevent burning while ensuring thorough cooking.
Moisture management during pork cooking prevents drying and maintains the juicy texture that defines quality BBQ. We monitor internal temperatures closely and use foil wrapping techniques when necessary to preserve natural juices. Proper temperature control and adequate cooking time transform tough cuts into tender, flavorful centerpieces that pull apart easily with minimal effort.
Finishing Touches and Serving

After perfecting our smoking and cooking techniques, we need to master the final steps that separate exceptional BBQ from merely good barbecue. These finishing touches ensure our carefully prepared meat delivers maximum flavor and tenderness to every guest.
Resting Your Meat
We cannot emphasize enough how crucial resting becomes after removing meat from the grill. Our meat needs 5 to 15 minutes of rest time depending on the cut size to achieve optimal juiciness and tenderness. During the cooking process, juices move toward the surface of the meat, and resting allows these essential liquids to redistribute evenly throughout the entire cut.
Cutting into meat immediately after grilling causes all those precious juices to spill out onto the cutting board rather than staying in the meat where they belong. This mistake results in dry, disappointing barbecue that fails to showcase our careful preparation and cooking efforts. We recommend tenting the meat loosely with aluminum foil during the resting period to maintain warmth while allowing the redistribution process to occur naturally.
Sauce Application Timing
Strategic sauce application can make or break our BBQ masterpiece. We apply barbecue sauce during the last few minutes of grilling rather than at the beginning of the cooking process to prevent burning and achieve the perfect glaze. Most barbecue sauces contain sugars that burn quickly when exposed to prolonged high heat, creating bitter flavors that overpower our carefully crafted smoke and seasoning profiles.
Brushing sauce onto meat towards the end of cooking creates a beautiful, flavorful glaze without the risk of charring. We typically apply the first coat of sauce about 10 minutes before removing the meat from the grill, then add a second light coating just before serving. This technique allows the sauce to caramelize slightly while maintaining its intended flavor profile and creating an appealing glossy finish.
Proper Slicing Techniques
Our slicing technique directly impacts the final texture and eating experience of our barbecue. We always slice grilled meat against the grain to maximize tenderness and make each bite easier to chew. The grain refers to the direction in which muscle fibers run through the meat, and cutting perpendicular to these fibers shortens them significantly.
Using a sharp knife becomes essential for clean, precise cuts that preserve the meat’s structure and presentation. We slice thinly to enhance texture and create more surface area for sauce adherence. For cuts like brisket or flank steak, we first identify the grain direction by looking for the parallel lines of muscle fibers, then position our knife to cut directly across these lines at a 90-degree angle.
| Resting Time Guidelines | Cut Size | Rest Duration |
|---|---|---|
| Small cuts (chicken thighs, steaks) | Individual portions | 5-8 minutes |
| Medium cuts (whole chicken, pork tenderloin) | 2-4 pounds | 10-12 minutes |
| Large cuts (brisket, pork shoulder) | 5+ pounds | 15+ minutes |
Make-Ahead Tips and Storage

Smart preparation and proper storage transform your BBQ experience from stressful to seamless. These strategic approaches ensure consistent results while maximizing flavor and minimizing waste.
Prep Work You Can Do in Advance
Marinate your meat or vegetables the night before to enhance flavor and tenderness. This extended marinating time allows seasonings to penetrate deeply into the protein fibers.
Pre-cut and season vegetables or side dishes so they are ready to grill when you fire up the pit. We recommend storing prepped vegetables in airtight containers to maintain freshness.
Prepare sauces and rubs ahead of time to save precious minutes during grilling. Homemade rubs actually improve in flavor when mixed 24 hours before use.
For charcoal grills, arrange charcoal briquettes in the chimney starter early for faster lighting. This preparation step reduces wait time when you are ready to start cooking.
Preheat the grill before cooking to ensure even heat distribution and reduce sticking. We suggest allowing 15-20 minutes for proper preheating depending on your grill type.
Storing Leftover BBQ
Allow grilled food to cool slightly before refrigerating, but never leave at room temperature for over 2 hours. This cooling period prevents condensation while maintaining food safety standards.
Store leftovers in airtight containers to preserve freshness and prevent contamination. Glass containers work exceptionally well for maintaining moisture and preventing flavor transfer.
For charcoal, wood chips, or pellets, use airtight storage bins with locking lids to keep them dry and ready for use. Moisture degrades fuel quality and affects burning characteristics significantly.
When storing the grill itself for long-term periods, clean it fully and ensure it is completely dry before covering or storing. This prevents rust formation and extends your equipment’s lifespan.
Reheating Methods
Oven reheating at low temperature around 250-300°F helps retain moisture without overcooking your carefully prepared BBQ. Wrap meats in foil with a splash of apple juice or broth for best results.
For smoky flavor restoration, reheat briefly on the grill over indirect heat. This method revives the authentic BBQ taste while warming the meat evenly.
Microwave reheating offers speed but can dry out BBQ quickly. Cover food with a damp paper towel to maintain moisture during the reheating process.
Avoid reheating BBQ repeatedly as this leads to dry, tough texture. We recommend portioning leftovers into single-serving containers for optimal reheating results.
Conclusion
BBQ mastery isn’t about complicated techniques or expensive equipment – it’s about understanding the fundamentals and applying them consistently. We’ve walked you through everything from selecting quality ingredients to perfecting your temperature control and timing.
The beauty of great BBQ lies in the details: proper preparation, strategic smoking, and those finishing touches that make all the difference. With these proven methods in your toolkit, you’re ready to transform your backyard gatherings into memorable culinary experiences.
Remember, every pitmaster started somewhere. Start with the basics we’ve outlined, practice regularly, and don’t be afraid to experiment with different rubs and wood combinations. Your friends and family will taste the difference, and you’ll develop the confidence that comes with consistent, delicious results every time you fire up the grill.
Frequently Asked Questions
What are the essential BBQ tools every beginner needs?
Every beginner needs long-handled tools for safety, a reliable grill brush for cleaning, heat-resistant gloves, and a chimney starter for charcoal grills. Most importantly, invest in an instant-read thermometer to eliminate guesswork and ensure perfectly cooked meat every time.
Which type of grill is best for BBQ – gas, charcoal, or pellet?
Each grill type has advantages: gas grills offer convenience and consistent heat control, charcoal grills provide authentic smoky flavor, and pellet grills combine ease of use with wood-fired taste. Choose based on your priorities – convenience, flavor intensity, or versatility.
How do I control temperature on a charcoal grill?
Control temperature by adjusting the air vents on your charcoal grill. Open vents increase airflow and raise temperature, while closing them reduces heat. Maintain 200-250°F for low heat, 300-350°F for medium, and 400°F+ for high heat cooking.
What’s the difference between hot smoking and cold smoking?
Hot smoking cooks and flavors meat simultaneously at 200-250°F, perfect for brisket and ribs. Cold smoking infuses smoky flavor without cooking, typically below 90°F, ideal for cheese, fish, or pre-cooked items that need flavor enhancement.
How long should I rest meat after BBQ cooking?
Rest meat 5-10 minutes for smaller cuts like chicken pieces, 15-20 minutes for steaks and chops, and 30-60 minutes for large roasts like brisket. This allows juices to redistribute, ensuring maximum tenderness and flavor retention.
What wood types work best for different meats?
Oak and hickory provide strong, classic BBQ flavor perfect for beef and pork. Apple and cherry offer mild, sweet notes ideal for chicken and fish. Mesquite delivers intense flavor for red meat, while pecan provides subtle nuttiness for all meats.
How can I keep BBQ chicken from drying out?
Use indirect heat at moderate temperatures (325-350°F), cook skin-side up initially, and baste regularly with butter or marinade. Remove chicken when internal temperature reaches 165°F and let it rest before serving to retain maximum moisture.
When should I apply BBQ sauce during cooking?
Apply sauce during the last 10-15 minutes of cooking to prevent burning from sugar content. For multiple coats, brush on thin layers every 5 minutes. Always reserve some sauce for serving to maintain food safety and fresh flavor.
How do I properly store leftover BBQ?
Store leftover BBQ in airtight containers in the refrigerator for up to 4 days or freeze for up to 3 months. Separate meat from sauce when storing to prevent sogginess and maintain texture quality for reheating.
What’s the best way to reheat leftover BBQ?
Reheat BBQ in a 300°F oven wrapped in foil with a splash of broth or apple juice to retain moisture. Alternatively, use low heat on the grill. Avoid microwaving as it can make meat tough and dry out the texture.