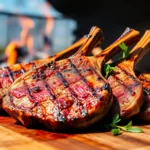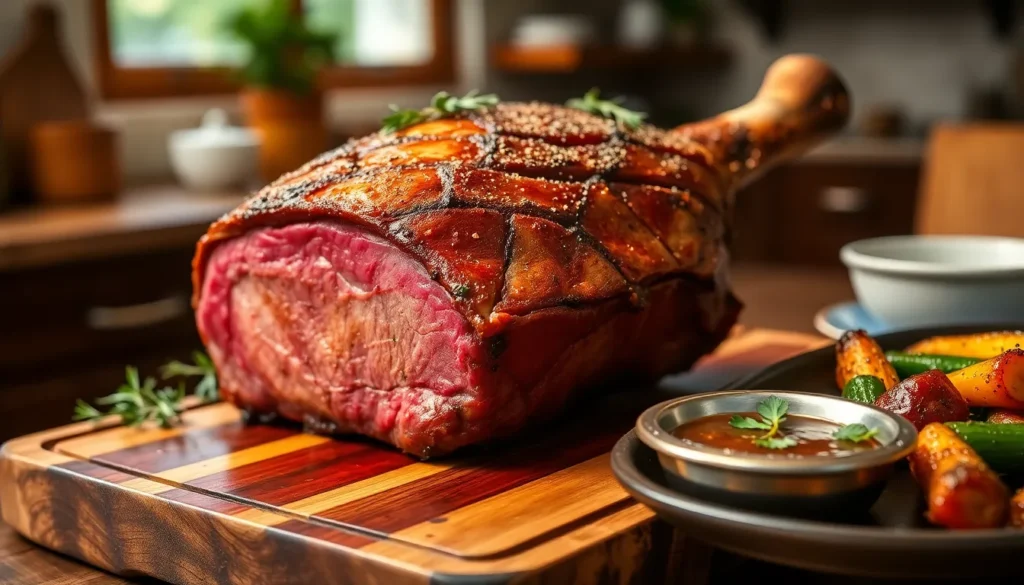
We’ve discovered the ultimate secret to tender, juicy beef that’ll transform your dinner game forever. The boneless beef cap, also known as the coulotte or top sirloin cap, is a hidden gem that delivers restaurant-quality flavor at home without very costly.
This triangular cut comes from the top of the sirloin and packs incredible marbling that melts into pure deliciousness when cooked properly. We’re talking about beef that’s tender enough to cut with a fork yet bold enough to satisfy the most serious carnivores at your table.
What makes this cut truly special is its versatility – whether you’re grilling for a backyard barbecue or roasting for Sunday dinner, the boneless beef cap delivers consistent results that’ll have everyone asking for seconds. Let’s jump into our foolproof method that guarantees perfectly cooked beef every single time.
What Is Beef Cap and Why You’ll Love It
Beef cap sits at the top of the sirloin primal cut and delivers exceptional flavor with remarkable tenderness. This triangular shaped muscle gets its name from literally capping the top sirloin area. We source our beef cap from the gluteus medius muscle which creates that distinctive marbling pattern you’ll notice running through the meat.
The cut weighs between 2 to 4 pounds typically and features a beautiful fat cap on one side. This external fat layer bastes the meat naturally during cooking while protecting it from drying out. We love how this natural protection system works better than any artificial method.
| Beef Cap Characteristics | Details |
|---|---|
| Average Weight | 2-4 pounds |
| Muscle Source | Gluteus medius |
| Marbling Level | Moderate to high |
| Fat Cap Thickness | 1/4 to 1/2 inch |
| Cooking Temperature Range | 125°F to 145°F |
The marbling throughout beef cap creates pockets of flavor that melt during cooking. These intramuscular fat deposits keep the meat moist while adding richness to every bite. We find this cut responds beautifully to both high heat searing and low temperature roasting methods.
Your butcher might label this cut as coulotte steak or top sirloin cap depending on regional preferences. Some grocery stores sell it as picanha when catering to Brazilian barbecue traditions. The name variations don’t change the exceptional eating quality this cut delivers.
Beef cap costs significantly less than premium steaks like ribeye or strip loin while delivering comparable flavor and tenderness. We appreciate how this cut gives home cooks access to restaurant quality results without breaking the budget. The generous size makes it perfect for feeding families or entertaining guests.
The grain structure in beef cap runs in one clear direction making it easy to slice properly for maximum tenderness. We recommend slicing against the grain at a 45 degree angle for the best texture. This cutting technique transforms even well done beef cap into tender satisfying bites.
Ingredients

To create this exceptional boneless beef cap roast, we’ll need ingredients for the meat itself, an optional marinade, and a flavorful seasoning rub. The following ingredients will ensure optimal flavor and tenderness for your final dish.
For the Beef Cap
- 1.2 to 3.5 pounds boneless beef cap (top sirloin cap, coulotte, picanha, or rump cap)
- Fat cap intact if possible (for flavor and moisture)
For the Marinade
This chimichurri-style marinade adds incredible depth of flavor and helps tenderize the meat:
- 3 cloves garlic, minced
- 1 cup fresh coriander leaves, chopped
- 5 spring onions, chopped
- 1/2 cup flat leaf parsley, chopped
- 1/2 cup red wine vinegar
- Juice of 1/2 lemon
- 1 teaspoon toasted coriander seeds
- 1 teaspoon toasted cumin seeds
- 1 teaspoon salt
- Freshly ground black pepper
- 1/2 cup vegetable oil or olive oil
For the Seasoning Rub
- 2 1/2 teaspoons kosher salt or coarse salt (sal grosso)
- 1 tablespoon olive oil
- 1 tablespoon herbes de Provence or dried oregano
- 1 1/2 teaspoons Dijon mustard (optional)
- 1 teaspoon coarse salt
- Ground black pepper, to taste
Equipment Needed

Successfully preparing our boneless beef cap roast requires the right tools to achieve that perfect combination of tender interior and crispy exterior. We’ve compiled the essential equipment that makes the difference between good and exceptional results.
Our oven serves as the foundation for this cooking method. We need a conventional oven with adjustable racks and a reliable broiler function for finishing touches. The ability to maintain consistent low temperatures around 275°F proves crucial for the slow roasting technique that keeps our beef cap incredibly tender.
A heavy roasting pan or cast iron skillet provides the ideal cooking vessel for our roast. Cast iron excels at heat retention and distribution while creating beautiful browning on the bottom of our meat. The heavy construction prevents hot spots that could lead to uneven cooking.
We recommend placing a wire rack inside our roasting pan to elevate the beef cap above any accumulated juices. This positioning allows hot air to circulate completely around the roast while preventing the bottom from becoming soggy. The elevated cooking surface promotes even browning on all sides.
A reliable meat thermometer becomes our best friend when monitoring internal temperatures. Digital instant read thermometers offer the most accurate readings to ensure we hit that perfect 120°F for medium rare doneness. We insert the probe into the thickest part of the roast away from any fat pockets.
Sharp knives play multiple roles in our preparation process. We use them for initial trimming of excess fat and silver skin before seasoning. After cooking and resting, the same knife helps us slice against the grain at the proper 45 degree angle for maximum tenderness.
Small mixing bowls or dishes help us prepare and combine our seasoning rub ingredients. We can easily blend salt, herbs, garlic, and olive oil into a cohesive paste that coats our roast evenly.
Finally, we need a serving platter and aluminum foil for the critical resting period. The platter provides space for our finished roast while the foil tent helps retain heat during the resting phase that allows juices to redistribute throughout the meat.
Prep Instructions

Proper preparation transforms our beef cap from a great cut into an exceptional roast. We’ll walk through the essential steps to ensure maximum tenderness and flavor.
Trimming the Beef Cap
We begin with our boneless top sirloin cap and focus on strategic trimming for optimal results. Remove any excess silver skin or tough connective tissue using a sharp boning knife, but we must keep the fat cap completely intact. This generous layer of fat serves as our natural basting system during cooking, adding both flavor and juiciness to the final roast.
We should leave approximately ¼ to ½ inch of fat on one side since this helps continuously baste the meat throughout the roasting process. The fat cap prevents the beef from drying out while creating that coveted crispy exterior we’re aiming for.
Marinating the Meat
We have two excellent approaches for improving our beef cap’s natural flavors. For those who prefer preserving the meat’s inherent taste, we can skip marinating entirely and rely on our seasoning rub alone. But, a marinade significantly enhances tenderness and adds complex flavor layers.
Our recommended marinade combines olive oil, Dijon mustard, garlic granules, and fresh herbs like thyme and rosemary mixed with salt for optimal seasoning penetration. We allow the beef cap to marinate for 2 to 24 hours in the refrigerator, ensuring the flavors fully penetrate the meat fibers.
Critical timing requires removing our beef cap from the refrigerator about 2 hours before cooking. This allows the meat to reach room temperature, promoting even heat distribution throughout the roasting process.
Preparing the Seasoning Rub
We create our flavorful herb rub by combining garlic granules, dried thyme, dried rosemary, and coarse salt in a small mixing bowl. For additional depth, we can incorporate ground porcini mushrooms or other aromatic spices based on personal preference.
The Brazilian picanha approach uses generous kosher salt, freshly ground black pepper, and optionally dried oregano applied directly to the fat cap side. We rub this mixture thoroughly over the entire surface of our beef cap until achieving a paste-like consistency for maximum flavor adherence.
Our seasoning technique involves working the rub into the meat’s surface with firm pressure, ensuring complete coverage. This creates the foundation for developing that beautiful crust while the interior remains tender and juicy.
Cooking Instructions

Our boneless beef cap transforms into a masterpiece using any of these three proven cooking methods that maximize flavor and tenderness. Each technique offers unique advantages for achieving perfect doneness while developing that coveted caramelized crust.
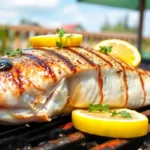
Grilling Method
We start by preheating our grill to high heat to achieve the ideal searing temperature. Generously season the beef cap with coarse salt and freshly ground black pepper for maximum flavor penetration.
Place the roast fat cap side down on the direct heat zone of our grill. This positioning allows the fat to render properly and create natural basting during the initial sear. We sear for 3-4 minutes until the fat cap develops a golden brown crust.
Flip the roast and sear the opposite side for another 3-4 minutes to lock in juices. The high heat creates the Maillard reaction that develops complex flavors throughout the meat.
Move the beef cap to the indirect heat zone and close the grill lid. We continue cooking until the internal temperature reaches our desired doneness level:
| Doneness Level | Internal Temperature |
|---|---|
| Rare | 120-125°F |
| Medium-Rare | 130°F |
| Medium | 135-140°F |
Rest the meat for 10-15 minutes before slicing against the grain at a 45-degree angle for optimal tenderness.
Oven Roasting Method
We preheat our oven to 275°F for slow roasting or 325°F for quicker results. Remove the beef cap from refrigeration 1-2 hours beforehand to reach room temperature for even cooking.
Rub the entire surface with olive oil and Dijon mustard if desired. Apply our prepared herb seasoning blend evenly across all surfaces for maximum flavor development.
Heat a heavy skillet or cast iron pan over medium-high heat. Sear the beef cap fat side down for 3 minutes to render the fat and create initial browning. Flip and sear each remaining side for 3 minutes until all surfaces develop a golden crust.
Transfer the seared roast to a wire rack positioned in our roasting pan. This elevation promotes even air circulation and prevents the bottom from becoming soggy.
| Oven Temperature | Cooking Time | Target Temperature |
|---|---|---|
| 275°F | 13 minutes per pound | 130°F for medium-rare |
| 325°F | 30-45 minutes total | 130°F for medium-rare |
After reaching target temperature we turn off the oven and leave the roast inside for one additional hour without opening the door. This resting period allows the meat to tenderize further while maintaining warmth.
Cover loosely with foil before final slicing to preserve moisture and temperature.
Reverse Sear Technique
We begin by slowly cooking the beef cap in a low 225-275°F oven until it reaches an internal temperature 10-15°F below our target doneness. This gentle approach ensures even cooking throughout the entire roast.
Monitor the internal temperature carefully using our meat thermometer. Remove the beef cap from the oven when it reaches the appropriate pre-sear temperature.
Allow the meat to rest briefly while we heat a cast iron skillet or grill to very high heat. The surface should be smoking hot for optimal crust development.
Sear the beef cap fat side down first for 3 minutes to achieve maximum caramelization. The high heat creates an exceptional crust while the interior remains perfectly cooked to our desired temperature.
Flip and sear each remaining side for 3 minutes until all surfaces develop a deep golden brown color. This final searing step elevates both flavor and visual appeal.
The reverse sear method provides precise control over doneness while guaranteeing a flavorful exterior crust that rivals any steakhouse preparation.
Temperature Guidelines and Doneness

Understanding proper internal temperatures is crucial for achieving the perfect boneless beef cap that balances safety with optimal flavor and texture. We recommend using a reliable meat thermometer to monitor the cooking process and ensure consistent results every time.
Safe Internal Temperature Standards
The USDA recommends cooking beef steaks and roasts to at least 145°F with a 3-minute rest time for food safety. But, many home cooks prefer lower temperatures for rare to medium rare doneness, which requires careful attention to proper handling and cooking techniques.
| Doneness Level | Internal Temperature (°F) | Rest Time |
|---|---|---|
| Rare | 120–125 | 5 minutes |
| Medium Rare | 130 (before rest), 135 (final) | 5 minutes |
| Medium | 140 | 3 minutes (USDA safe) |
Temperature Monitoring During Cooking
We strongly recommend pulling the beef cap from heat when it reaches 120°F to 135°F, depending on your preferred doneness level. Carryover cooking will continue to raise the internal temperature by 5 to 10 degrees during the resting period. This technique prevents overcooking while allowing the meat to reach its final target temperature naturally.
Achieving Perfect Doneness
For oven roasting at 275°F, we target an internal temperature between 120°F and 125°F for rare doneness. This typically requires about 13 minutes per pound for a 2.25-pound roast. After reaching the target temperature, we turn off the oven and let the meat rest inside for one hour without opening the door.
When pan searing ribeye cap steaks that are 1 to 1.5 inches thick, we cook for 7 to 11 minutes total, checking for 130°F before the final rest. The steak should reach a final temperature of 135°F after resting covered for 5 minutes.
Grilling Temperature Control
Maintain your grill temperature between 250°F and 350°F to prevent overcooking the exterior before the interior reaches the desired doneness. Lower temperatures allow for more even cooking throughout the thick beef cap while developing a beautiful crust on the fat cap side.
Using these temperature guidelines ensures your boneless beef cap delivers the perfect combination of safety, tenderness, and flavor that makes this cut truly exceptional.
Resting and Slicing

Once our boneless beef cap reaches the perfect internal temperature, the cooking process isn’t quite complete. These final steps will ensure our roast delivers maximum tenderness and flavor in every bite.
Proper Resting Technique
We always rest our boneless beef cap immediately after removing it from heat to allow the internal juices to redistribute evenly throughout the meat. Remove the roast from the oven or grill and loosely tent it with aluminum foil to retain warmth while preventing overcooking.
Rest the meat for at least 10 to 15 minutes before slicing. This crucial waiting period prevents the juices from running out when we cut into the roast and keeps the meat moist and tender. We’ve found that skipping this step results in dry meat and lost flavors that end up on the cutting board instead of in our mouths.
During the resting period, the internal temperature will continue to rise slightly, and the muscle fibers will relax. This process ensures that each slice retains its natural juices and delivers the full flavor potential of our carefully prepared beef cap.
How to Slice Against the Grain
Proper slicing technique transforms our tender beef cap into perfectly chewable portions that showcase the meat’s natural tenderness. First, we identify the grain direction by looking for the muscle fibers running through the meat.
The grain in a top sirloin cap typically runs lengthwise along the roast. We always slice against the grain, cutting perpendicular to these muscle fibers to shorten them and create maximum tenderness. This technique makes the meat significantly easier to chew and enhances the overall eating experience.
Cut the beef cap crosswise into thin, even slices using a sharp carving knife. We aim for slices that are approximately ¼ to ½ inch thick for optimal texture and presentation. Each slice should cleanly separate the muscle fibers, creating tender portions that practically melt in your mouth.
Position the roast on a stable cutting board and use smooth, confident strokes with your knife. We find that consistent slice thickness ensures even cooking carryover and creates an attractive presentation for serving.
Serving Suggestions

We enhance the rich flavors of our perfectly cooked boneless beef cap with thoughtful accompaniments that complement its natural beef taste. The versatility of this cut allows us to pair it with both classic and contemporary sides and sauces.
Side Dishes
Roasted vegetables bring out the best in our beef cap while adding vibrant colors to the plate. We recommend asparagus spears roasted with olive oil and garlic for their crisp texture and bright flavor. Brussels sprouts caramelized with balsamic vinegar create a delightful contrast to the rich meat. Baby carrots glazed with honey and thyme offer natural sweetness that balances the savory beef.
Potato preparations work exceptionally well alongside this cut. Our creamy mashed potatoes with butter and cream provide a luxurious base that soaks up the meat’s natural juices. Roasted baby potatoes tossed with rosemary and sea salt deliver crispy exteriors and fluffy interiors that complement the beef’s texture.
Fresh salads add brightness to the plate without overwhelming the main course. We prepare arugula salads with lemon vinaigrette to cut through the richness of the beef cap. Mixed greens with cherry tomatoes and cucumber provide refreshing elements that cleanse the palate between bites.
Grain-based sides round out the meal beautifully. Rice pilaf with toasted almonds and herbs absorbs the meat’s flavorful juices while adding subtle nuttiness. Garlic buttered noodles create comfort food appeal that pairs naturally with the hearty beef flavors.
Sauce Pairings
Chimichurri emerges as the perfect companion for our boneless beef cap due to its vibrant herb profile. We blend fresh parsley, cilantro, garlic, red wine vinegar, and olive oil to create this Argentine sauce that cuts through the meat’s richness while improving its natural flavors. The acidic components in chimichurri help tenderize each bite while adding fresh herb complexity.
Molho Campeiro salsa brings Brazilian flair to our beef cap presentation. We combine diced tomatoes, red onions, bell peppers, fresh parsley, vinegar, and oil to create this colorful salsa that adds bright acidity and fresh vegetable textures. This traditional Brazilian accompaniment perfectly complements the picanha preparation method.
Classic wine-based sauces elevate the dining experience significantly. Our red wine reduction concentrates the flavors of good quality wine with beef stock and herbs to create a glossy sauce that amplifies the meat’s savory notes. Beef jus made from pan drippings provides concentrated beef flavor that enhances rather than masks the cut’s natural taste.
Sharp and tangy sauces provide excellent contrast to the beef’s richness. We prepare horseradish cream by combining fresh grated horseradish with sour cream and chives for a cooling yet spicy accompaniment. Dijon mustard sauce mixed with herbs and white wine creates sophisticated flavor profiles that complement the meat without overwhelming its taste.
Storage and Reheating

Proper storage extends the life of your perfectly cooked boneless beef cap while maintaining its exceptional flavor and texture. We’ve developed these proven methods to help you preserve and reheat your roast for maximum enjoyment.
Refrigerator Storage
We recommend cooling your cooked beef cap to room temperature within 2 hours to prevent bacterial growth. Place the roast in an airtight container or wrap it tightly with aluminum foil or plastic wrap for optimal freshness. Your properly stored beef cap will maintain its quality in the refrigerator for up to 3-4 days.
Store leftover slices separately from the whole roast when possible to preserve moisture and prevent oxidation. We find that wrapping individual portions helps maintain the meat’s natural juices and makes reheating more convenient for single servings.
Freezing Instructions
Begin the freezing process by ensuring your beef cap roast has cooled completely to room temperature. Wrap the meat tightly in freezer-safe materials or place it in airtight freezer containers to prevent freezer burn and maintain quality.
Label each package with the date and contents for easy identification and rotation. We recommend freezing your boneless beef cap for up to 3 months for best quality and flavor retention. Slice the roast before freezing if you prefer individual portions for quicker thawing and reheating.
Reheating Tips
Oven reheating produces the most consistent results for maintaining the beef cap’s original texture and flavor. Preheat your oven to 325°F and place the roast on a wire rack with loose foil covering. Heat until the internal temperature reaches 165°F which typically takes 10-20 minutes depending on portion size.
Microwave reheating works well for quick single servings when you use a microwave-safe dish covered with a damp paper towel. Heat in 30-second intervals until warmed through to prevent overcooking and maintain moisture.
Skillet reheating offers excellent control for sliced portions over medium heat in a non-stick pan. We suggest brief heating periods to prevent the meat from becoming tough while ensuring it reaches safe serving temperatures throughout.
Recipe Variations

The versatility of boneless beef cap allows us to explore exciting international flavor profiles that transform this cut into distinctly different culinary experiences. Each variation showcases the meat’s natural tenderness while incorporating authentic regional cooking techniques and seasonings.
Brazilian-Style Picanha
Brazilian picanha represents the traditional preparation that celebrates the beef cap’s natural flavors with minimal but impactful seasoning. We season the roast generously with coarse kosher salt or sal grosso, freshly ground black pepper, and dried oregano for authentic flavor. The slow roasting method at 275°F allows the generous fat cap to baste the meat naturally while developing incredible tenderness throughout the cooking process.
After reaching the desired internal temperature, we finish the picanha under high heat or a broiler to create that signature crispy exterior crust that Brazilians treasure. The resting period under loose foil becomes crucial for allowing the juices to redistribute before slicing thinly against the grain.
We recommend serving Brazilian-style picanha with traditional Molho Campeiro salsa, which combines diced tomatoes, onions, bell peppers, and Italian parsley with white wine vinegar, vegetable oil, salt, oregano, and black pepper for a fresh accompaniment that complements the rich beef perfectly.
Asian-Inspired Preparation
Our Asian-inspired variation transforms the beef cap through strategic marination and finishing techniques that emphasize umami flavors. We create a marinade using soy sauce, minced garlic, fresh ginger, and sesame oil to infuse the meat with distinctive Asian flavors before cooking.
The cooking technique begins by searing the fat cap side down in a hot pan for exactly 3 minutes to render the fat and develop deep flavor before flipping to sear the opposite side. We then finish the beef cap using reverse searing or traditional roasting methods to achieve the perfect doneness while maintaining the Asian flavor profile.
For serving, we garnish with toasted sesame seeds and sliced green onions, or prepare a dipping sauce combining soy sauce, chili, and lime juice for an umami-packed experience that highlights the beef’s natural richness through complementary Asian flavors.
Mediterranean Herb Crust
The Mediterranean variation creates an aromatic herb crust that transforms the beef cap into a sophisticated roast with complex flavors. We prepare a paste using olive oil, garlic granules, coarse salt, dried thyme, rosemary, and oregano, sometimes adding ground dried mushrooms for additional umami depth.
We apply this herb mixture to the room temperature beef cap before slow roasting at 275°F for approximately 13 minutes per pound. The unique Mediterranean technique involves turning off the oven after cooking and leaving the meat inside for one hour without opening the door, allowing the flavors to deepen while the meat continues to rest.
This preparation method results in a beautifully seasoned exterior that penetrates throughout the meat, creating layers of Mediterranean flavors that pair excellently with roasted vegetables, olives, and crusty bread for an authentic Mediterranean dining experience.
Troubleshooting Tips

Even experienced cooks encounter challenges when preparing boneless beef cap, but we can help you navigate the most common issues to ensure perfect results every time.
Overcooking remains the primary concern with this lean cut since it becomes dry and tough when internal temperatures exceed 145°F. We recommend using a reliable meat thermometer to monitor doneness throughout the cooking process. Insert the probe into the thickest part of the roast, avoiding the fat cap for accurate readings. When the internal temperature reaches 5°F below your target doneness, remove the beef cap from heat and allow carryover cooking to finish the process.
Dry or tough meat typically results from insufficient resting time or improper slicing technique. We suggest resting the cooked roast for at least 15 to 20 minutes before slicing, allowing juices to redistribute throughout the muscle fibers. During this critical period, cover the meat loosely with aluminum foil to maintain warmth while preventing steam buildup that could soften the exterior crust.
Slicing against the grain proves essential for maximum tenderness, particularly with this cut’s distinctive muscle structure. We identify the grain direction by observing the parallel lines running through the meat, then slice perpendicular to these fibers at a 45-degree angle. Thin slices of approximately 1/4 inch thickness work best for optimal texture and presentation.
Fat cap rendering issues can affect both flavor and appearance during cooking. We position the roast fat side up during most cooking methods to allow natural basting, but some techniques benefit from initial searing. Score the fat cap lightly in a crosshatch pattern before seasoning to promote even rendering and prevent curling during high-heat finishing.
Uneven cooking often occurs with thicker roasts or inconsistent oven temperatures. We recommend using a wire rack in your roasting pan to promote air circulation around the entire roast. Rotate the pan halfway through cooking if your oven has hot spots, and consider using the reverse sear method for more controlled temperature management.
If your beef cap turns out dry even though careful temperature monitoring, we suggest serving it with moisture-rich accompaniments like molho campeiro salsa or chimichurri. Thinly slice the meat and arrange it on a platter with these fresh salsas to add both flavor and moisture to each bite. This Brazilian approach transforms even slightly overcooked meat into an enjoyable dining experience.
Temperature accuracy challenges can derail your cooking efforts, so we calibrate our meat thermometers regularly using ice water or boiling water tests. Digital instant-read thermometers provide the most reliable results, but probe thermometers that remain in the meat throughout cooking offer continuous monitoring for consistent outcomes.
Conclusion
This comprehensive guide equips you with everything needed to master the boneless beef cap at home. We’ve covered multiple cooking methods from traditional oven roasting to international variations that showcase this cut’s remarkable versatility.
The key to success lies in understanding proper temperatures monitoring the cooking process and allowing adequate resting time. Whether you choose the Brazilian picanha approach or create your own seasoning blend the beef cap delivers restaurant-quality results without the premium price tag.
Remember that slicing against the grain transforms even a perfectly cooked roast into an exceptional dining experience. With these techniques and troubleshooting tips you’re ready to impress family and guests with this underrated cut that rivals far more expensive steaks.
Start with quality meat follow our proven methods and you’ll discover why the boneless beef cap deserves a permanent place in your cooking repertoire.
Frequently Asked Questions
What is a boneless beef cap?
A boneless beef cap, also known as coulotte or top sirloin cap, is a cut from the gluteus medius muscle located on top of the sirloin. It typically weighs 2-4 pounds and features excellent marbling with a distinctive fat cap that bastes the meat during cooking, ensuring tenderness and flavor while remaining more affordable than premium steaks.
How do you cook a boneless beef cap?
You can cook boneless beef cap using three main methods: grilling (searing fat cap side down), oven roasting at 275°F, or reverse searing (low-temperature cooking followed by high-heat searing). Each method maximizes flavor and tenderness. Always use a meat thermometer to monitor internal temperature and rest the meat for 10-15 minutes before slicing.
What internal temperature should boneless beef cap reach?
For food safety, the USDA recommends 145°F minimum internal temperature. However, preferred doneness levels include: rare (120-125°F), medium rare (130-135°F), and medium (140-145°F). Use a reliable meat thermometer inserted into the thickest part of the roast to ensure accurate temperature readings and optimal results.
How do you slice boneless beef cap properly?
Always slice boneless beef cap against the grain at a 45-degree angle to maximize tenderness. Allow the meat to rest for 10-15 minutes after cooking to redistribute juices. Use a sharp knife to create even slices, typically ¼ to ½ inch thick, which showcases the meat’s natural marbling and ensures optimal texture.
What are the best side dishes for boneless beef cap?
Excellent side dishes include roasted vegetables, creamy mashed potatoes, fresh salads, and grain-based sides like rice or quinoa. For sauces, consider chimichurri, red wine reduction, horseradish cream, or Brazilian molho campeiro salsa. These accompaniments complement the beef’s rich flavors while adding contrasting textures and tastes.
How do you store leftover boneless beef cap?
Cool cooked beef cap to room temperature within 2 hours, then store in an airtight container in the refrigerator for 3-4 days. For longer storage, wrap tightly and freeze for up to 3 months. Reheat using the oven for best results, microwave for quick portions, or skillet for sliced pieces to maintain moisture and quality.
What makes boneless beef cap different from other cuts?
Boneless beef cap offers excellent marbling and flavor comparable to premium steaks but at a more affordable price point. Its natural fat cap provides self-basting during cooking, preventing dryness. The cut’s versatility allows for various cooking methods, and its moderate size (2-4 pounds) makes it perfect for feeding families or entertaining guests.
Can you marinate boneless beef cap?
Yes, boneless beef cap benefits from marinating. A chimichurri-style marinade with garlic, fresh herbs, red wine vinegar, lemon juice, and oil adds depth and helps tenderize the meat. Alternatively, try Asian-inspired marinades with soy sauce, garlic, and ginger, or Mediterranean herb crusts with olive oil and herbs for international flavor profiles.