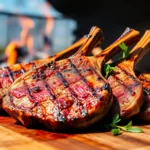
Nothing beats the smoky aroma and tender bite of perfectly cooked BBQ ribs that fall right off the bone. We’ve spent countless hours perfecting our technique and testing dozens of flavor combinations to bring you what we believe is the ultimate ribs recipe that’ll have your neighbors peeking over the fence.
The secret isn’t just in the rub or the sauce – it’s about understanding the science behind low and slow cooking that transforms tough meat into succulent perfection. We’ve broken down every step from selecting the right cut to achieving that coveted bark that seals in all the juicy goodness.
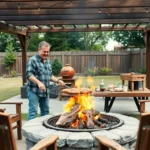
Whether you’re firing up your backyard smoker for the first time or you’re a seasoned pitmaster looking to elevate your game we’ll show you exactly how to create restaurant-quality ribs that’ll become your signature dish. Get ready to become the BBQ hero of every gathering.
Choose the Right Cut of Ribs for Maximum Flavor
Selecting the perfect rib cut forms the foundation of exceptional BBQ ribs recipes. Understanding each cut’s unique characteristics helps us achieve the tender, flavorful results we’re seeking.
Baby Back Ribs vs. Spare Ribs
Baby back ribs come from the top portion of the pig’s rib cage and offer lean, tender meat with less fat marbling. These ribs typically weigh 1.5 to 2 pounds per rack and cook faster than other cuts, usually requiring 4 to 5 hours at 225°F. We recommend baby backs for beginners because they’re more forgiving and less likely to dry out during cooking.
Spare ribs originate from the belly side of the rib cage and contain more fat, connective tissue, and flavor. Each rack weighs 2.5 to 3.5 pounds and demands longer cooking times of 5 to 6 hours at the same temperature. Fat content in spare ribs creates incredibly juicy, rich meat that stays moist throughout the smoking process.
Meat texture differs significantly between these cuts. Baby backs provide a more delicate bite, while spare ribs deliver a chewier, more substantial eating experience. Price points favor spare ribs, typically costing 20% to 30% less than baby backs at most retailers.
St. Louis Style Ribs
St. Louis style ribs represent spare ribs trimmed to create a uniform, rectangular shape by removing the sternum bone, cartilage, and rib tips. This trimming process creates consistent cooking and presentation while reducing the overall weight to approximately 2 to 2.5 pounds per rack.
Uniform thickness across the entire rack ensures even cooking temperatures and eliminates the guesswork common with untrimmed spare ribs. We find these ribs perfect for competition BBQ because they present beautifully and cook predictably.
Flavor profile remains similar to traditional spare ribs, maintaining the rich, fatty characteristics that create exceptional taste. Cooking time reduces slightly compared to untrimmed spare ribs, typically requiring 4.5 to 5.5 hours at 225°F.
Where to Buy Quality Ribs
Local butcher shops provide the highest quality ribs with expert trimming and personalized service. Butchers can custom trim ribs to our specifications and often source from local farms with superior meat quality. We typically pay 10% to 20% more but receive significantly better products.
Warehouse stores like Costco and Sam’s Club offer excellent value for bulk purchases, especially when cooking for large groups. These retailers frequently stock USDA Choice grade ribs at competitive prices, perfect for practice sessions or big gatherings.
Specialty meat suppliers and online retailers deliver premium options including heritage breed pork and organic ribs. Companies like Snake River Farms and Porter Road ship vacuum sealed ribs nationwide, ensuring freshness during transport.
Grocery store meat departments work well for convenience but require careful inspection. Look for ribs with good marbling, avoid packages with excessive liquid, and check expiration dates carefully. We suggest asking the butcher about delivery schedules to purchase the freshest available inventory.
Prepare Your Ribs with Proper Trimming Techniques

Proper preparation sets the foundation for exceptional BBQ ribs that’ll have your guests coming back for seconds. These trimming techniques ensure even cooking and maximum flavor penetration.
Remove the Silver Skin Membrane
Start by locating the silver skin membrane on the back of your ribs. This tough membrane prevents seasonings and smoke from penetrating the meat, creating an unpleasant chewy texture that nobody wants. We recommend sliding a knife under the membrane to loosen one corner, then grabbing it with a paper towel for better grip.
Pull the membrane off in one smooth motion whenever possible. The paper towel provides the traction you need to remove this stubborn layer completely. Once removed, you’ll notice how the seasonings absorb more effectively and the ribs cook more evenly throughout.
Trim Excess Fat
Identify large fat deposits while leaving a thin protective layer intact. Although fat adds flavor and moisture during cooking, excess fat causes dangerous flare-ups on the grill and creates greasy, unappetizing ribs. We focus on removing only the thickest areas of fat that would otherwise render poorly.
Use a sharp knife to carefully trim away chunks of fat thicker than ¼ inch. This selective approach maintains the natural marbling that keeps ribs juicy while eliminating the problematic excess. The remaining fat layer will render slowly during cooking, basting the meat naturally.
Score the Meat for Better Seasoning Penetration
Make shallow cuts across the surface of the meat in a crosshatch pattern. Light scoring creates channels that allow dry rubs and marinades to penetrate deeper into the ribs, improving the overall taste profile. We recommend making cuts about ¼ inch deep and 1 inch apart.
Exercise caution to avoid cutting too deeply into the meat fibers. These shallow scores should only break the surface tension without compromising the rib’s structural integrity. The enhanced seasoning penetration you’ll achieve makes this extra step worthwhile for maximum flavor development.
Create the Perfect Dry Rub Blend

Now that we’ve prepared our ribs, we’ll create a dry rub that transforms good ribs into extraordinary ones. The key lies in balancing sweet, savory, and spicy elements that penetrate deep into the meat.
Essential Spices for BBQ Ribs
Brown sugar forms the foundation of our dry rub, providing sweetness and creating that coveted caramelized crust. We recommend using 1/4 to 1/3 cup depending on your preferred sweetness level.
Kosher salt enhances all other flavors while tenderizing the meat. Add 1-2 tablespoons to achieve the perfect balance without overpowering the blend.
Smoked paprika delivers that signature smoky depth we’re after. Use 1-2 tablespoons to give your ribs an authentic BBQ flavor even before they hit the grill.
Garlic powder and onion powder create savory complexity that complements the meat beautifully. Include 1-2 teaspoons of each for well-rounded flavor development.
Black pepper adds mild heat and earthy notes. Start with 1-2 teaspoons and adjust based on your heat preference.
Chili powder brings warmth and additional spice layers. We suggest 1-1.5 tablespoons for a balanced kick.
Ground mustard and celery salt contribute unique flavor complexity. Add 1/2 teaspoon of mustard and 1/4 teaspoon of celery salt for subtle but noticeable depth.
Sweet vs. Savory Rub Profiles
Sweet rubs emphasize higher brown sugar proportions, creating caramelized crusts and dessert-like BBQ experiences. These profiles work perfectly for family gatherings where milder flavors are preferred.
Savory rubs reduce sugar content while emphasizing salt, pepper, mustard, and garlic powders. This approach delivers robust, smoky flavors that appeal to traditional BBQ enthusiasts.
We can customize our blend by adjusting the brown sugar ratio. More sugar creates sweeter profiles, while reducing it emphasizes the savory spices for a more intense flavor experience.
Optional additions like cinnamon (1/2 teaspoon) and cayenne pepper (to taste) add extra warmth and complexity. These spices elevate the basic blend into something truly special.
How Long to Let the Rub Set
Minimum timing allows us to apply rub directly before cooking when we’re short on time. While this works, we won’t achieve maximum flavor penetration.
Recommended approach involves letting ribs rest for at least 1 hour after applying the rub. This timeframe allows flavors to begin penetrating the meat surface.
Optimal results come from refrigerating our rubbed ribs overnight or up to 24 hours. We should wrap them in plastic or foil to maintain moisture while the seasonings work their magic.
The longer resting period transforms our dry rub from surface seasoning into deep flavor enhancement. Our ribs will taste more complex and well-seasoned throughout when we allow proper resting time.
Master Low and Slow Smoking Methods

Now that our ribs are perfectly prepped and seasoned, it’s time to transform them into barbecue masterpieces through the art of low and slow smoking. This cooking method breaks down connective tissues and renders fat over several hours, creating the tender, fall-off-the-bone texture that defines exceptional BBQ ribs.
Setting Up Your Smoker Temperature
Maintain a stable smoker temperature between 225°F and 250°F for optimal results. We’ve found that this temperature range provides the perfect balance for breaking down tough connective tissues without drying out the meat. Higher temperatures above 275°F risk creating tough, dry ribs, while temperatures below 225°F unnecessarily extend cooking time without improving quality.
Preheat your smoker completely before adding the ribs. This ensures consistent heat from the moment our seasoned ribs hit the grates. We recommend using a reliable thermometer to monitor temperature throughout the cooking process, as maintaining steady heat is crucial for even cooking.
Add a water pan to your smoker setup to maintain humidity levels. The moisture helps keep ribs from drying out during the long cooking process, typically lasting 3 to 6 hours depending on the method and rib type. Position the water pan away from direct heat sources to create gentle steam that circulates around the ribs.
Best Wood Chips for Rib Smoking
Choose wood chips that complement pork’s natural flavors without overwhelming the meat. The right wood selection can make the difference between good ribs and extraordinary ones, as different woods impart distinct flavor profiles that enhance our carefully crafted dry rub.
| Wood Type | Flavor Profile | Best For |
|---|---|---|
| Hickory | Strong, classic smoky taste | Traditional BBQ ribs |
| Apple | Mild, sweet, fruity notes | Beginners and sweet rubs |
| Cherry | Subtle sweetness with color enhancement | Beautiful presentation |
| Pecan | Rich, nutty flavor | Complex flavor combinations |
Hickory remains the gold standard for rib smoking, delivering that classic barbecue flavor most people expect. Its strong, bacon-like smokiness pairs perfectly with pork, creating the authentic taste that defines traditional American BBQ. We use hickory when we want bold, unmistakable smoke flavor that stands up to robust dry rubs.
Apple and cherry woods offer milder alternatives that won’t overpower delicate seasonings. These fruit woods provide subtle sweetness that enhances rather than masks our carefully balanced rub flavors. Cherry wood also adds beautiful reddish color to the bark, creating visually stunning ribs.
Pecan wood delivers rich, nutty smoke that adds complexity without overwhelming intensity. This versatile wood works especially well with sweeter rub profiles, creating layers of flavor that develop throughout the long cooking process.
The 3-2-1 Smoking Method
Follow the proven 3-2-1 method for consistently tender, flavorful ribs every time. This technique combines direct smoking with steaming phases to achieve the perfect balance between smoky bark development and meat tenderness. We’ve used this method countless times with reliable results that impress even the most discerning BBQ enthusiasts.
Smoke the ribs unwrapped for 3 hours at 225°F to develop the initial bark. During this phase, the dry rub forms a flavorful crust while smoke penetrates deep into the meat. Place ribs bone-side down on the grates, allowing hot air to circulate around all surfaces for even cooking.
Wrap ribs tightly in heavy-duty aluminum foil for the next 2 hours. This steaming phase breaks down remaining connective tissues and ensures fork-tender results. We often add a small amount of butter, brown sugar, or apple juice to the foil packet for extra moisture and flavor enhancement.
Unwrap ribs and apply BBQ sauce during the final hour of cooking. This last phase allows the sauce to caramelize while maintaining the bark we developed earlier. Apply sauce in thin layers every 15-20 minutes, building up a glossy, flavorful coating that won’t burn or become bitter.
Test for doneness using the bend test or toothpick method rather than relying solely on time. Properly cooked ribs will bend easily when picked up with tongs, and a toothpick should slide through the meat with minimal resistance. Internal temperature should reach 195°F to 203°F for optimal tenderness.
Apply BBQ Sauce at the Right Time

Timing makes the difference between beautifully caramelized ribs and burnt, bitter disappointment. We’ve perfected our smoking technique, and now it’s time to master the art of saucing for that perfect finish.
Homemade vs. Store-Bought Sauce Options
Homemade BBQ sauce gives us complete control over flavor and ingredients. Creating your own sauce starts with a simple base of ketchup, hot chili sauce, brown sugar, and apple cider vinegar. Essential spices like cumin add depth to the mixture. We recommend cooking these ingredients together to meld the flavors before applying them to your ribs.
Store-bought sauces offer convenience but vary widely in sweetness, tang, and spice levels. These commercial options work well on their own or can be enhanced with homemade additions for a personalized taste. Popular brands provide consistent results, though they may contain preservatives and higher sodium content than homemade versions.
Sweet and spicy combinations work exceptionally well with our low and slow cooking method. A typical homemade sauce combines ketchup, brown sugar, hot sauce, and vinegar in balanced proportions. This mixture creates the perfect complement to our smoky, tender ribs.
When to Sauce Your Ribs
Apply sauce near the end of cooking to prevent burning the sugars. BBQ sauce contains high sugar content that caramelizes quickly under heat. Adding sauce too early during our 3 to 6 hour smoking process will result in burnt, bitter flavors.
Oven-baked ribs need sauce brushed on after the main cooking is complete. Once we’ve baked our ribs at 275°F for 2 to 3 hours, we brush sauce generously on both sides. The final step involves broiling for 3 to 4 minutes to achieve that perfect caramelized finish.
Grilled ribs benefit from sauce application during the last 30 minutes of cooking. We baste the ribs with sauce while they’re cooking over indirect medium heat. This technique builds layers of flavor while avoiding the flame flare-ups that can char our carefully prepared meat.
Avoid saucing too early as prolonged heat exposure turns sauce bitter. The sugars in BBQ sauce burn quickly when exposed to high temperatures for extended periods. We’ve learned that patience with sauce timing produces superior results.
Glazing Techniques for Caramelized Finish
Place sauced ribs under a broiler briefly to caramelize the sugars. After applying our BBQ sauce, we position the ribs 4 to 6 inches from the broiler element. Typical broiling time ranges from 3 to 4 minutes, requiring careful monitoring to prevent burning.
Frequent basting over indirect heat builds a rich, glossy glaze. On the grill, we continuously baste and turn the ribs to develop multiple layers of caramelized sauce. This technique creates that sticky, restaurant-quality finish we’re after.
Watch carefully during the glazing process to achieve optimal results. The sugars transform quickly from golden caramelization to burnt disappointment. We keep a close eye on our ribs during this final crucial step.
High heat finishing creates the signature BBQ rib appearance. Whether using a broiler or hot grill, this final caramelization step produces the glossy, sticky coating that makes our ribs irresistible. The contrast between the caramelized exterior and tender meat inside defines exceptional BBQ ribs.
Test for Doneness Using Proven Methods

After hours of patient smoking, determining when your ribs are perfectly cooked becomes the final crucial step. Mastering these proven testing methods ensures you’ll never serve overcooked or undercooked ribs again.
The Bend Test for Tender Ribs
Grab your tongs and hold the ribs from one end to perform this reliable tenderness test. Gently lift the rack and watch how it responds to gravity. Properly cooked ribs will bend easily and begin to crack on the surface without breaking apart completely.
This bending action indicates that collagen has broken down into gelatin, creating that coveted tender texture. The meat should flex naturally but still maintain its structural integrity. If the ribs break apart during the bend test, they’ve been overcooked and will likely fall off the bone too easily.
Watch for the sweet spot where the ribs crack but don’t completely separate. This visual cue tells us that connective tissues have rendered properly while the meat retains enough structure for clean eating.
Internal Temperature Guidelines
Target an internal temperature between 195°F and 203°F for optimal rib tenderness. Insert your meat thermometer into the thickest part of the meat between the bones. This temperature range allows fat and connective tissue to render completely without drying out the meat.
Cooking ribs slowly at 250°F to 300°F until reaching this internal temperature ensures consistent results. The low temperature prevents the exterior from burning while the interior reaches the perfect doneness. Most rib recipes require 2 to 3 hours of cooking time to achieve this temperature range.
Remember that ribs continue cooking slightly after removal from heat due to carryover cooking. Pull them off the smoker or out of the oven when they reach 195°F to account for this temperature rise.
Visual Cues for Perfectly Cooked Ribs
Look for meat pulling back from the ends of the rib bones by approximately a quarter inch. This bone exposure serves as a reliable visual indicator that the meat has cooked long enough to shrink properly. The exposed bone tips should appear clean and white.
Check for a well-developed bark or caramelized crust on the surface, especially if you’ve applied BBQ sauce. This outer layer should appear glossy and slightly sticky when sauce has been brushed on during the final cooking stage. The surface color should be deep reddish-brown with some darker spots.
Examine the meat for moisture retention while ensuring it holds together without falling apart. Perfectly cooked ribs should appear juicy with rendered fat glistening on the surface. The meat should pull away cleanly from the bone when eaten but not slide off during handling.
Rest and Serve Your BBQ Ribs Properly

After achieving that perfect smoky bark and tender meat, we need to handle our ribs properly to deliver the best possible dining experience.
Why Resting Time Matters
Allowing ribs to rest after cooking helps the juices redistribute throughout the meat, ensuring moist and tender results when cut. This crucial step prevents all those flavorful juices from running out onto the cutting board when we slice into our perfectly cooked ribs.
We recommend letting our ribs rest for 10 to 15 minutes after removing them from the smoker or oven. During this time, the internal temperature continues to equalize while the muscle fibers relax and reabsorb the redistributed juices.
Tenting our ribs loosely with foil during the resting period keeps them warm without creating steam that could soften our hard-earned bark. This technique ensures we maintain that perfect balance between tender meat and crispy exterior.
Cutting Techniques for Clean Portions
Cutting ribs between the bones creates neat portions that showcase our cooking skills. We should use a sharp knife to slice cleanly through the meat, following the natural lines between each rib bone.
Starting from one end, we position our knife perpendicular to the bone and make smooth, decisive cuts. This approach prevents tearing the meat and maintains the attractive presentation we’ve worked so hard to achieve.
Removing the silver skin membrane from the back before cooking improves tenderness and flavor absorption. We slide a knife under the membrane at one end, then grip it with a paper towel and pull it off in one piece. This preparation step ensures our seasoning penetrates deeply and our ribs cook evenly.
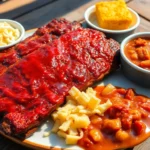
Best Side Dishes to Complement Your Ribs
Pairing our BBQ ribs with complementary sides creates a well-rounded meal that balances rich flavors and textures. We’ve found these classic combinations work exceptionally well:
Coleslaw offers creamy, tangy crunch that cuts through the richness of our perfectly sauced ribs. The cool, crisp texture provides a refreshing contrast to the warm, smoky meat.
Baked beans add sweet, smoky depth that harmonizes beautifully with our barbecue flavors. We can prepare them with bacon or pulled pork for extra richness.
Cornbread or grilled corn brings natural sweetness and satisfying texture to our barbecue spread. Fresh corn on the cob grilled alongside our ribs creates a complete outdoor cooking experience.
Potato salad or roasted vegetables offer comforting, hearty complements that round out our meal. Roasted root vegetables like carrots and potatoes absorb smoky flavors when cooked on the same grill.
Pickles or fresh salad provide necessary acidity to cut through the richness of our sauced ribs. Dill pickles or a simple green salad with vinaigrette cleanse the palate between bites.
Conclusion
We’ve walked you through every step of creating restaurant-quality BBQ ribs that’ll have your guests coming back for seconds. From selecting the perfect cut to mastering the low and slow smoking technique these fundamentals will transform your backyard cooking game.
The key to exceptional ribs lies in patience and attention to detail. Whether you’re using the 3-2-1 method or developing your own signature dry rub the techniques we’ve shared will help you achieve that perfect balance of smoky flavor and tender meat.
Fire up your smoker and put these methods to work. With practice you’ll develop the confidence to create consistently delicious ribs that rival any barbecue joint. Your next cookout is about to become legendary.
Frequently Asked Questions
What’s the difference between baby back ribs and spare ribs?
Baby back ribs are leaner, smaller, and cook faster (typically 3-4 hours), making them perfect for beginners. Spare ribs are larger, fattier, and more flavorful but require longer cooking times (4-6 hours). St. Louis style ribs are trimmed spare ribs that cook more evenly and present better.
What temperature should I maintain when smoking ribs?
Maintain a stable smoker temperature between 225°F and 250°F. This low and slow cooking method breaks down tough connective tissues without drying out the meat, resulting in tender, juicy ribs that fall off the bone.
How long should I let the dry rub sit on the ribs?
Allow the dry rub to set for at least one hour before cooking. For optimal results, refrigerate the rubbed ribs overnight. This extended time allows the seasoning to penetrate deeper into the meat, creating more complex flavors throughout.
What’s the 3-2-1 smoking method?
The 3-2-1 method involves smoking ribs unwrapped for 3 hours, wrapping them in foil for 2 hours to steam and tenderize, then unwrapping for the final hour to apply BBQ sauce and develop the bark. This technique ensures tender, flavorful ribs.
When should I apply BBQ sauce to my ribs?
Apply BBQ sauce during the final hour of cooking to prevent burning the sugars. This timing allows the sauce to caramelize properly, creating a glossy, sticky glaze without becoming bitter or charred from excessive heat exposure.
How do I know when my ribs are done?
Use the bend test – properly cooked ribs should bend easily without breaking apart. The internal temperature should reach 195°F to 203°F. Look for visual cues like meat pulling back from bones and a well-developed bark on the surface.
Should I remove the membrane from ribs before cooking?
Yes, always remove the silver skin membrane from the back of the ribs. This tough layer prevents seasoning and smoke from penetrating the meat. Use a paper towel for grip and peel it off in one piece for best results.
What are the best wood chips for smoking ribs?
Hickory provides a strong, traditional smoky flavor. Apple and cherry woods offer milder, sweeter profiles. Pecan delivers a rich, nutty taste. Mix different woods to create complex flavor combinations that complement your chosen dry rub seasoning.
How long should ribs rest after cooking?
Rest cooked ribs for 10 to 15 minutes after removing from the smoker. Tent with foil to maintain warmth while allowing juices to redistribute throughout the meat. This resting period ensures maximum tenderness and flavor in every bite.
What side dishes pair well with BBQ ribs?
Classic accompaniments include creamy coleslaw, hearty baked beans, sweet cornbread, tangy potato salad, and crisp pickles. These sides balance the rich, smoky flavors of the ribs while providing contrasting textures and refreshing elements to the meal.