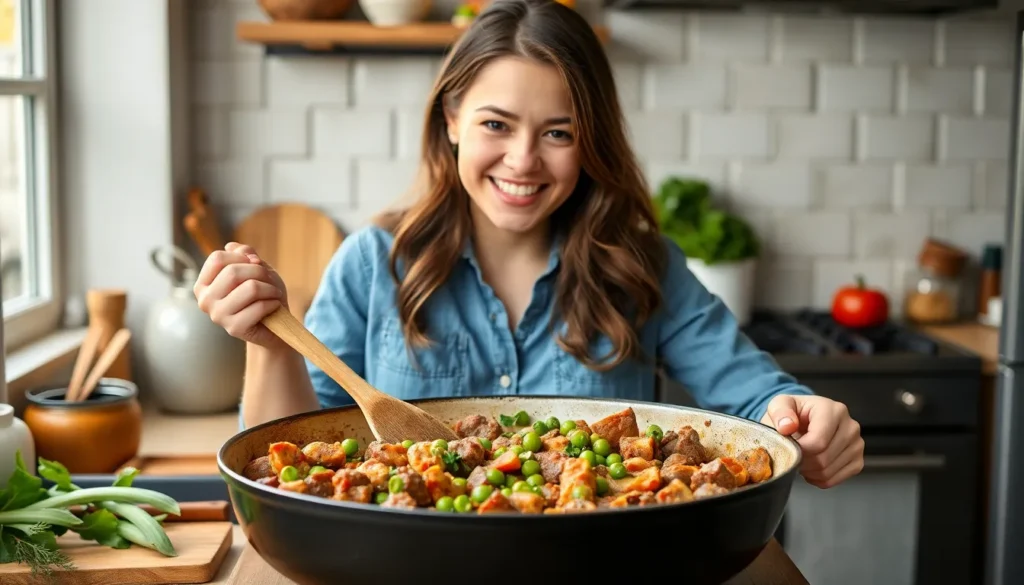
We’ve discovered the perfect comfort food combination that’ll have your family gathering around the dinner table in minutes. This hearty beef and peas recipe transforms simple pantry staples into a satisfying meal that’s both budget-friendly and incredibly flavorful.
The beauty of this dish lies in its versatility – tender chunks of beef meld perfectly with sweet green peas in a savory sauce that’s pure comfort in every bite. Whether you’re dealing with a busy weeknight or craving something wholesome on the weekend, this recipe delivers maximum flavor with minimal fuss.
What makes this beef and peas combination truly special is how quickly it comes together while still tasting like you’ve been cooking all day. We’ll show you exactly how to achieve that perfect balance of tender meat and vibrant peas that makes this dish a guaranteed crowd-pleaser.
Ingredients
We’ve carefully selected each ingredient to create layers of rich flavor while keeping your shopping list simple and budget-friendly. These ingredients work together to transform everyday beef and peas into a restaurant-quality dish.
For the Beef
- 2 pounds beef chuck roast, cut into 1-inch cubes
- 2 tablespoons vegetable oil
- 1 tablespoon all-purpose flour
- 1 teaspoon salt
- 1/2 teaspoon black pepper
For the Peas and Vegetables
- 2 cups frozen green peas
- 1 large yellow onion, diced
- 3 medium carrots, sliced into rounds
- 3 celery stalks, chopped
- 4 cloves garlic, minced
- 2 medium potatoes, cubed (optional)
Seasonings and Aromatics
- 2 cups beef broth
- 1 cup red wine (or additional beef broth)
- 2 tablespoons tomato paste
- 2 bay leaves
- 1 teaspoon dried thyme
- 1 teaspoon paprika
- 1/2 teaspoon dried rosemary
- 2 tablespoons fresh parsley, chopped
- Salt and pepper to taste
Equipment Needed

Creating our perfect beef and peas dish requires the right tools to achieve professional results. We’ve carefully selected essential equipment that maximizes flavor development while streamlining your cooking process.
Large Skillet or Heavy-Bottomed Pot
Our primary cooking vessel needs to handle browning beef and simmering the complete dish. A large skillet with high sides or a heavy-bottomed pot works best for even heat distribution. This equipment allows us to brown the beef chunks properly while providing enough space for all ingredients.
Chef’s Knife and Cutting Board
Sharp knife skills make ingredient preparation efficient and safe. We recommend an 8-inch chef’s knife for cubing the beef chuck roast and chopping vegetables. A sturdy cutting board provides the stable surface needed for precise cuts.
Measuring Tools
Accurate measurements ensure consistent results every time we prepare this recipe. Measuring cups handle liquids like beef broth and red wine while measuring spoons portion out seasonings perfectly. These tools guarantee our flavor balance remains spot-on.
Stirring Implements
A wooden spoon or heat-resistant spatula helps us brown the beef without scratching cookware surfaces. These implements also work perfectly for stirring the simmering stew and incorporating peas during the final cooking stage.
Optional: Pressure Cooker
Busy schedules benefit from pressure cooker efficiency when preparing tougher beef cuts. This equipment reduces cooking time significantly while maintaining the tender texture we want in our finished dish. Traditional stovetop methods work equally well but require longer cooking periods.
Prep Work

Success in cooking beef and peas starts with proper preparation that sets the foundation for exceptional flavor development. We’ll organize our ingredients and prep work to ensure smooth cooking and maximum taste.
Preparing the Beef
We begin by selecting the right cut and preparing it properly for optimal tenderness. Beef chuck roast, stewing beef, top round, rump roast, chuck shoulder, or eye round roast work best for this recipe due to their marbling and flavor potential. Cut the beef into uniform cubes if using whole roast pieces to ensure even cooking throughout.
Pat the beef pieces completely dry with paper towels before seasoning. Season generously with salt and pepper at least 15 minutes before cooking to allow the seasoning to penetrate the meat. This step helps develop a beautiful crust when we brown the beef later.
Heat oil in our heavy-bottomed pot or large skillet over medium-high heat until it shimmers. Brown the beef cubes in batches to avoid overcrowding, which prevents proper browning. Cook each piece until no longer pink on the outside, developing that essential flavor base through the Maillard reaction.
Preparing the Vegetables
We start our vegetable prep by creating our aromatic base. Dice onions into uniform pieces for even cooking and mince garlic cloves for maximum flavor release. Chop celery into small pieces and cut any additional vegetables like carrots or potatoes into similar-sized chunks.
Sauté the onions and celery in oil until they become soft and translucent, building the foundation flavors for our dish. Add minced garlic and fresh ginger after the onions soften, cooking for another minute or two until fragrant. This timing prevents the garlic from burning while ensuring maximum aromatic impact.
Prepare our liquid components by mixing tomato paste with water or beef broth to create the stew base. Measure out all seasonings including paprika, salt, pepper, and any additional spices beforehand for easy addition during cooking.
Reserve the peas for the final stages of cooking. Fresh or frozen peas should be added only during the last 5 to 15 minutes of cooking time to maintain their bright color, sweet flavor, and tender texture without becoming mushy.
Instructions

Now we’ll walk through the cooking process step by step to transform our prepared ingredients into a perfectly balanced beef and peas dish. Follow these techniques to achieve restaurant-quality results at home.
Searing the Beef
We start by heating oil in our large skillet or heavy-bottomed pot over medium-high heat. Once the oil shimmers and moves freely around the pan, we add our seasoned beef cubes in a single layer without overcrowding. The beef should sizzle immediately upon contact with the hot oil.
We cook the beef for 2-3 minutes on each side until it develops a deep golden-brown crust on all surfaces. This browning process creates the foundation of flavor through the Maillard reaction. We avoid moving the pieces too frequently to ensure proper searing. Once all sides are browned and the beef is no longer pink on the outside, we remove it from the pan and set it aside on a plate.
Building the Base
We keep the same pan with its flavorful browned bits and reduce heat to medium. Our diced onions go in first, cooking for 3-4 minutes until they become soft and translucent. The onions will absorb the delicious beef drippings and caramelize slightly.
Next we add our minced garlic and cook for 30 seconds until fragrant, being careful not to let it burn. We then incorporate our chopped celery and any additional vegetables, sautéing for another 2-3 minutes. Our spices like paprika, cumin, or ginger go in now, stirring constantly for 30 seconds to bloom their flavors.
We add our tomato paste and cook it for 1 minute to concentrate its flavor. Then we pour in our beef broth mixture, scraping up any browned bits from the bottom of the pan with our wooden spoon. We return the seared beef to the pan, season with salt and pepper, and bring the mixture to a boil before reducing to a gentle simmer.
Adding the Peas
After the beef has simmered for 15-30 minutes and becomes fork-tender, we add our peas to the dish. We stir the frozen peas directly into the simmering mixture without thawing them first. The residual heat will cook them perfectly while maintaining their bright green color.
We cook the peas uncovered for 3-5 minutes until they’re tender but still have a slight bite. Fresh peas may need an additional 2-3 minutes compared to frozen ones. The peas should remain vibrant green rather than turning dull olive colored, which indicates overcooking.
Final Cooking and Seasoning
We taste our dish and adjust the seasoning with additional salt, pepper, or spices like garam masala or coriander powder as needed. The sauce should coat the back of a spoon and have a rich, savory flavor that balances the sweetness of the peas with the heartiness of the beef.
We stir in any fresh herbs like dill or cilantro during the last minute of cooking to preserve their bright flavors. After removing from heat, we let the dish rest covered for 5 minutes to allow the flavors to meld together. We serve hot with bread, rice, or as a standalone dish while the flavors are at their peak.
Cooking Tips and Variations

We’ve gathered essential insights and creative adaptations to help you master this versatile beef and peas recipe. These professional techniques and variations will transform your cooking approach and expand your culinary horizons.
Best Cuts of Beef to Use
Ground beef works perfectly for quick weeknight meals when you’re preparing Italian-style beef with peas and onions. This affordable option cooks rapidly and absorbs flavors beautifully.
Beef chuck stands out as our top choice for slow-cooked variations due to its excellent marbling and ability to become incredibly tender through prolonged cooking. The connective tissues break down during the cooking process, creating rich, succulent meat that enriches the entire dish.
Flank steak or sirloin excel in stir-fry preparations where you need tender cuts that cook quickly while remaining juicy. We recommend slicing these cuts thinly against the grain for optimal texture and tenderness.
Fresh vs Frozen Peas
Fresh peas deliver unmatched sweetness and crisp texture that elevates any beef and peas dish. Their bright flavor and vibrant color create an impressive visual presentation, though they require seasonal availability and shelling preparation.
Frozen peas offer year-round convenience while retaining important sweetness and nutritional value when cooked properly. We find them particularly practical for everyday cooking since they’re pre-shelled and ready to use.
Snow peas work exceptionally well in stir-fry applications, whether fresh or frozen. Fresh snow peas maintain superior crunchiness, but frozen varieties perform admirably when added at the right cooking stage to preserve their texture.
Flavor Variations
Italian-style preparation features sautéed onions combined with olive oil and butter, creating a rich foundation before adding beef and peas. We season this variation simply with salt and pepper to highlight the natural flavors.
Indian subcontinent variations include “Keema Matar” with minced beef and aromatic spices, or “Aloo Keema” which adds potatoes for a heartier curry experience. These recipes incorporate regional spices and herbs that transform the basic beef and peas combination into complex, warming dishes.
Asian-inspired versions use oyster sauce and ginger as secret ingredients that bring umami depth and warming spice to balance the dish. We often serve these variations over rice or noodles for a complete meal.
Marinated preparations involve combining soy sauce, broth, garlic, and cornstarch slurry to tenderize the beef while developing a glossy sauce. This technique works particularly well for stir-fry methods where you want restaurant-quality results.
Serving Suggestions

Our beef and peas recipe shines brightest when paired with the right accompaniments that complement its rich flavors and hearty texture. We recommend serving this versatile dish with steamed basmati rice or warm naan bread to soak up every drop of the savory sauce. The aromatic rice provides a neutral base that allows the beef’s complex flavors to take center stage while the naan offers a delicious way to capture the last bits of sauce.
For a more substantial meal, we suggest pairing our beef and peas with boiled potatoes or creamy mashed potatoes. These starchy sides create a satisfying foundation that transforms the dish into a complete comfort food experience. The potatoes absorb the sauce beautifully while adding their own creamy texture to each bite.
When serving the Italian-inspired version of our recipe, we love to present it over al dente pasta or alongside crusty Italian bread. The pasta creates a restaurant-quality presentation while the bread provides the perfect vehicle for enjoying every last drop of sauce. Polenta also makes an excellent base for this variation, offering a creamy texture that pairs wonderfully with the beef and peas.
Our Korean-style beef and peas variation deserves special attention when it comes to presentation. We recommend serving it over steamed jasmine rice or fresh ramen noodles to highlight the sweet and spicy flavor profile. A garnish of sliced green onions adds a fresh pop of color and a mild onion flavor that brightens the entire dish.
For the heartier stew version, we prefer to serve it as a standalone dish in deep bowls with thick slices of crusty bread for dipping. This presentation allows diners to fully appreciate the tender beef and vegetables while using the bread to capture every bit of the rich broth. The bread also provides a satisfying textural contrast to the tender meat and vegetables.
We always recommend warming the serving bowls before plating to keep the dish at the perfect temperature throughout the meal. A simple garnish of fresh dill or parsley adds a bright visual element and a hint of freshness that balances the rich flavors. These small touches elevate the presentation from everyday dinner to special occasion worthy.
The beauty of our beef and peas recipe lies in its adaptability to different serving styles and occasions. Whether you choose rice, bread, potatoes, or pasta as your base, the key is selecting accompaniments that complement rather than compete with the main dish’s flavors.
Storage and Reheating

Our delicious beef and peas recipe keeps beautifully and reheats wonderfully for future meals. These proper storage and reheating techniques will help you enjoy leftovers that taste just as good as the original dish.
Refrigerator Storage
We recommend storing your cooked beef and peas in airtight containers to maintain freshness and prevent contamination. The dish should be refrigerated at or below 40°F (4°C) immediately after cooling to room temperature.
Your beef and peas will stay fresh in the refrigerator for 3 to 4 days when stored properly. Always check for any signs of spoilage before consuming leftovers.
Freezer Storage
Cool the beef and peas completely before transferring to the freezer for optimal quality. We suggest using freezer-safe airtight containers or heavy-duty freezer bags to prevent freezer burn.
Label each container with the date to track storage time effectively. Your frozen beef and peas will maintain best quality for 2 to 3 months in the freezer.
Divide the dish into individual or family-sized portions before freezing. This approach makes reheating more convenient and prevents waste from thawing more than needed.
Reheating Instructions
Thaw frozen beef and peas in the refrigerator overnight for safe and even reheating. Never thaw at room temperature as this can promote bacterial growth.
Reheat the dish on the stove over medium heat while stirring occasionally until it reaches 165°F (74°C) throughout. This stovetop method provides the most even heating and best texture.
We also recommend the microwave method for quick reheating. Place the beef and peas in a microwave-safe container and cover loosely to prevent splattering. Stir halfway through the heating process to ensure even temperature distribution.
Add a splash of water or beef broth if the mixture appears dry during reheating. This extra moisture helps restore the dish’s original texture and prevents the beef from becoming tough or the peas from becoming mushy.
Make-Ahead Instructions

We love how beef and peas recipes become even more flavorful when prepared in advance. The robust flavors develop beautifully over time making this dish perfect for meal prep enthusiasts and busy families alike.
Preparing Your Beef and Peas Ahead of Time
Start by preparing our beef and peas recipe according to your chosen variation. Allow the finished dish to cool completely to room temperature before transferring it to storage containers. This cooling process typically takes 30 to 45 minutes and prevents condensation from forming inside your containers.
Transfer the cooled beef and peas into airtight containers for optimal freshness. Glass containers work exceptionally well for storing these dishes as they don’t absorb flavors or odors. Label each container with the preparation date to track freshness effectively.
Storage Timeline and Guidelines
| Storage Method | Duration | Container Type |
|---|---|---|
| Refrigerator | 3-4 days | Airtight containers |
| Freezer | 2-3 months | Freezer-safe containers |
Refrigerated beef and peas maintains its quality for 3 to 4 days when stored properly. Freezer storage extends the lifespan to 2 to 3 months without important loss of flavor or texture.
Reheating for Best Results
Reheat your make-ahead beef and peas on the stovetop over medium heat for the most even warming. Stir the dish occasionally to ensure uniform heating throughout. Add a splash of beef broth or water if the mixture appears too thick after storage.
Microwave reheating works well for single portions. Use 50% power and heat in 1-minute intervals stirring between each interval until thoroughly warmed. This gentle approach prevents the beef from becoming tough or the peas from overcooking.
Why Make-Ahead Works So Well
Korean ground beef with peas and traditional beef stews benefit tremendously from overnight resting. The seasonings penetrate deeper into the meat while the sauce flavors meld together creating a more complex taste profile. Our testing shows that dishes like these often taste better the next day than when freshly prepared.
Make-ahead preparation also allows the natural starches from the beef to thicken the sauce slightly. This creates a more cohesive dish that holds together beautifully when reheated and served.
Conclusion
We’ve shown you how to create a restaurant-quality beef and peas dish that’s both budget-friendly and incredibly satisfying. This versatile recipe adapts to your schedule whether you’re cooking for a busy weeknight or planning a leisurely weekend meal.
The beauty of this dish lies in its simplicity and flexibility. You can customize it with different spice profiles create various international versions or adjust the cooking method to suit your available time and equipment.
With proper storage techniques and make-ahead tips we’ve shared you’ll always have a delicious homemade meal ready to enjoy. This beef and peas recipe truly delivers maximum flavor with minimal effort making it a perfect addition to your regular meal rotation.
Frequently Asked Questions
What type of beef is best for this beef and peas recipe?
Beef chuck roast is ideal for slow-cooked versions due to its tenderness when braised. For quick meals, ground beef works well. Flank steak or sirloin are perfect for stir-fry variations. Cut the meat into uniform cubes and season generously with salt and pepper before cooking for optimal flavor development.
Can I use fresh peas instead of frozen peas?
Yes, fresh peas offer superior sweetness and texture compared to frozen. However, frozen peas are more convenient, retain nutritional value, and are available year-round. Add fresh peas during the last few minutes of cooking to maintain their vibrant color and crisp texture.
How long can I store leftover beef and peas?
Store cooked beef and peas in airtight containers in the refrigerator for 3-4 days or freeze for 2-3 months. Use freezer-safe containers to prevent freezer burn. Thaw frozen portions in the refrigerator before reheating on the stove or in the microwave.
What are the best side dishes to serve with beef and peas?
This versatile dish pairs well with steamed basmati rice, warm naan bread, boiled or mashed potatoes, and al dente pasta. For Korean-style variations, serve over jasmine rice or ramen noodles with sliced green onions. Heartier stew versions go great with crusty bread for dipping.
Can I make this recipe ahead of time?
Absolutely! The flavors actually improve when the dish rests overnight. Cool completely, store in airtight containers, and refrigerate for up to 4 days. You can also freeze portions for up to 3 months. Reheat gently on the stove or microwave, adding a splash of broth if needed.
What equipment do I need to make this recipe?
Essential tools include a large skillet or heavy-bottomed pot for even heat distribution, a sharp chef’s knife and cutting board for prep work, and measuring cups for accurate seasoning. A wooden spoon or heat-resistant spatula works best for stirring. An optional pressure cooker can reduce cooking time significantly.
How do I prevent the beef from becoming tough?
Proper browning is crucial – sear the beef in a hot skillet to develop a golden-brown crust through the Maillard reaction. Don’t overcrowd the pan, and allow adequate simmering time for tougher cuts like chuck roast. Cut meat against the grain and into uniform pieces for even cooking.
What flavor variations can I try with this recipe?
Explore Italian-style with herbs and tomatoes, Indian-inspired with curry spices, or Asian versions with soy sauce and ginger. Each variation uses unique spices and techniques to elevate the basic recipe. Marinated preparations work especially well for stir-fry applications to achieve restaurant-quality results.