Transform your backyard into the ultimate entertaining space with DIY outdoor BBQ area ideas that won’t expensive. We’ve discovered that creating your own grilling paradise is easier than you think – and the satisfaction of building it yourself makes every burger taste better.
Whether you’re working with a sprawling lawn or a compact patio, we’ll show you how to design a functional outdoor cooking space that becomes the heart of your home. From simple fire pit setups to elaborate outdoor kitchen islands, these creative answers will have your neighbors asking for your secret.
Ready to become the grill master your friends have been waiting for? We’ve compiled the most practical and budget-friendly BBQ area designs that deliver maximum impact with minimal effort. Let’s turn that empty corner of your yard into the gathering spot everyone will remember.
Build a Simple Brick BBQ Pit
Building a brick BBQ pit transforms your outdoor space into a permanent grilling station that’ll last for decades. We’ll guide you through creating this timeless addition to your DIY outside BBQ area.
Gather Essential Materials and Tools
Materials we’ll need include:
- Fire bricks (approximately 50-75 pieces)
- Regular building bricks (200-300 pieces)
- High temperature mortar mix (4-6 bags)
- Steel grill grate (24″ x 18″ minimum)
- Concrete mix for foundation (8-10 bags)
- Gravel for base preparation (2 cubic feet)
Tools required for construction:
- Shovel for excavation work
- Level to ensure proper alignment
- Trowel for mortar application
- Rubber mallet for brick placement
- Measuring tape for accurate dimensions
- String line for maintaining straight edges
Create a Solid Foundation Base
Excavation starts with marking a 4-foot by 3-foot rectangle where your brick BBQ pit will sit. We dig down 6 inches deep to create a stable base that prevents settling over time.
Gravel placement comes next as we spread a 2-inch layer of crushed stone across the excavated area. This drainage layer prevents water from pooling under your BBQ structure.
Concrete pouring creates the permanent foundation using a 4-inch thick slab that extends 2 inches beyond your planned brick footprint. We allow 48 hours for complete curing before starting brick work.
Leveling verification ensures success by checking multiple points across the foundation with a 4-foot level. Any high spots get ground down while low areas receive additional concrete.
Construct the Fire Box and Cooking Surface
First course of bricks establishes the perimeter using fire bricks for the interior walls and regular bricks for the outer structure. We maintain a 1/2-inch mortar joint between each brick.
Interior dimensions should measure 24 inches wide by 18 inches deep to accommodate standard grill grates while providing adequate cooking space. Fire bricks handle extreme temperatures without cracking or deteriorating.
Height progression continues with alternating brick patterns to create structural strength through overlapping joints. We build the walls to 18 inches high for comfortable cooking height.
Grill grate placement requires embedded steel supports positioned at the 16-inch height mark on opposite walls. These L-shaped brackets hold your cooking surface securely in place.
Ventilation openings enhance airflow through 3-inch gaps left in the front base course and rear wall. Proper air circulation maintains consistent cooking temperatures throughout your grilling sessions.
Design a Portable Rolling BBQ Station

Unlike permanent installations, a rolling BBQ station brings grilling convenience wherever you need it most. We’ll explore how to construct this mobile masterpiece using quality materials and smart design choices.
Select Weather-Resistant Materials
Cedar stands out as our top choice for the main frame due to its natural resistance to rot and insects. We recommend using cedar planks measuring 2×4 inches for the structural framework and 1×6 inches for shelving components. Pressure-treated lumber serves as an excellent alternative, offering similar durability at a lower cost point.
Stainless steel fasteners prevent rust formation and ensure long-lasting connections throughout your BBQ station. We suggest using #8 wood screws measuring 2.5 inches for frame assembly and 1.25-inch screws for attaching lighter components. Galvanized hardware provides another rust-resistant option that works well for outdoor applications.
Marine-grade polyurethane sealant protects your wood surfaces from moisture damage and UV rays. We apply two coats annually to maintain optimal protection, focusing extra attention on horizontal surfaces where water tends to accumulate.
Add Storage Compartments and Shelving
Cabinet doors keep your BBQ tools organized and protected from weather elements. We install hinged doors using weather-resistant piano hinges that won’t sag over time. Interior shelving accommodates various utensil sizes, from long-handled spatulas to seasoning containers.
Open shelving provides easy access to frequently used items like plates, napkins, and condiment bottles. We position these shelves at comfortable working heights, typically 30 to 36 inches from the ground. Wire basket inserts work exceptionally well for storing charcoal, wood chips, and cleaning supplies.
Drawer systems offer premium storage answers for smaller accessories and tools. We use heavy-duty drawer slides rated for outdoor use, ensuring smooth operation even in humid conditions. Soft-close mechanisms prevent slamming and extend hardware life.
Install Heavy-Duty Caster Wheels
Swivel casters on the front corners provide maximum maneuverability when positioning your BBQ station. We choose casters rated for at least 150 pounds per wheel to handle the combined weight of the station, grill, and supplies. Ball bearing construction ensures smooth rolling across various outdoor surfaces.
Fixed casters on the rear provide stability during cooking operations while still allowing forward and backward movement. We install locking mechanisms on at least two wheels to prevent unwanted rolling during food preparation. Pneumatic wheels work best on uneven terrain like gravel or grass surfaces.
Mounting plates require sturdy attachment points to distribute weight evenly across the frame. We use carriage bolts measuring 3/8 inch diameter with washers and lock nuts for secure wheel installation. Thread locker compound prevents fasteners from loosening due to vibration and movement.
Create a Built-In Stone BBQ Island

Building a stone BBQ island transforms your outdoor space into a permanent grilling destination that rivals professional outdoor kitchens. Natural or manufactured stone creates a sturdy foundation that houses your grill while providing essential prep space and storage underneath.
Plan Your Layout and Utilities
Strategic planning ensures your stone BBQ island functions efficiently and safely for years to come. Position the grill where smoke won’t blow directly into seating areas, considering prevailing wind patterns and guest traffic flow. We recommend measuring distances between your indoor kitchen and the planned island location to maintain convenient access to supplies and ingredients.
Electrical planning becomes crucial when incorporating lighting, ventilation fans, or small appliances into your design. Install GFCI outlets at strategic locations around the island, typically 6 feet apart for maximum convenience. Water supply lines should be considered if you’re planning to include a sink, requiring proper drainage and freeze protection in colder climates.
Traffic flow deserves careful attention during the design phase. Create clear pathways around the island that allow multiple people to move comfortably without interfering with the cooking process. Standard recommendations suggest maintaining at least 3 feet of clearance on the cooking side and 2 feet on other sides.
Install Proper Ventilation Systems
Adequate ventilation protects both your cooking area and nearby structures from smoke and heat damage. Built-in grills positioned under shelters or pergolas require professional-grade hood systems that channel smoke away effectively. We suggest installing vent fans rated for outdoor use with CFM ratings appropriate for your grill’s BTU output.
Natural ventilation works well for open-air setups without overhead coverage. Position your island to take advantage of prevailing breezes that naturally carry smoke away from cooking and dining areas. Cross-ventilation through strategic placement creates air movement that disperses heat and cooking odors.
Hood installation requires proper mounting and ductwork that extends well beyond the cooking surface. Stainless steel hoods resist weather damage while providing the durability needed for outdoor environments. Professional installation ensures compliance with local building codes and optimal performance.
Add Counter Space and Storage Answers
Extended counter space transforms your BBQ island from a simple grill station into a full outdoor kitchen workspace. Weather-resistant materials like granite, concrete, or sealed natural stone provide durable surfaces that withstand temperature changes and moisture. We recommend planning at least 18 inches of counter space on each side of the grill for safe food handling.
Storage answers keep your outdoor cooking area organized and functional throughout the grilling season. Built-in cabinets with marine-grade hardware resist rust and corrosion while protecting BBQ tools, utensils, and supplies from weather exposure. Drawer systems with full-extension slides provide easy access to frequently used items.
Cabinet doors should feature magnetic latches or secure closures that prevent wind damage and keep contents dry. Open shelving areas work well for displaying decorative items or storing items that benefit from air circulation. Combination storage approaches maximize both hidden and accessible storage options within your island design.
Construct a Rustic Wood and Metal BBQ Setup

A rustic wood and metal BBQ setup brings together natural warmth and industrial strength for an outdoor cooking space that’s both functional and visually striking. This combination creates a durable grilling station that develops character over time while withstanding the elements.
Choose Durable Hardwood Materials
Selecting the right hardwood forms the foundation of our rustic BBQ area’s longevity and appearance. Cedar, teak, and redwood stand out as exceptional choices due to their natural weather resistance and beautiful aging characteristics. These woods develop a rich patina over time that enhances the rustic aesthetic while maintaining structural integrity.
Oak, mahogany, and ipe offer superior resistance to rot, insects, and warping, making them ideal for outdoor BBQ furniture and structural elements. We recommend these hardwoods for components that’ll face constant exposure to heat, moisture, and temperature fluctuations. Their density and natural oils provide protection that synthetic materials simply can’t match.
Proper wood selection eliminates the need for frequent replacements and reduces long-term maintenance costs. Weather-resistant hardwoods maintain their structural strength even after years of outdoor exposure, ensuring our BBQ setup remains safe and functional throughout countless grilling seasons.
Incorporate Steel Grating and Hardware
Steel grating serves multiple purposes in our rustic BBQ design, providing ventilation, grilling surfaces, and sturdy shelving options. We use steel grating for adjustable cooking grates that accommodate different food types and cooking methods. This material distributes heat evenly while creating attractive grill marks on our food.
Galvanized or stainless steel hardware prevents rust formation and ensures long-lasting connections between wood and metal components. Steel brackets, hinges, and bolts should resist corrosion to maintain both safety and appearance. We incorporate industrial-style hardware that complements the rustic aesthetic while providing reliable functionality.
Storage hooks and adjustable components made from steel add versatility to our BBQ setup. These elements allow us to customize the space based on our cooking needs while maintaining the rustic industrial look. Steel’s strength supports heavy equipment and withstands the thermal stress of outdoor cooking environments.
Apply Weather Protection Finishes
Sealing all wood surfaces with high-quality weatherproof finishes protects against moisture, UV damage, and temperature changes that can compromise our BBQ area’s integrity. Outdoor wood sealants penetrate deep into the grain, creating a barrier that prevents water absorption and subsequent cracking or warping.
Annual reapplication of protective sealants maintains optimal protection and extends the life of our hardwood components. We choose sealants specifically formulated for outdoor cooking environments that can withstand heat exposure and food-safe requirements. This regular maintenance preserves both the appearance and structural soundness of our investment.
Metal components benefit from rust-resistant paint or clear protective coatings that maintain their appearance and prevent corrosion. These treatments create a barrier against moisture and salt air while allowing the industrial character of the steel to show through. Proper finishing ensures our wood and metal elements age gracefully together, developing a cohesive rustic patina that enhances the overall design.
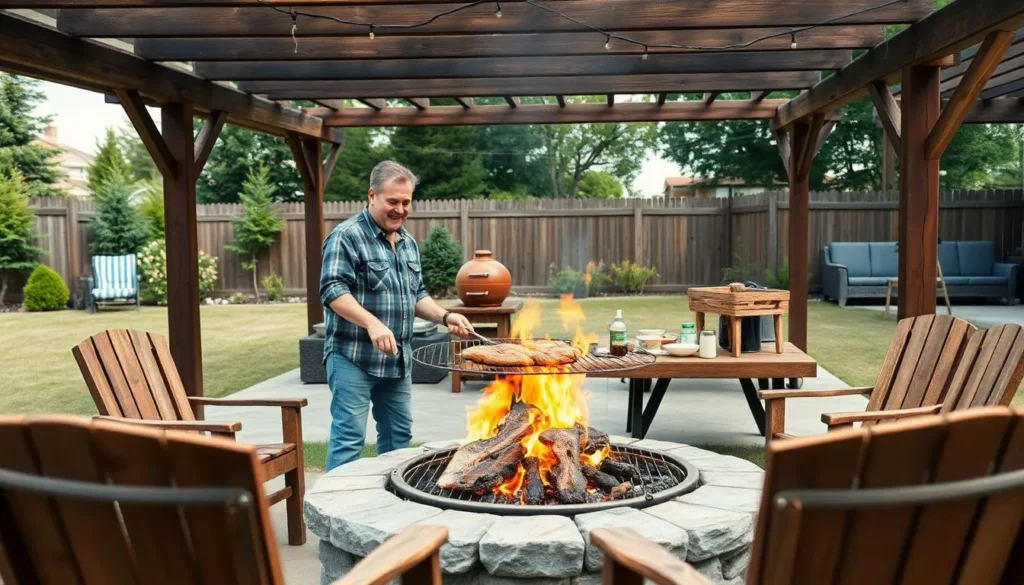
Install a Fire Pit BBQ Combo Area

Moving from permanent installations to versatile cooking answers, we’re excited to show you how to create a fire pit BBQ combo that merges warmth with functionality. This setup transforms your outdoor space into a rustic gathering spot perfect for both cooking and socializing.
Dig and Prepare the Fire Ring
Starting with site selection, we recommend choosing a flat location at least 10 feet away from any flammable materials or structures. Excavate a circular hole measuring 24 to 36 inches in diameter and 12 to 18 inches deep for optimal fire containment. Level the base carefully using a spirit level to ensure even heat distribution across your cooking surface.
Line the excavated area with fire-resistant materials such as fire bricks, natural stone, or steel rings to create a safe burning environment. Add a 2-inch layer of sand or gravel at the bottom to improve drainage and provide a stable foundation for your fire ring. This preparation prevents water accumulation and extends the life of your fire pit structure.
Add Adjustable Cooking Grates
Install adjustable cooking grates approximately 6 to 12 inches above the fire ring to control heat intensity during grilling sessions. Mount a metal tripod system or swing-away grates designed to withstand temperatures exceeding 1000°F for maximum durability. These adjustable mechanisms allow you to raise or lower food based on cooking requirements and flame intensity.
Position multiple grate levels if you’re planning to cook different foods simultaneously at varying heat zones. Stainless steel or cast iron grates work best for high-temperature cooking and resist warping under extreme heat. This flexibility transforms your fire pit into a versatile cooking station capable of everything from searing steaks to slow-cooking vegetables.
Create Seating Around the Perimeter
Arrange seating in a circular or semi-circular pattern around your fire pit BBQ combo to encourage natural conversation flow and equal heat distribution. Stone benches, wooden logs, or weather-resistant outdoor chairs positioned 4 to 6 feet from the fire ring provide comfortable viewing of the cooking process while maintaining safe distances from flames.
Incorporate cushions made from outdoor fabrics or weather-resistant materials to enhance comfort during extended gathering sessions. Built-in stone seating offers permanence and requires minimal maintenance, while portable options like wooden logs or folding chairs provide flexibility for different group sizes. This thoughtful arrangement creates an inviting atmosphere where guests naturally gather to enjoy both the warmth and the cooking experience.
Build a Concrete Block BBQ Structure

Concrete blocks offer incredible durability and heat resistance for permanent outdoor cooking installations. This method creates a solid foundation that’ll withstand years of high-temperature grilling while maintaining structural integrity.
Stack and Mortar the Base Layer
Stack concrete blocks in your desired BBQ shape to establish the foundation of your cooking structure. We recommend starting with a rectangular or L-shaped design that provides ample cooking surface while maintaining structural stability. Position each block carefully to ensure level alignment before applying mortar between joints.
Bond each layer with high-temperature mortar specifically designed for masonry work exposed to heat. Apply mortar evenly across the top surface of each block before placing the next layer. Check alignment frequently using a level to prevent structural issues as you build upward.
Stabilize the structure by offsetting each layer’s joints from the previous row, creating a strong interlocking pattern. This technique distributes weight evenly and prevents cracking under thermal expansion. Allow 24 hours of curing time between major construction phases for optimal bond strength.
Install Removable Cooking Components
Design slots within the block structure to accommodate removable grill grates and cooking surfaces. We suggest creating multiple height positions by leaving gaps between exact blocks during construction. This approach allows you to adjust cooking temperatures by raising or lowering grates.
Install adjustable brackets made from stainless steel to support removable cooking components. These brackets should slide into pre-planned openings in your block structure. Position them at 6-inch intervals to provide maximum flexibility for different cooking methods and food sizes.
Add removable shelves for food preparation and serving areas using the same bracket system. Choose stainless steel or heat-resistant stone surfaces that won’t warp under temperature changes. Easy removal enables thorough cleaning and seasonal storage without dismantling your entire BBQ structure.
Finish with Heat-Resistant Materials
Apply heat-resistant coatings to all surfaces exposed to direct flame and high temperatures. We recommend using specialized masonry sealers rated for temperatures exceeding 2000°F. These coatings protect the concrete blocks from thermal damage while preventing moisture absorption that could cause cracking.
Install ceramic tiles on cooking surfaces and immediate surrounding areas for enhanced heat protection and easy cleaning. Choose tiles specifically rated for outdoor use and high-temperature applications. Grout lines should use heat-resistant grout to prevent deterioration over time.
Coat exposed surfaces with weather-resistant finishes to protect against rain, snow, and UV damage. These protective materials help maintain the structure’s appearance while extending its operational lifespan. Reapply protective coatings annually or as manufacturer recommendations suggest for optimal performance.
Design a Pergola-Covered BBQ Zone

Creating a pergola-covered BBQ zone elevates your outdoor cooking experience with both style and functionality. This overhead structure provides essential shade while defining your grilling area as a dedicated entertaining space.
Frame the Overhead Structure
Building the pergola frame requires careful attention to materials and design for long-lasting durability. We recommend using pressure-treated lumber or cedar for wooden frames, as these materials naturally resist weather damage and insects. Metal frames offer superior strength and can support heavier loads, making them ideal for areas with harsh weather conditions.
Designing the frame with a slight pitch ensures proper water runoff during rain storms. Most pergola frames work best with a rectangular design measuring 10×12 feet, providing ample space for a grill and prep area. We suggest positioning support posts at least 8 feet apart to create an open, unobstructed cooking environment.
Installing the frame requires digging post holes 2-3 feet deep and securing them with concrete footings. Each post should extend 8-10 feet above ground level to accommodate both the overhead structure and adequate headroom. Connecting the posts with horizontal beams creates the foundation for your roofing system.
Add Lighting and Electrical Components
Proper lighting transforms your pergola BBQ zone into a functional evening entertaining space. String lights draped across the pergola beams create warm ambient lighting that enhances the dining atmosphere. We recommend using LED string lights rated for outdoor use, as they consume less energy and last longer than traditional bulbs.
Installing electrical outlets requires running weatherproof wiring to power your grill and other appliances. Professional electricians should handle this installation to ensure safety and code compliance. We suggest adding at least two GFCI outlets positioned conveniently near the grill and prep areas.
Task lighting becomes essential for safe food preparation and cooking after dark. Under-beam LED strips or pendant lights provide focused illumination directly over the grill surface. Solar-powered lights offer an eco-friendly alternative that requires no electrical wiring.
Install Privacy Screens or Curtains
Privacy screens create an intimate cooking environment while blocking unwanted views from neighboring properties. Wooden lattice panels work well for permanent installations, allowing air circulation while providing visual barriers. We recommend cedar or teak screens that naturally resist weather damage and complement the pergola structure.
Hanging outdoor curtains offers flexible privacy options that you can adjust based on weather conditions and gatherings. Marine-grade fabrics withstand UV rays and moisture better than indoor materials. We suggest installing curtain rods on tracks so you can easily slide panels open or closed.
Combining both screens and curtains provides maximum versatility for your pergola BBQ zone. Fixed screens on the sides facing neighbors offer permanent privacy, while curtains on the front and back allow you to control airflow and create different moods for various occasions.
Create a Multi-Level Outdoor Kitchen

Building a multi-level outdoor kitchen elevates your BBQ area from basic grilling to restaurant-quality cooking experiences. We’ll transform your backyard into a functional culinary workspace that accommodates multiple cooking tasks while maintaining an organized flow.
Plan Your Cooking and Prep Zones
Organizing your outdoor kitchen around distinct cooking and preparation zones creates efficiency during meal preparation. We recommend positioning the grill as your central cooking station with generous counter space extending at least 2 feet on each side for hot cookware placement.
Strategic placement of your prep area should include a dedicated cutting station positioned 3-4 feet from the grill to prevent cross-contamination while maintaining easy ingredient transfer. Bar seating along one edge of your prep zone allows guests to socialize while you cook without crowding your workspace.
Consider ergonomic workflow patterns by arranging utensil storage, spice racks, and cutting boards within arm’s reach of both cooking and prep surfaces. We suggest installing pull-out drawers beneath prep counters for easy access to frequently used tools like tongs, spatulas, and meat thermometers.
Install Plumbing for Sink Access
Adding plumbing infrastructure transforms your outdoor kitchen from convenient to essential for serious cooking. We recommend installing water supply lines using PEX piping designed for outdoor temperatures and UV resistance rather than traditional copper pipes that can freeze and burst.
Positioning your sink 2-3 feet from the prep area provides immediate access for washing produce, cleaning utensils, and maintaining hygiene during food preparation. Install the sink away from direct grill heat to prevent water from splashing onto hot cooking surfaces and creating dangerous steam.
Drainage planning requires attention to local codes and proper slope calculations to prevent standing water issues. We suggest consulting with licensed plumbers for complex installations while simple hook-ups to existing outdoor spigots can often be DIY projects using weatherproof quick-connect fittings.
Add Refrigeration and Storage Units
Incorporating outdoor-rated refrigeration eliminates constant trips to your indoor kitchen while keeping beverages and perishables at safe temperatures. We recommend compact undercounter refrigerators specifically designed for outdoor use with weather-sealed electrical connections and corrosion-resistant components.
Weatherproof storage answers protect your investment in quality grilling tools and accessories from moisture damage. Install marine-grade cabinets with stainless steel hinges beneath your prep counters or choose standalone storage boxes with rubber gasket seals for ultimate weather protection.
Built-in storage maximizes your outdoor kitchen’s functionality by dedicating exact spaces for different categories of supplies. We suggest creating separate compartments for cooking utensils, cleaning supplies, seasonings, and entertaining accessories to maintain organization during busy cooking sessions.
Conclusion
Creating your perfect outdoor BBQ area doesn’t have to be overwhelming or expensive. We’ve shown you that with the right planning and a bit of creativity you can transform any outdoor space into a grilling paradise that suits your needs and budget.
Whether you choose a simple fire pit setup or go all out with a multi-level outdoor kitchen these DIY projects will give you years of enjoyment and countless memorable gatherings. The key is starting with a design that matches your space and skill level then building up from there.
Your backyard BBQ area will become the heart of your outdoor entertaining where friends and family naturally gather to share great food and even better memories. Now it’s time to roll up your sleeves and start building the outdoor cooking space you’ve always wanted.
Frequently Asked Questions
What materials do I need to build a simple brick BBQ pit?
You’ll need fire bricks, regular building bricks, high-temperature mortar, and a steel grill grate. Essential tools include a shovel for excavation, level for alignment, and trowel for mortar application. Don’t forget gravel for the foundation and concrete for a stable base.
How do I create a solid foundation for my outdoor BBQ?
Start by excavating the area and placing a gravel base for drainage. Pour concrete to create a stable foundation that can support the weight of your BBQ structure. Ensure the foundation is level and properly cured before beginning construction.
What makes a portable rolling BBQ station convenient?
A portable BBQ station offers flexibility to grill in various locations around your yard. It features heavy-duty caster wheels for easy movement, weather-resistant materials like cedar, and built-in storage compartments for tools and accessories, making it both functional and mobile.
What should I consider when planning a built-in stone BBQ island?
Focus on strategic layout planning, including proper grill placement, electrical planning for lighting and appliances, and adequate traffic flow. Consider ventilation systems with professional-grade hoods and ensure you have weather-resistant countertops and marine-grade hardware for durability.
How do I combine a fire pit with BBQ functionality?
Create a fire ring using fire-resistant materials and install adjustable cooking grates for versatile cooking at different heat levels. Select an appropriate site, excavate properly, and arrange comfortable seating around the fire pit to create a perfect cooking and socializing space.
What are the benefits of using concrete blocks for BBQ construction?
Concrete blocks offer excellent durability and heat resistance for permanent installations. They’re easy to stack and mortar, provide structural integrity through interlocking patterns, and can accommodate removable cooking components and adjustable shelves for versatile cooking heights.
How does a pergola-covered BBQ zone enhance outdoor cooking?
A pergola provides style and functionality by offering overhead protection while maintaining open-air cooking. It allows for integrated lighting and electrical components, proper water runoff, and the option to add privacy screens or curtains for an intimate cooking environment.
What features should I include in a multi-level outdoor kitchen?
Organize distinct cooking and prep zones with a central grill station, ample counter space, and dedicated cutting areas. Include plumbing for sink access, outdoor-rated refrigeration, and weatherproof storage units to create a restaurant-quality cooking experience in your backyard.