There’s nothing quite like the satisfaction of building your own BBQ pit and creating mouthwatering smoked meats in your backyard. Whether you’re a weekend warrior looking to upgrade from that basic grill or a serious pitmaster ready to create the ultimate smoking setup we’ve got the inspiration you need.
DIY BBQ pits offer endless possibilities – from simple barrel smokers that you can build in an afternoon to elaborate brick and stone structures that become the centerpiece of your outdoor living space. The best part? Building your own pit means customizing every detail to match your cooking style and budget.
We’ll explore creative designs that transform everyday materials into powerful smoking machines. From repurposed propane tanks and steel drums to sophisticated offset smokers with temperature controls you’ll discover projects that range from beginner-friendly to advanced builds that’ll make your neighbors jealous.
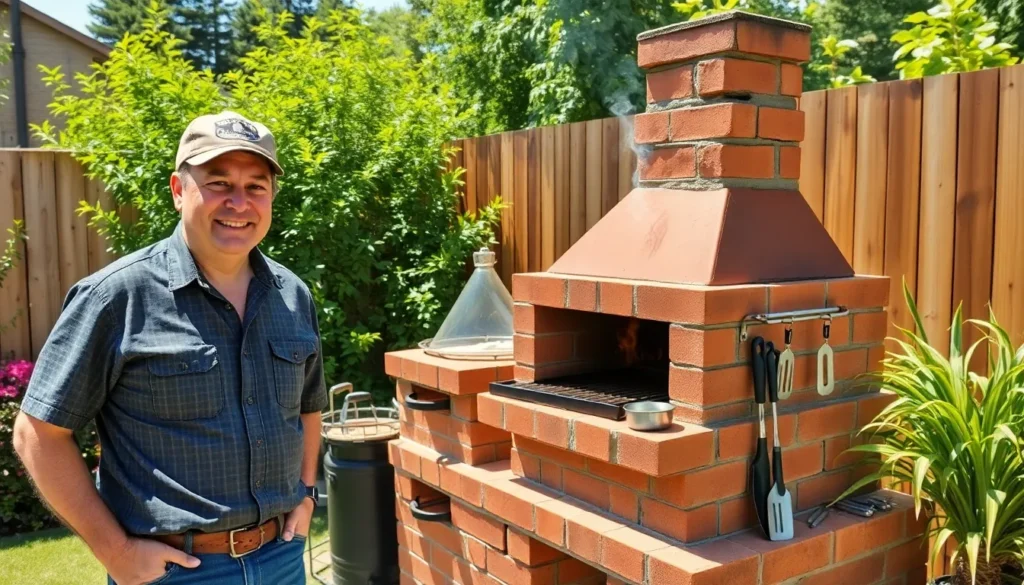
Build a Classic Brick BBQ Pit for Permanent Outdoor Cooking
Creating a permanent brick BBQ pit transforms your backyard into the ultimate outdoor cooking destination. Building with brick offers superior heat retention and creates a stunning focal point that’ll serve your family for decades.
Choose the Right Location and Foundation
Selecting the perfect spot determines your pit’s success and safety. We recommend positioning your brick BBQ pit at least 10 feet from your house and any overhanging trees or structures. Check local building codes since many areas require permits for permanent outdoor cooking structures.
Level ground provides the essential base for stable construction. Clear a 6×6 foot area and excavate 4-6 inches deep to create your foundation pad. Pour and level a concrete slab that extends 12 inches beyond your planned pit dimensions on all sides.
Consider wind patterns and smoke direction when finalizing placement. Position the pit so prevailing winds carry smoke away from your home and outdoor seating areas. We suggest testing wind direction at different times of day before breaking ground.
Access to utilities enhances your cooking experience significantly. Plan electrical connections for lighting and consider running a water line for easy cleanup. Installing a gas line allows you to add convenient starter burners to your design.
Gather Essential Materials and Tools
Standard fire bricks form the core of any quality BBQ pit construction. Purchase 200-300 fire bricks depending on your design size, plus 50 additional bricks for repairs and modifications. We recommend buying 10% extra materials to account for breakage during construction.
Refractory mortar withstands the extreme temperatures your pit will generate. Standard mortar fails under high heat, so invest in high temperature mortar rated for 2000°F or higher. You’ll need approximately 10-15 bags for a medium sized pit.
Essential tools streamline your building process and ensure professional results. Gather a masonry trowel, rubber mallet, level, measuring tape, and chalk line for marking. We also recommend renting a wet saw for cutting bricks to size.
Additional materials complete your permanent outdoor cooking station. Source steel reinforcement bars, concrete blocks for the base, and metal grates sized for your cooking chamber. Don’t forget chimney components including flue tiles and a damper for smoke control.
Step-by-Step Construction Process
Foundation preparation sets the stage for a rock solid BBQ pit. Lay your first course of concrete blocks directly on the cured foundation, checking for level in all directions. Use a rubber mallet to adjust blocks and ensure each course sits perfectly straight.
Building the firebox requires precision and heat resistant materials throughout. Start with fire bricks laid in refractory mortar, creating walls that are at least 4 inches thick. We recommend double wall construction with an air gap for better insulation and heat retention.
Constructing the cooking chamber above the firebox demands careful planning. Create an arch or dome shape using a wooden form, then remove the form once the mortar cures. This design maximizes heat circulation and creates authentic BBQ pit cooking conditions.
Installing the chimney system controls airflow and smoke management effectively. Position the flue opening at cooking grate level to draw smoke across your food before exiting. We suggest adding a damper to fine tune your pit’s temperature control capabilities.
Curing your completed pit prevents cracking and ensures longevity. Build progressively hotter fires over several days, starting with small kindling fires and gradually increasing intensity. This process removes moisture from the mortar and conditions your new BBQ pit for years of reliable service.
Create a Steel Drum BBQ Pit for Portable Grilling

Building a portable steel drum BBQ pit offers versatility and mobility that brick structures can’t match. We’ll show you how to transform a simple 55-gallon drum into a functional grilling and smoking station.
Select and Prepare Your Steel Drum
Find a clean, food-grade 55-gallon steel drum from scrap yards or online listings to ensure safety for food preparation. Remove all paint and coatings using paint stripper or sanding to expose bare metal for proper welding and cutting. Mark your cutting lines carefully before creating either a quarter section from the side for the main grilling chamber or cutting a hinged lid from the top. Clean the interior thoroughly to eliminate any hazardous residues that could contaminate your food.
Install Air Vents and Temperature Controls
Drill large holes near the bottom sides of the drum to create air vents that control airflow and fuel combustion effectively. Add smaller drainage holes in the middle section to prevent water accumulation during outdoor storage. Create a precise hole in the lid for installing a temperature gauge to monitor internal cooking temperatures. Attach sturdy handles and hinges to the lid using bolts for easy operation while maintaining consistent heat control throughout your cooking sessions.
Add Cooking Grates and Finishing Touches
Cut steel bars or use box steel tubing to fabricate internal grill supports that will hold your cooking surfaces securely. Install cooking grates made from expanded metal or stainless steel on these supports, allowing for two cooking levels if you want both grilling and smoking capabilities. Weld or bolt steel tubing legs to raise your BBQ pit to a comfortable working height while ensuring stability during transport. Mount hooks on the exterior sides to hold BBQ tools and accessories within easy reach. Apply high-heat resistant paint to the exterior for durability and attractive appearance that will withstand outdoor conditions.
| Component | Material | Purpose |
|---|---|---|
| Main Body | 55-gallon steel drum | Primary cooking chamber |
| Air Vents | Drilled holes (large) | Control airflow and combustion |
| Drainage | Drilled holes (small) | Prevent water accumulation |
| Cooking Grates | Expanded metal/stainless steel | Food cooking surface |
| Legs | Steel tubing | Height and stability |
| Paint | High-heat resistant coating | Protection and aesthetics |
Construct a Concrete Block BBQ Pit for Durability

Concrete blocks offer an excellent middle ground between portable steel drums and permanent brick structures. We’ll show you how to build a durable cinder block BBQ pit that provides excellent heat retention while remaining more budget-friendly than traditional masonry.
Plan Your Design and Measurements
Planning your concrete block BBQ pit starts with determining the ideal size for your cooking needs and available space. Standard cinder blocks measure 8″x8″x16″ and stack together like LEGO bricks, making them perfect for modular construction. We recommend sketching your layout to scale, including the firebox dimensions, wall height, and cooking surface area.
Design considerations should include proper airflow for your firebox and adequate space for your cooking grates. Most successful builds use approximately 22-24 standard blocks for the main structure, creating a cooking area that accommodates family-sized meals. Your sketch should show how blocks will align and where you’ll place supports for cooking surfaces.
Lay the Foundation and First Course
Foundation preparation ensures your concrete block BBQ pit remains stable and level for years of use. Clear and level the construction area, then pour a concrete slab or create a compacted gravel base for optimal stability. This foundation prevents settling and keeps your pit from shifting over time.
Installing the first course requires seven blocks arranged in your planned configuration with careful attention to alignment and leveling. We suggest using mortar for permanent installations or dry stacking if you want flexibility for future modifications. Each block must sit perfectly level to ensure the entire structure remains stable as you build upward.
Build Up Walls and Install Fire Box
Building the walls requires offsetting each layer using half blocks (8″x8″x8″) to create staggered joints that add structural strength. Stack blocks to your desired height, typically four to five courses, ensuring each layer remains level and properly aligned. This staggered pattern prevents weak points and creates a stronger overall structure.
Firebox construction involves arranging blocks to form a rectangular cavity designed for wood or charcoal burning. Install fire bricks inside the firebox area for enhanced heat resistance, though standard cinder blocks work adequately for most applications. Add angle iron or expanded metal supports for your cooking grates, positioning them at the appropriate height for your cooking style.
Wall finishing involves capping the structure with concrete cap blocks (bullnose or finish blocks) that provide both durability and aesthetic appeal. These cap blocks create a finished appearance while offering additional surface area for food preparation or serving. Allow mortar to cure completely before using your pit to ensure maximum stability and longevity.
Design a Stone BBQ Pit for Natural Aesthetics

Stone BBQ pits offer unmatched durability while blending seamlessly with outdoor landscapes. We’ll create a cooking station that feels like it naturally belongs in your backyard environment.
Source Local Stone Materials
Collect native stones from local quarries or landscaping suppliers to achieve the most authentic look for your BBQ pit. Local fieldstone and large flat rocks provide excellent durability while maintaining that rustic outdoor aesthetic we’re aiming for.
Choose stones with varied textures and colors to add natural beauty and uniqueness to your cooking structure. These variations create visual interest and help your BBQ pit blend naturally with existing industry features.
Purchase materials from nearby suppliers to reduce transport costs and ensure the stones complement your regional environment. Native materials always look more natural than imported stones that might clash with local geology.
Create a Stable Base Structure
Excavate your desired pit location by digging approximately 24 inches deep to establish a solid foundation for your stone structure. This depth provides adequate stability for the weight of stacked stones and prevents settling over time.
Build a reinforced concrete slab that’s 8 to 10 centimeters thick using wooden formwork and electrowelded mesh to prevent cracking. Pour the concrete carefully and ensure it’s level throughout the entire base area.
Allow the concrete to cure for at least 24 to 48 hours before proceeding with stone placement. Proper curing ensures maximum strength and durability for your BBQ pit’s foundation.
Stack and Mortar Stone Layers
Spread a half layer of masonry mortar on the cured concrete slab as a bed for your first course of stones. This mortar bed creates proper adhesion and helps level any minor imperfections in the foundation.
Place stones in layers to construct pit walls about 2 feet high or more depending on your exact design requirements. Install wire mesh between layers for additional structural strength and prevent potential shifting.
Apply mortar between stones to create firm bonds while working carefully to maintain that natural appearance without excessive mortar showing. Keep joints relatively thin to preserve the rustic aesthetic we’re creating.
Cover the structure with wet burlap for at least 48 hours after laying to enhance mortar curing and overall strength. This moisture retention process significantly improves the long term durability of your stone BBQ pit.
Assemble a Metal Fire Ring BBQ Pit for Simplicity

Metal fire ring BBQ pits offer the perfect balance of functionality and ease of construction. We’ll walk you through building this straightforward design that combines durability with customizable features.
Purchase or Fabricate Metal Components
Start with acquiring a sturdy metal fire ring that’ll serve as your BBQ pit’s foundation. Pre-made steel fire rings are available at most hardware stores, or you can fabricate one from steel plates or repurpose old metal barrels for a budget-friendly approach. Heat-resistant metal is essential since your pit will withstand high cooking temperatures regularly.
Consider additional components like stainless steel grill grates, metal legs or stands, and accessory hooks to enhance functionality. Custom fabrication allows you to tailor dimensions to your exact needs, while purchased components offer convenience and standardized sizing. Metal drums work exceptionally well for this project since they’re already cylindrical and heat-tested.
Apply heat-resistant paint to all metal surfaces before assembly to prevent rust and extend your pit’s lifespan. Quality preparation at this stage saves maintenance headaches later and keeps your BBQ pit looking great for years.
Prepare Ground Surface and Drainage
Choose a level area in your backyard that’s clear of grass, bushes, and low-hanging branches to eliminate fire hazards. Safety considerations should guide your location selection, ensuring adequate space for cooking activities and guest movement around the pit.
Clear the topsoil and create a stable base using gravel or compacted sand for proper drainage. This foundation prevents water pooling around your metal components, which would accelerate rust and compromise structural integrity. Level surfaces also ensure even heat distribution during cooking sessions.
Allow sufficient clearance around the pit for safe operation and easy access to all sides. We recommend at least 10 feet of clearance from structures and 6 feet from property lines, though local fire codes may require different specifications in your area.
Install Grill Grates and Accessories
Position your metal fire ring on the prepared surface and secure it with anchor rods driven into the ground for stability. Some builders prefer welding or bolting legs directly to the ring to elevate it to comfortable grilling height, typically 30-36 inches from ground level.
Install adjustable height grill grates inside the ring to provide cooking versatility for different food types. Stainless steel grates resist corrosion and clean easily, while adjustable systems let you control cooking temperature by raising or lowering food relative to the heat source.
Add functional accessories such as side tables, tool hooks, and ash catchers to improve usability during cooking sessions. Steel plate dampers or vent systems welded to the ring allow precise airflow control, giving you better temperature management for both grilling and smoking applications.
Consider a removable lid or cover for smoke retention during low and slow cooking, plus weather protection when the pit isn’t in use. Regular cleaning of ash and debris maintains proper airflow and keeps your DIY metal fire ring BBQ pit performing at its best.
Convert an Old Washing Machine into a Unique BBQ Pit

Transforming a discarded washing machine drum into a functional BBQ pit combines sustainability with creativity. This project offers an eco-friendly alternative to traditional pit construction while delivering excellent grilling results.
Safety Preparation and Material Removal
Removing all plastic components from the washing machine drum represents our first critical step in this conversion process. Burning plastic releases toxic fumes that pose serious health risks and violate safety standards for cooking equipment.
Extracting the drum requires proper tools including a grinder with a cut-off wheel and heavy-duty pliers for handling metal components. Safety equipment such as protective gloves and eye protection becomes essential when working with sharp metal edges and power tools.
Cleaning the drum thoroughly eliminates detergent residues and other potentially flammable materials that could contaminate food or create fire hazards. We’ll need to scrub all surfaces completely and allow the drum to dry fully before proceeding with modifications.
Modify Drum for Proper Ventilation
Creating adequate airflow maintains steady combustion and prevents smoke buildup inside the cooking chamber. Modifying ventilation requires cutting strategic openings using a grinder or metal snips to ensure proper air circulation throughout the drum.
Removing the drum’s central protrusion creates additional cooking space while the opening can be covered with metal screen to enhance airflow. This modification prevents embers from escaping while maintaining the necessary oxygen flow for consistent burning.
Drilling precisely marked holes around the drum provides mounting points for additional components and creates supplementary ventilation openings. We’ll mark each hole location carefully before drilling to ensure perfect alignment for clamps and mounting hardware.
Add Custom Features and Paint Finish
Installing a bottom screen using metal screws allows airflow from below while containing ash and preventing spillage. Grinding any sharp edges around the drum lip ensures safe handling during cooking sessions.
Cable clamps combined with a pre-made steel pot stand or custom legs elevate the BBQ pit to proper cooking height while providing stability. This elevation improves heat distribution and makes the pit more comfortable to use.
Adding removable screen doors creates easier access to the fire chamber for fuel management and cleaning. Additional custom features might include tool hooks, side handles, or adjustable grill grates customized to exact cooking preferences.
Applying heat-resistant paint to the exterior improves both durability and visual appeal after assembly completion. This protective coating extends the pit’s lifespan while creating an attractive finished appearance that complements outdoor cooking spaces.
| Component | Material | Purpose |
|---|---|---|
| Bottom Screen | Metal mesh | Airflow and ash containment |
| Mounting Hardware | Cable clamps and screws | Structural attachment |
| Support System | Steel legs or pot stand | Elevation and stability |
| Protective Finish | Heat-resistant paint | Durability and aesthetics |
Build an Underground BBQ Pit for Traditional Smoking

Underground BBQ pits represent one of the most authentic methods for traditional smoking, using the earth’s natural insulation to create consistent low and slow cooking conditions. We’ll guide you through constructing this time-tested smoking method that delivers exceptional flavor.
Excavate and Line the Pit
Excavation begins with selecting a location clear of debris and fire hazards. We recommend choosing a spot away from structures, dry vegetation, and underground utilities. Dig a hole approximately 3 feet deep and 3 feet square, though you can adjust dimensions based on your cooking needs. Using an auger or similar tools makes the excavation process significantly easier by loosening compacted soil.
Moistening the soil before digging helps reduce dust and makes the work more manageable. Set aside topsoil and rocks separately since you’ll use them for backfilling or other garden projects later. Target a solid base of semi-solid rock or compact soil to support your cooking area effectively. This foundation prevents settling and ensures your pit maintains its shape over time.
Smooth the pit walls and bottom to create an even cooking chamber. Remove any loose debris or rocks that could interfere with heat distribution. Pack the bottom firmly to create a stable surface for your coal bed.
Install Proper Drainage System
Drainage prevents water accumulation that can extinguish coals and ruin your smoking session. Grade the pit bottom with a slight slope toward one corner to encourage water runoff. Installing a 2-inch layer of gravel at the bottom aids drainage while maintaining structural integrity.
Avoid digging in areas prone to flooding or with high water tables. Check local weather patterns and soil conditions before beginning excavation. Areas with poor drainage require additional gravel layers or French drain systems to redirect water away from the cooking chamber.
Consider adding a small drainage channel leading away from the pit. This simple addition prevents rainwater from pooling and ensures your underground BBQ pit remains functional in various weather conditions.
Create Removable Cover and Access Points
Cover construction requires fire-resistant materials like quarter-inch steel plate or thick wooden boards. We recommend making the cover slightly wider than the pit opening to create an effective heat seal. Steel plates offer superior heat retention and durability compared to wooden alternatives.
Bury the cover edges with soil to create an insulated seal that retains heat and prevents fire spread. This technique transforms your pit into an efficient underground oven that maintains consistent temperatures for hours. Pack soil firmly around the edges to eliminate air gaps.
Install optional access points or vents around the cover for airflow control and smoke management. These openings allow you to adjust oxygen levels and monitor cooking progress without completely removing the cover. Simple metal pipes or ceramic tiles work well as adjustable vents.
Design the cover to serve multiple functions as both a lid and cooking surface. Many pitmasters use their covers as additional grilling space or as a base for wrapping food in foil. This versatility maximizes your cooking options during large gatherings.
Construct a Portable Cinder Block BBQ Pit

Building a portable cinder block BBQ pit offers the perfect balance of affordability and functionality for backyard cooking enthusiasts. We’ll guide you through creating a modular design that’s both sturdy and easily transportable.
Design Modular Block Configuration
Standard 8″x8″x16″ cinder blocks form the foundation of our portable BBQ pit design, available at hardware stores like Lowe’s or Home Depot. We start by laying seven full cinder blocks side by side to create our base layer, ensuring they’re level and properly aligned.
Enhanced stability comes from incorporating half blocks (8″x8″x8″) in an offset pattern on the second layer. These shorter blocks stagger over the joints of the lower blocks, creating a stronger bond that prevents shifting during use. Building upward requires continuing this stacking pattern for three to four layers total, depending on your preferred cooking height and comfort level.
Cap blocks provide the finishing touch by creating clean edges and useful surfaces for resting grilling tools. Longer and thinner than standard blocks, these caps complete the structure while adding functional workspace around your cooking area.
Arrange Blocks for Optimal Airflow
Strategic gaps between blocks promote essential air circulation under the firebox and cooking area. We position blocks to create natural vents or openings near the bottom, allowing crucial oxygen intake that maintains steady combustion throughout your cooking session.
Proper ventilation requires keeping the front of the pit open or designing removable components for easy access. This configuration allows smoke and heat to escape efficiently, significantly improving overall cooking quality and temperature control.
Careful block placement ensures adequate airflow while maintaining structural integrity. The modular design allows us to adjust spacing based on exact cooking needs and wind conditions in your outdoor space.
Add Removable Grill Components
Expanded metal grates rest securely on rebar or angle iron supports positioned inside the pit structure. We recommend using 2″x2″x46″ angle iron as sturdy support bars that can handle the weight of food and maintain stability during extended cooking sessions.
Adjustable grilling surfaces provide flexibility for different cooking techniques and fuel management. These removable metal grates or shelves can be lifted or repositioned to add charcoal, adjust heat levels, or create multi zone cooking areas.
Temperature and smoke control improves with the addition of a metal lid or cover system. We suggest creating covers from plywood wrapped in heavy duty foil or sheet metal, allowing precise heat retention and smoke management during longer cooking processes.
Conclusion
Building your own BBQ pit transforms backyard cooking from ordinary grilling into an art form. Whether you choose the rustic charm of stone construction or the budget-friendly approach of cinder blocks each design offers unique advantages for creating memorable outdoor dining experiences.
The beauty of DIY BBQ pits lies in their customization potential. We’ve explored options ranging from portable steel drums perfect for tailgating to permanent brick structures that become stunning focal points. Each project can be adapted to match your cooking style space constraints and budget requirements.
Remember that patience during the curing process pays dividends in longevity and performance. Your homemade BBQ pit will reward years of careful construction with countless hours of exceptional smoking and grilling. Start with a design that matches your skill level and watch as your backyard becomes the neighborhood’s favorite gathering spot.
Frequently Asked Questions
What materials do I need to build a brick BBQ pit?
Essential materials include fire bricks, refractory mortar, regular bricks for the structure, rebar for reinforcement, and concrete for the foundation. You’ll also need masonry tools like trowels, levels, and mixing equipment. Consider adding a metal grate, chimney components, and high-temperature paint for finishing touches.
How long does it take to cure a newly built BBQ pit?
Curing typically takes 7-10 days for concrete and mortar to fully set. Start with small, low-temperature fires and gradually increase heat intensity over several sessions. This prevents cracking and ensures the structure’s longevity. Avoid using the pit at full capacity for at least two weeks after construction.
Can I use a regular steel drum for a DIY BBQ pit?
Only use food-grade steel drums that haven’t contained hazardous materials. Avoid drums that held chemicals, oils, or unknown substances. Clean thoroughly and remove any coatings before conversion. A 55-gallon drum works best for most backyard BBQ projects and provides adequate cooking space.
Do I need permits to build a backyard BBQ pit?
Most areas require permits for permanent structures like brick or stone BBQ pits. Check local building codes and homeowner association rules before starting construction. Portable options like drum or cinder block pits typically don’t require permits but verify distance requirements from property lines and structures.
What’s the best location for a DIY BBQ pit?
Choose a level area at least 10 feet from structures, overhanging branches, and property lines. Ensure good drainage and consider wind patterns for smoke direction. Access to utilities and proximity to your kitchen for convenience are important factors. Always check local fire safety regulations.
How much does it cost to build a DIY BBQ pit?
Costs vary significantly by design and materials. A simple cinder block pit costs $100-300, while elaborate brick structures can reach $1,000-3,000. Steel drum conversions typically cost $50-150. Factor in tools, permits, and accessories when budgeting. DIY construction saves considerably compared to professional installation.
What’s the difference between grilling and smoking in a BBQ pit?
Grilling uses direct high heat (300-500°F) for quick cooking, while smoking uses indirect low heat (225-275°F) for slow cooking with wood smoke flavor. Many DIY pits accommodate both methods by adjusting fire placement, airflow, and cooking grate height.
How do I maintain proper airflow in my BBQ pit?
Install adjustable air vents at the bottom for oxygen intake and a chimney or top vent for smoke exhaust. The general rule is intake vents should be twice the size of exhaust vents. Clean vents regularly and adjust based on wind conditions and desired cooking temperature.
Can I convert an old appliance into a BBQ pit?
Yes, washing machine drums make excellent BBQ pits after proper preparation. Remove all plastic components, clean thoroughly, and add ventilation holes. Other appliances like old refrigerators or water heaters can work but require more extensive modification and safety considerations.
What type of wood should I use for smoking?
Hardwoods like hickory, oak, apple, and cherry work best for smoking. Avoid softwoods, painted, or treated lumber which can produce toxic fumes. Fruit woods provide mild flavors, while hickory and mesquite offer stronger smoke flavors. Always use seasoned, dry wood for clean burning.